内容全部由 Strapi CMS 管理,无需改代码即可更新项目、博客与首页区块
Next.jsReact作品集启动器
nextjs-strapi-portfolio-starter — Next.js 作品集模板
作者 PictureElement
一个基于 Next.js 与 Strapi 的无头 CMS 作品集启动模板,采用 Tailwind CSS,内置 SEO 优化与安全防护,适合开发者、自由职业者与机构展示项目与文章。
看看你的网站会是什么样
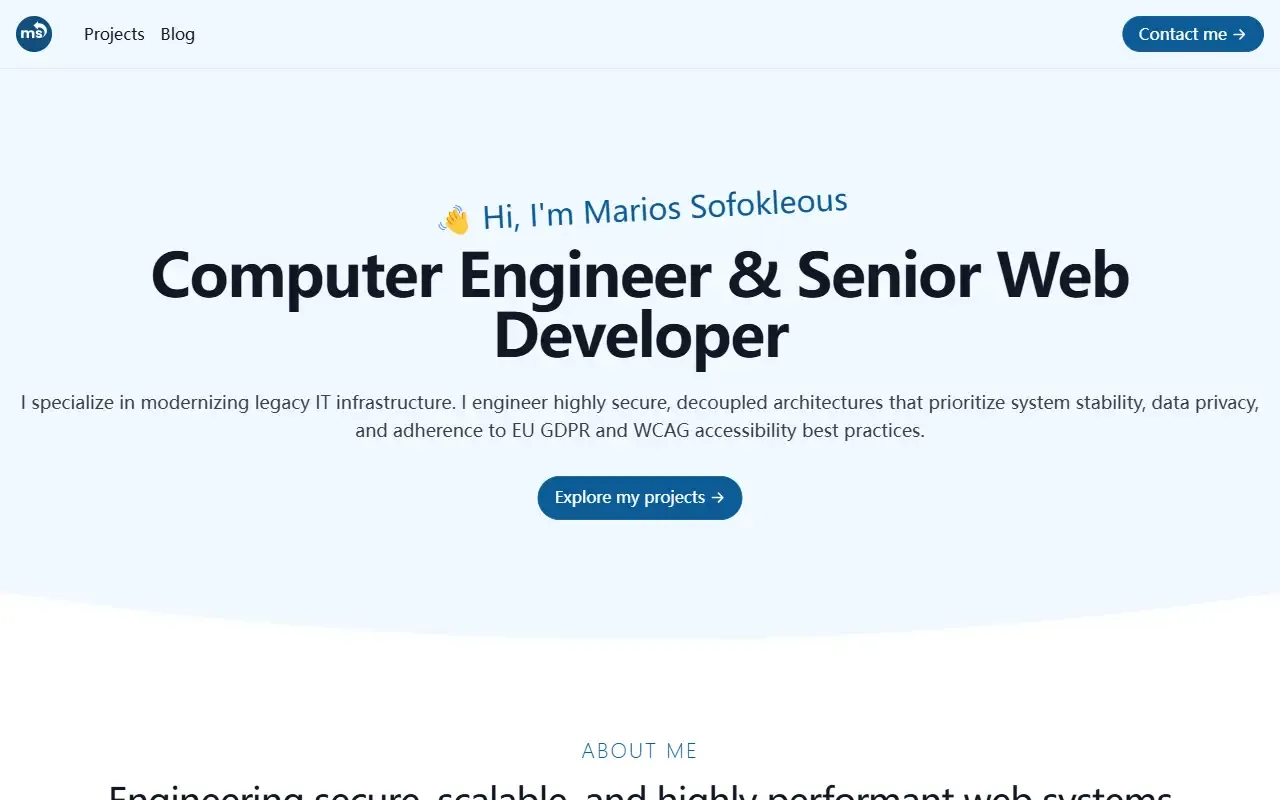
浏览真实页面截图,比较内容排版与手机效果。点击下方缩略图切换,放大查看整页细节。
全部页面与视图 3
截图用于了解视觉与布局,交互效果请以实际项目为准。 本截图因高度限制未包含整页。
采集于 2026-09-27查看来源
值得关注的模板亮点
从已有项目资料中,快速了解它的特点。
首页通过动态区可切换展示 experience 或 services,适配开发者与机构两种场景
构建时静态生成(SSG),并内联关键 CSS、优化图片加载以提升性能
内置 XML sitemap、canonical、OpenGraph 与多种 JSON-LD 结构化数据
联系表单使用 Zod 做客户端与服务端验证,并以蜜罐拦截机器人提交
提供 Base64 编码的邮箱/电话混淆、Strapi 速率限制中间件等安全措施
模板详细介绍
该模板是一个 monorepo 项目,前端使用 Next.js,后端使用 Strapi CMS,样式采用 Tailwind CSS。内容全部通过 Strapi 管理,无需改代码即可更新。首页包含 hero、about、skills、experience/services、featured projects、testimonials、latest posts、FAQ 与 CTA 等区块,并通过动态区(dynamic zone)让用户按需选择展示 experience 或 services。项目页与博客页均动态列出已发布内容,每项有独立详情页,支持代码片段语法高亮与丰富的 SEO 元数据。联系页提供带 Zod 客户端与服务端验证的表单,并用蜜罐防垃圾提交。隐私政策页独立存在。
性能与 SEO 方面,页面在构建时静态生成(SSG),图片显式定义尺寸、关键首屏图优先加载、非必要图懒加载并使用 sizes 属性,关键 CSS 内联以减少请求。SEO 包含自动 XML sitemap、canonical 标签、多种 JSON-LD 结构(Organization、Person、BlogPosting、ItemPage、ContactPage、CollectionPage、WebPage)以及 OpenGraph 元数据。安全方面有蜜罐、Base64 编码与客户端渲染的邮箱/电话混淆、Strapi 固定窗口速率限制中间件,以及 Zod API 验证。
开发环境需分别配置 Strapi 与 Next.js 的 .env,恢复配置转储并可选导入演示数据,然后创建只读与表单两个 API token。生产部署指南以 Coolify 与 Hetzner Cloud VPS 为例,但 README 明确提示 Coolify 处于公开测试阶段,稳定性需自行评估,也可选用 Vercel、Netlify、Heroku 等托管服务。
Next.js作品集启动器
适合你的项目吗?
适用场景
- 开发者或自由职业者搭建个人作品集,展示技能、项目与博客文章
- 小型机构或工作室用同一套模板呈现服务、案例与客户评价
- 需要无头 CMS 管理内容、同时希望前端静态生成以优化 SEO 的站点
- 在自有 VPS 上通过 Coolify 部署 Strapi 与 Next.js 的完整示例
适合人群
- 熟悉 Next.js 与 Strapi 基本操作的前端开发者
- 需要快速启动作品集或机构官网、并接受自行配置 CMS 与部署的用户
- 重视 SEO 结构化数据、静态生成与表单安全防护的项目
上手与定制指南
结合仓库当前版本的说明,按下面的资料检查内容、配置与运行要求。
- 1
克隆仓库后运行 npm run setup 安装 Next.js 与 Strapi 两侧依赖
- 2
在 /strapi 目录创建 .env,开发环境可使用占位密钥,但不可用于生产
- 3
恢复配置转储并可选导入演示数据,然后在 Strapi 管理后台创建只读与表单两个 API token
- 4
在 /next 目录配置 .env,填入 Strapi 地址、网站地址、Base64 编码的联系方式与两个 API token
- 5
生产部署指南以 Coolify 与 Hetzner Cloud VPS 为例,但 Coolify 处于公开测试阶段,稳定性需自行评估
授权与来源资料
使用条件与限制
免费使用 · 保留许可声明代码以MIT许可发布,允许免费使用、修改与商用,仅需保留版权与许可声明。
使用时需要遵守
- 保留原作者版权声明和 MIT 许可证声明。
- 在所有副本或实质性部分中包含版权声明和许可声明
额外费用与待核对事项
- README未说明banner等图片素材的授权情况
查看原文依据
to use, copy, modify, merge, publish, distribute, sublicense, and/or sell
许可证原文
Code released under the [MIT](LICENSE) license.
README 原文
https://github.com/PictureElement/nextjs-strapi-portfolio-starter/blob/main/LICENSEhttps://github.com/PictureElement/nextjs-strapi-portfolio-starter/blob/HEAD/README.mdPermission is hereby granted, free of char
许可证原文
DeepSeek 根据仓库许可证和 README 整理 ·2026-09-24。结果仅覆盖已读取资料,依赖、图片、字体及后续条款变更以各自原文为准。
项目核对记录与介绍依据
模板资料
- 来源平台
- GitHub
- 资料与维护参考分
- 资料较完整 · 86 / 100
- 技术栈
- Next.js · React
- 网站类型
- 作品集 · 启动器
这个分数如何计算
本站按许可资料(最高30分)、演示链接(12分)、预览图(10分)、Star数(15分)、记录的维护时间(15分)、描述完整度(8分)、功能记录(5分)和分类资料(5分)计算。它不是代码、安全或性能测试,也不是 Google 评分;有链接不代表已实测可用。
这个项目需要核对什么
- 记录的仓库更新时间
- 2026-09-25
- 截图检查日期
- 2026-09-25
已收录演示链接。请用你的内容与屏幕尺寸检查;有演示不代表表单、认证或支付已经可用。
目录记录的主要技术栈是 Next.js。请通过依赖清单和锁文件核对实际版本与托管要求。这些说明基于收录资料,不代表代码审计或部署实测。
查看具体选型方法 →介绍的制作与核对状态
介绍由 AI 辅助整理目录与仓库资料。仓库作者不等于这篇介绍的审核者。
审核声明: [email protected] · 2026-10-04
查看当时使用的来源资料
SHA-256: c845fc8f55faffaa0c3d714bd80b8a5bcb7efe03e2933821588e40b4c21874f0
2026-09-25T18:18:07.837Z
来源文件 / 仓库# Next.js, Strapi Portfolio Starter  ## Table of contents 1. [Description](#description) 2. [Features](#features) 3. [Development setup guide](#development-setup-guide) 4. [Production setup guide](#production-setup-guide) 5. [Roadmap](#roadmap) 6. [Acknowledgements](#acknowledgements) 7. [Contributing](#contributing) 8. [License](#license) ## Description This project is a modern portfolio website built as a monorepo containing **Next.js** and **Strapi CMS**. Designed for developers, freelancers, and agencies, it effectively showcases skills, projects, and achievements through a performant, SEO-optimized platform. The website features statically generated pages for projects, blog posts, and a secure contact form with both client-side and server-side validation. Content is seamlessly managed in Strapi CMS, including SEO configurations (titles, meta descriptions), while JSON-LD schemas (BlogPosting, Organization, etc.) enhance search engine visibility. Optimizations include a dynamic XML sitemap, OpenGraph metadata, image optimizations, semantic HTML and many more. Security measures like honeypot spam protection, API rate limiting, and email obfuscation safeguard sensitive data. Built with Tailwind CSS for rapid styling, this starter template balances flexibility with maintainability—ideal for portfolios, agencies, or developers prioritizing performance, accessibility, and modern best practices. **[View demo](https://msof.me/)** The demo website achieves outstanding PageSpeed scores: | Device | Performance | Accessibility | Best Practices | SEO | | ------- | ----------- | ------------- | -------------- | --- | | Mobile | 98 | 100 | 100 | 100 | | Desktop | 100 | 100 | 100 | 100 | _Captured at May 8, 2025, 3:18 PM GMT+3_ ## Features ### Core functionality ✅ Dynamic content management: - All content is managed via Strapi CMS, allowing easy updates without code changes. ✅ Demo content & quick setup: - Demo included for instant exploration. ✅ Home page: - Features a hero, about, skills, experience or services, featured projects, testimonials, latest posts, FAQ, and a prominent call-to-action. - A dynamic zone allows users to tailor the homepage based on their needs: - Experience section: For developers showcasing their career journey. - Services section: For freelance developers or agencies highlighting their offerings. ✅ Projects: - A dynamically updated projects page that lists all published projects and supports dynamic sorting. Each project has a dedicated page with detailed information, rich metadata for SEO, and syntax highlighting for code snippets. ✅ Blog: - A dynamically updated blog page that lists all published posts in reverse chronological order. Each post has a dedicated page with detailed content, rich metadata for SEO, and syntax highlighting for code snippets. ✅ Contact page: - Features a secure contact form with both client-side and server-side validation powered by Zod, along with spam protection implemented through a honeypot. ✅ Privacy policy page: - A dedicated page for privacy-related information. ### Performance & optimization ✅ Static site generation (SSG): - Delivers optimal performance and improves SEO by pre-rendering pages at build time. ✅ Optimized images: - Explicitly defined dimensions prevent layout shifts, improving visual stability and user experience. - Priority loading for critical above-the-fold images and lazy loading for non-essential images reduce initial page load time and improve user experience. - The `sizes` property is used to deliver appropriately sized images based on screen widths and device pixel ratios, minimizing bandwidth usage and enhancing page performance. ✅ Inline CSS: - Reduces additional network requests by inlining critical CSS, improving key performance metrics like First Contentful Paint (FCP) and Largest Contentful Paint (LCP). ### SEO & accessibility ✅ Semantic HTML: - Ensures accessibility and screen reader compatibility. - Enhances SEO by providing clear structure and context to web content, making it easier for search engines to crawl, index, and understand the content. This can improve visibility and relevance in search results. ✅ SEO enhancements: - Automated XML sitemap generation. - Canonical tags for all pages. - Supports various JSON-LD schemas (e.g., Organization, Person, BlogPosting, ItemPage, ContactPage, CollectionPage, WebPage) to enhance SEO and provide rich search engine results. - OpenGraph metadata for social sharing across platforms. ### Security & spam protection ✅ Spam protection: - Honeypot implementation to block bot submissions in the contact form. ✅ Email & phone obfuscation: - Protects sensitive contact information using Base64 encoding and client-side rendering. ✅ Rate limiting Strapi middleware: - Protects APIs from abuse using a fixed window rate limiter. ✅ API validation with Zod: - Ensures type safety and robust error handling across all API interactions. ### Developer experience ✅ Centralized API logic: - Simplifies data fetching and error handling across components. ✅ Reusable components: - Implements the single responsibility principle (SRP) for maintainable and scalable code. ✅ Tailwind CSS integration: - Fully customizable color palette with accessible focus states. - Utility-first approach for rapid development. ## Development setup guide ### Step 1: Clone & install ``` git clone https://github.com/PictureElement/nextjs-strapi-portfolio-starter.git cd nextjs-strapi-portfolio-starter npm run setup # Installs dependencies for both Next.js and Strapi ``` ### Step 2: Configure Strapi Navigate to the `/strapi/` directory and create `.env` file (use `.env.example` as template): ``` # Server HOST="localhost" PORT=1337 # Secrets APP_KEYS="toBeModified1,toBeModified2,toBeModified3,toBeModified4" API_TOKEN_SALT="toBeModified" ADMIN_JWT_SECRET="toBeModified" TRANSFER_TOKEN_SALT="toBeModified" JWT_SECRET="toBeModified" ``` Notes: - Since this is a development environment, you can leave the default placeholder values as they are—no modifications are needed. - The placeholder secrets are only for local development and should never be used in production. ### Step 3: Restore the configuration dump Navigate to the `/strapi/` directory and restore configuration: ``` npm run strapi config:restore -- --file backup/config.json ``` ### Step 4: Import demo (optional) Navigate to the `/strapi/` directory and import demo: ``` npm run strapi import -- --file backup/data.tar.gz ``` ### Step 5: Start Strapi Navigate to the `/strapi/` directory and start Strapi: ``` npm run develop ``` ### Step 6: Create API tokens i. Access admin at `http://localhost:1337/admin` ii. Create your first admin user iii. Generate API tokens (_Settings → API Tokens_): | Token Name | Type | Permissions | | ----------------- | --------- | ------------------ | | `READ-ONLY-TOKEN` | Read-only | All content types | | `FORM-TOKEN` | Custom | Lead → Create only | iv. Note down the tokens for later use. ### Step 7: Configure Next.js i. Set up environment variables Keep Strapi running, then open another terminal, navigate to the `/next/` directory, and create a `.env` file (use `.env.example` as template): ``` # Public URLs NEXT_PUBLIC_STRAPI="http://localhost:1337" # URL for the Strapi backend (default: localhost) NEXT_PUBLIC_WEBSITE="http://localhost:3000" # URL for the website frontend (default: localhost) # Encoded Contact Information NEXT_PUBLIC_EMAIL_ENCODED="am9obmRvZUBleGFtcGxlLmNvbQ==" # Base64-encoded email address (e.g., [email protected]) NEXT_PUBLIC_TELEPHONE_ENCODED="KzEgKDU1NSkgMTIzLTQ1Njc=" # Base64-encoded telephone number (e.g., +1 (555) 123-4567) # API Tokens STRAPI_READ_ONLY_TOKEN="your_generated_token" # Replace with your generated Strapi API token STRAPI_FORM_TOKEN="your_generated_token" # Replace with your generated Strapi API token ``` Replace `your_generated_token` with the API tokens you created in the previous step. For the remaining placeholder values, you can leave them as-is since this is a development environment—no further modifications are required. ii. Customize Tailwind CSS colors (optional) Update your color palette in `/next/tailwind.config.js` to match your design preferences. Below is an example configuration: ``` colors: { secondary: '#E81547', primary: { '50': '#effef1', '100': '#d9ffde', '200': '#b5fdbe', '300': '#7cf98e', '400': '#3cec55', '500': '#13d430', '600': '#0ac526', '700': '#0b8a1e', '800': '#0f6c1e', '900': '#0e591c', '950': '#01320a', }, }, ``` To generate a custom color scale for your primary color, use a Tailwind CSS color generator tool such as [UI Colors](https://uicolors.app/). Select your desired primary color and create a gradient scale ranging from `50` to `950`. The secondary color is used primarily for the ring focus of focusable elements, such as buttons, input fields, and links, to enhance accessibility and visual feedback during navigation. Choose a secondary color that complements the primary color while offering sufficient contrast. ### Step 8: Start Next.js Navigate to the `/next/` directory and start Next.js: ``` npm run dev ``` Website will run at `http://localhost:3000`. ### Quick start (optional) To launch both Strapi and Next.js simultaneously from the root directory: ``` npm run dev # Starts both apps in parallel ``` ## Production setup guide (Coolify + Hetzner Cloud VPS) ### Prerequisites ✅ SSH access to Coolify server: - You have SSH credentials (username + key/password) to the host running Coolify. - Test access: `ssh deploy@your-coolify-server-ip`. ✅ Directory permissions on Coolify host: - Ensure you can create/modify directories on the Coolify server (e.g., `/home/strapi/src`). ### Introduction This guide demonstrates configuring a production environment using Coolify—an open-source, self-hosted Platform-as-a-Service (PaaS) alternative to managed platforms like Netlify, Vercel, and Heroku. Designed for developers seeking full infrastructure control, Coolify simplifies deployment workflows while eliminating reliance on third-party cloud services. ### Disclaimer - Coolify is currently in public beta, and while it provides powerful CI/CD automation and deployment workflows, its stability should be carefully evaluated for critical production workloads. If stability is a concern, you can always opt for more established managed services like Vercel, Netlify, or Heroku. - For this tutorial, we'll use a Hetzner Cloud VPS as our hosting platform. I'm not affiliated with Hetzner—it's chosen purely for its cost-effective performance-to-price ratio, though alternatives like AWS Lightsail or DigitalOcean would work similarly. Coolify's self-hosted nature allows flexibility in VPS provider selection. ### Step 1: VPS & Coolify setup Follow CJ Reynolds' [Coolify Crash Course](https://youtu.be/taJlPG82Ucw) on the [Syntax](https://www.youtube.com/@syntaxfm) YouTube channel to configure Coolify on a Hetzner Cloud VPS server. The tutorial covers essential steps such as SSH setup, firewall configuration, reverse proxy settings, SSL termination, and more. ### Step 2: Strapi setup > If you encounter errors such as "Failed to fetch dynamically imported module" when accessing the admin dashboard during this step, try clearing your browser's cache and performing a hard reload. **i. Create a Strapi resource** - In the Coolify dashboard, go to "Projects". - Create a new project (or select an existing one). - Under your chosen project, add a new resource. - Search for the _Strapi_ template (based on the `elestio/strapi-development` image). **ii. Set the Node environment** - In the resource settings, find "Strapi Node Environment". - Set it to `production` to ensure Strapi runs in production mode. **
看看同类模板
对比同技术栈与用途的模板,找到更适合的视觉与内容结构。
ai-website-cloner-template
Clone any website with one command using AI coding agents
Next.js · 启动器

Next.js SaaS Starter
Next.js SaaS Starter 是 Next.js 官方维护的 SaaS 起点模板,定位介于学习资源和可直接部署的脚手架之间。
Next.js · SaaS

Next.js Commerce
Next.js Commerce 是 Vercel 团队维护的电商启动模板,基于 Next.js App Router 构建,采用服务端渲染、React Server Components、Server Actions …
Next.js · 电商

Next-js-Boilerplate
Next-js-Boilerplate 是一个面向 Next.js 16、Tailwind CSS 4 和 TypeScript 的启动器,核心定位是开发者体验优先。
Next.js · 启动器

tailwind-nextjs-starter-blog
tailwind-nextjs-starter-blog 是一个面向个人技术博客的 Next.js 与 Tailwind CSS 启动模板,其 v2 版本基于 App Router 与 React Server Comp…
Next.js · 博客

next-forge
Production-grade Turborepo template for Next.js apps.
Next.js · 启动器