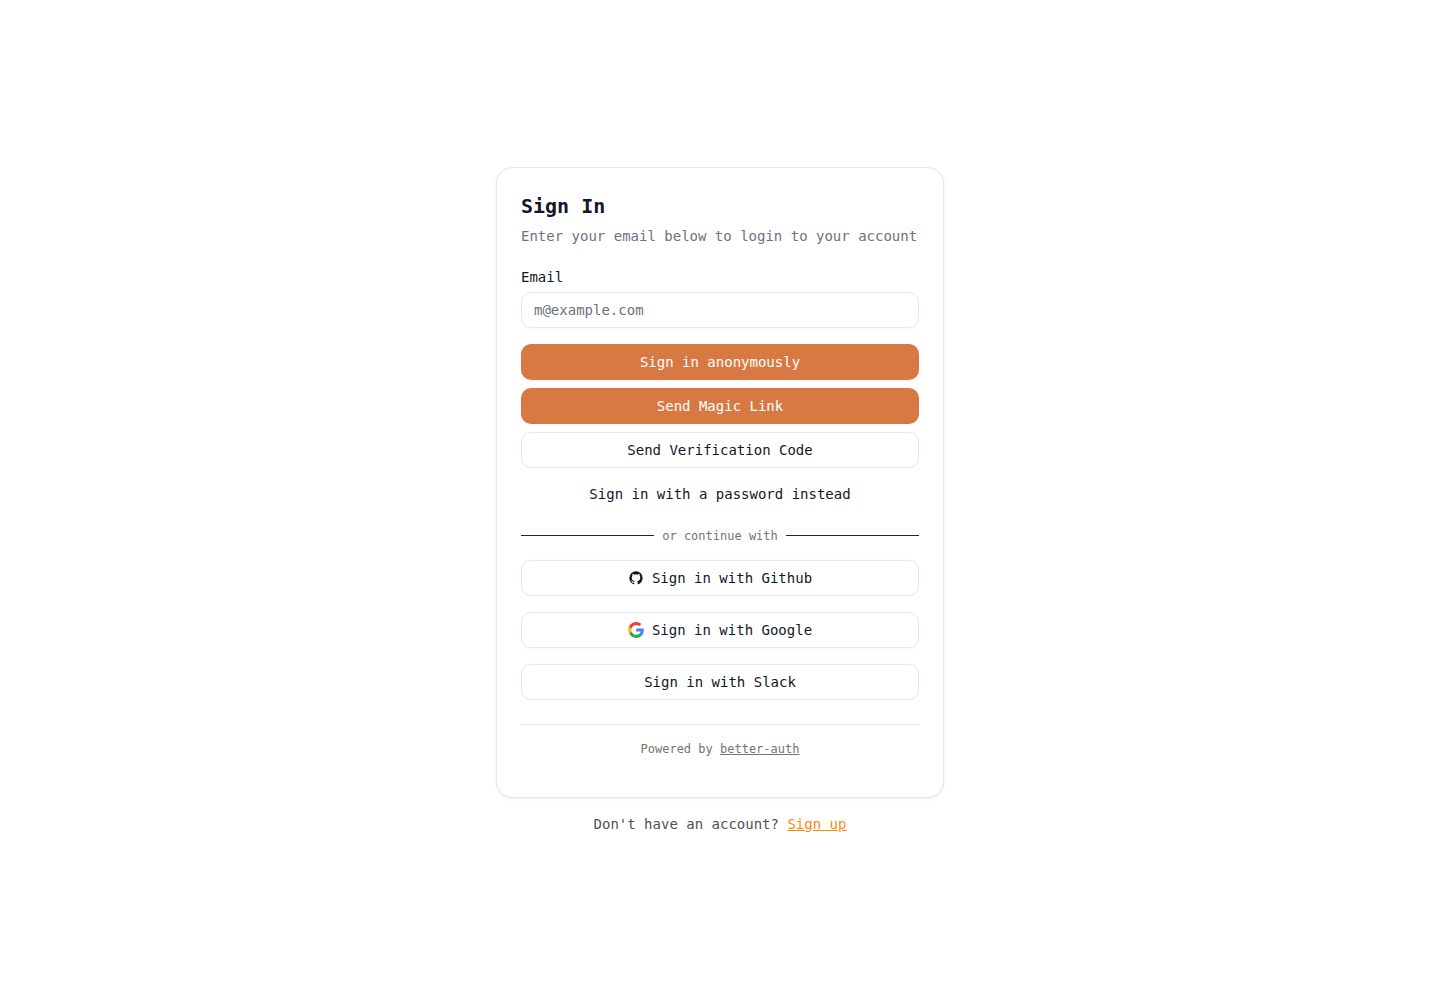
支持邮箱密码、Google/GitHub/Slack OAuth、魔法链接、邮箱 OTP、TOTP 两步验证与匿名登录
Next.jsReact启动器
next-convex-betterauth-template — Next.js 启动器模板
作者 podalls97
基于 Next.js、Convex 与 Better Auth 的全栈认证模板,内置邮箱密码、OAuth、魔法链接、邮箱 OTP、TOTP 两步验证与匿名登录,并附带受保护路由、邮件模板、文档与 API 参考页面。
看看你的网站会是什么样
浏览真实页面截图,比较内容排版与手机效果。点击下方缩略图切换,放大查看整页细节。
全部页面与视图 2
截图用于了解视觉与布局,交互效果请以实际项目为准。
采集于 2026-10-03查看来源
值得关注的模板亮点
从已有项目资料中,快速了解它的特点。
内置受保护路由、邮箱验证与密码重置流程
使用 Convex 作为实时数据库,schema 与认证逻辑集中在 convex 目录
提供 React Email 邮件模板与暗色模式响应式界面
附带 /documentation 与 /api-reference 页面以及 CLAUDE.md 技术文档
模板详细介绍
这是一个面向认证场景的全栈启动模板,把 Next.js 前端、Convex 实时数据库与 Better Auth 认证层组合在一起。仓库提供可直接运行的注册、登录、邮箱验证、密码重置、两步验证(TOTP,含二维码与备用码)、魔法链接、邮箱 OTP 与匿名登录流程,并配有暗色模式界面和 React Email 邮件模板。
模板包含受保护路由机制(README 描述为 Next.js 16 proxy 模式)、内置的 /documentation 与 /api-reference 页面,以及供 AI 编码助手参考的 CLAUDE.md。项目结构区分 (auth) 与 (unauth) 路由组,认证逻辑集中在 convex/auth.ts 与 src/lib/auth.ts,数据库 schema 位于 convex/schema.ts。
使用前需要自行准备 Convex 部署、Better Auth 密钥、邮件服务(Resend 或 SMTP)以及可选的 Google、GitHub、Slack OAuth 凭据,并在 .env.local 与 Convex 环境中分别设置变量。仓库采用 MIT 许可,免费范围限于该版本代码,外部服务与第三方素材需另行核对。
Next.js启动器
适合你的项目吗?
适用场景
- 需要快速搭建带多种登录方式的 Next.js 应用认证层
- 希望以 Convex 作为实时数据库并统一管理用户数据
- 需要邮箱验证、密码重置与两步验证等完整账号流程的项目
- 为 AI 编码助手准备包含 CLAUDE.md 与 API 参考的代码库
适合人群
- 使用 Next.js 与 Convex 技术栈的全栈开发者
- 需要现成认证流程而非从零实现的团队
- 希望参考 Better Auth 与 Convex 集成方式的开发者
上手与定制指南
结合仓库当前版本的说明,按下面的资料检查内容、配置与运行要求。
- 1
需要 Node.js 18 及以上版本,推荐使用 pnpm 与 Convex CLI
- 2
在 .env.local 与 Convex 环境中分别设置 SITE_URL、BETTER_AUTH_SECRET 及 OAuth 凭据
- 3
邮件功能需配置 Resend API Key 或 SMTP 凭据
- 4
OAuth 回调地址需按开发与生产环境分别配置
- 5
部署到 Vercel 时构建命令使用 npx convex deploy --cmd 'pnpm run build'
授权与来源资料
使用条件与限制
免费使用 · 保留许可声明本次收录的是公开仓库中采用 MIT 许可的免费版本;免费范围为该版本代码,不代表外部服务或第三方素材免费。
使用时需要遵守
- 允许免费使用、修改、商用和分发该版本代码。
- 分发代码副本或实质性部分时,保留原作者版权声明和完整 MIT 许可声明。
- 代码按现状提供;担保与责任限制以原许可证及适用法律为准。
额外费用与待核对事项
- 使用该模板需自行注册并配置外部服务(Convex 部署、邮件服务 Resend 或 SMTP、以及可选的 Google/GitHub/Slack OAuth),这些服务可能产生费用或需要账号与 API 密钥。
- 邮件功能依赖第三方服务 Resend,需注册账号并获取 API Key,其免费额度与收费政策由该服务商决定。
- 必须自行生成并配置 BETTER_AUTH_SECRET 密钥,否则认证流程无法正常运行。
- 部署示例依赖 Vercel 平台,实际部署需使用该外部托管服务并可能产生费用。
- 演示图片、字体、图标及其他第三方素材需按各自许可核对,不能仅凭代码的 MIT 许可判断。
- 域名、托管、数据库、支付或 AI 等外部服务可能另外收费。
查看原文依据
Permission is hereby granted, free of charge
许可证原文
You'll need to set up the following services:
README 原文
Sign up at [Resend](https://resend.com/)
README 原文
Generate a secure random string using: `openssl rand -base64 32`
README 原文
https://github.com/podalls97/next-convex-betterauth-template/blob/main/LICENSEhttps://github.com/podalls97/next-convex-betterauth-template/blob/main/README.mdConnect your repository to [Vercel](https://vercel.com)
README 原文
DeepSeek 根据仓库许可证和 README 整理 ·2026-10-03。结果仅覆盖已读取资料,依赖、图片、字体及后续条款变更以各自原文为准。
项目核对记录与介绍依据
模板资料
- 来源平台
- GitHub
- 资料与维护参考分
- 资料较完整 · 87 / 100
- 技术栈
- Next.js · React
- 网站类型
- 启动器
这个分数如何计算
本站按许可资料(最高30分)、演示链接(12分)、预览图(10分)、Star数(15分)、记录的维护时间(15分)、描述完整度(8分)、功能记录(5分)和分类资料(5分)计算。它不是代码、安全或性能测试,也不是 Google 评分;有链接不代表已实测可用。
这个项目需要核对什么
- 记录的仓库更新时间
- 2025-12-19
- 截图检查日期
- 2026-10-03
已收录演示链接。请用你的内容与屏幕尺寸检查;有演示不代表表单、认证或支付已经可用。
目录记录的主要技术栈是 Next.js。请通过依赖清单和锁文件核对实际版本与托管要求。这些说明基于收录资料,不代表代码审计或部署实测。
查看具体选型方法 →介绍的制作与核对状态
介绍由 AI 辅助整理目录与仓库资料。仓库作者不等于这篇介绍的审核者。
审核声明: [email protected] · 2026-10-04
查看当时使用的来源资料
SHA-256: fdc4b92998637700824f716f20c32ff4663b2c409897516b58f50b1f952d4b02
2026-10-03T16:57:16.635Z
来源文件 / 仓库# Next.js + Convex + Better Auth Template
[](https://nextjs.org/)
[](https://react.dev/)
[](https://convex.dev/)
[](https://better-auth.com/)
[](https://www.typescriptlang.org/)
[](https://opensource.org/licenses/MIT)

A **production-ready**, full-stack authentication template built with Next.js 16, Convex, and Better Auth. This template provides a complete authentication system with multiple auth methods, real-time database, comprehensive documentation, and API reference.
> **✨ New!** Built-in [Documentation](/documentation) and [API Reference](/api-reference) pages to help you get started quickly!
## 🚀 Features
### Authentication Methods
- ✅ **Email/Password** - Traditional authentication with secure password handling
- ✅ **OAuth Providers** - Google, GitHub, and Slack (via genericOAuth)
- ✅ **Magic Links** - Passwordless authentication via email
- ✅ **Email OTP** - One-time password verification
- ✅ **Two-Factor Authentication (2FA)** - TOTP-based 2FA with QR codes and backup codes
- ✅ **Anonymous Auth** - Guest access for users
### Core Features
- ✅ **Protected Routes** - Automatic route protection with Next.js 16 proxy pattern
- ✅ **Email Verification** - Verify user emails with secure tokens
- ✅ **Password Reset** - Secure password recovery flow
- ✅ **Modern UI** - Beautiful, responsive design with dark mode support
- ✅ **Type Safety** - Full TypeScript support with Convex
- ✅ **Real-time Database** - Powered by Convex for instant updates
- ✅ **Email Templates** - Pre-built React Email templates for all auth flows
### Developer Experience
- ✅ **Comprehensive Documentation** - Built-in `/documentation` page with setup guides
- ✅ **API Reference** - Full API documentation at `/api-reference` with code examples
- ✅ **Claude AI Ready** - Includes `CLAUDE.md` for AI coding assistants
- ✅ **TypeScript** - Full type safety throughout the stack
- ✅ **Tailwind CSS v4** - Modern styling with utility classes
- ✅ **Radix UI** - Accessible component primitives
## 📖 Quick Links
- 📚 **[Documentation](/documentation)** - Complete setup guide, architecture overview, and deployment instructions
- 🔧 **[API Reference](/api-reference)** - Comprehensive API documentation with copy-paste examples
- 🤖 **[CLAUDE.md](CLAUDE.md)** - Technical documentation for AI coding assistants
- 💬 **[GitHub Issues](https://github.com/podalls97/next-convex-betterauth-template/issues)** - Report bugs or request features
- ⭐ **[Star on GitHub](https://github.com/podalls97/next-convex-betterauth-template)** - Show your support!
## 📋 Prerequisites
Before you begin, ensure you have the following installed:
- [Node.js](https://nodejs.org/) (v18 or later)
- [pnpm](https://pnpm.io/) (recommended) or npm/yarn
- [Convex CLI](https://docs.convex.dev/get-started/quickstart)
## 🛠️ Setup Instructions
### 1. Clone the Repository
```bash
git clone https://github.com/podalls97/next-convex-betterauth-template.git
cd next-convex-betterauth-template
```
### 2. Install Dependencies
```bash
pnpm install
```
### 3. Set Up Environment Variables
Create a `.env.local` file in the root directory with the following variables:
```bash
# Convex (automatic)
CONVEX_DEPLOYMENT=automatic
NEXT_PUBLIC_CONVEX_URL=https://example.convex.cloud
NEXT_PUBLIC_CONVEX_SITE_URL=https://example.convex.site
# Site Configuration
SITE_URL=http://localhost:3000
# Google OAuth (optional)
GOOGLE_CLIENT_ID=
GOOGLE_CLIENT_SECRET=
# GitHub OAuth (optional)
GITHUB_CLIENT_ID=
GITHUB_CLIENT_SECRET=
# Better Auth
BETTER_AUTH_SECRET=
```
### 4. Set Up Convex Variables
After creating your `.env.local` file, set the required variables in Convex:
```bash
# Set up environment variables in Convex (development)
pnpm convex env set SITE_URL http://localhost:3000
pnpm convex env set BETTER_AUTH_SECRET your-secret-key-here
pnpm convex env set GOOGLE_CLIENT_ID your-google-client-id
pnpm convex env set GOOGLE_CLIENT_SECRET your-google-client-secret
pnpm convex env set GITHUB_CLIENT_ID your-github-client-id
pnpm convex env set GITHUB_CLIENT_SECRET your-github-client-secret
# Set up environment variables in Convex (production)
pnpm convex env set SITE_URL your-production-domain --prod
pnpm convex env set BETTER_AUTH_SECRET your-secret-key-here --prod
pnpm convex env set GOOGLE_CLIENT_ID your-google-client-id --prod
pnpm convex env set GOOGLE_CLIENT_SECRET your-google-client-secret --prod
pnpm convex env set GITHUB_CLIENT_ID your-github-client-id --prod
pnpm convex env set GITHUB_CLIENT_SECRET your-github-client-secret --prod
```
### 6. Required API Keys
You'll need to set up the following services:
#### 📧 Email Service (Choose one)
**Option 1: Resend (Recommended)**
- Sign up at [Resend](https://resend.com/)
- Get your API key from the dashboard
- Add `RESEND_API_KEY` to your environment variables in Convex
**Option 2: SMTP (Gmail/Outlook)**
- For Gmail: Enable 2FA and create an App Password
- For Outlook: Use your regular credentials
- Add SMTP variables to your environment
#### 🔐 Better Auth Secret
- Generate a secure random string using: `openssl rand -base64 32`
- Add to `BETTER_AUTH_SECRET` in both `.env.local` and Convex
#### 🔑 OAuth Providers (Optional)
**Google OAuth**
1. Go to [Google Cloud Console](https://console.cloud.google.com/)
2. Create a new project or select an existing one
3. Navigate to "APIs & Services" > "Credentials"
4. Click "Create Credentials" > "OAuth 2.0 Client ID"
5. Configure consent screen if prompted
6. Set application type to "Web application"
7. Add authorized redirect URIs:
- Development: `http://localhost:3000/api/auth/callback/google`
- Production: `https://yourdomain.com/api/auth/callback/google`
8. Copy `GOOGLE_CLIENT_ID` and `GOOGLE_CLIENT_SECRET`
**GitHub OAuth**
1. Go to [GitHub Developer Settings](https://github.com/settings/developers)
2. Click "New OAuth App"
3. Fill in the details:
- Application name: Your app name
- Homepage URL: `http://localhost:3000` (dev) or your production URL
- Authorization callback URL:
- Development: `http://localhost:3000/api/auth/callback/github`
- Production: `https://yourdomain.com/api/auth/callback/github`
4. Copy `GITHUB_CLIENT_ID` and `GITHUB_CLIENT_SECRET`
**Slack OAuth (via genericOAuth)**
1. Go to [Slack API](https://api.slack.com/apps)
2. Click "Create New App" > "From scratch"
3. Configure OAuth & Permissions
4. Add redirect URL: `http://localhost:3000/api/auth/callback/slack`
5. Copy `SLACK_CLIENT_ID` and `SLACK_CLIENT_SECRET`
6. Update `convex/auth.ts` and `src/lib/auth-client.ts` to include Slack configuration
### 5. Start Development
#### Option 1: Start Everything (Recommended)
```bash
# This will automatically start both Convex dev and Next.js dev
pnpm dev
```
#### Option 2: Start Convex Only
```bash
# Start Convex development server only
pnpm convex dev
# Or run once and exit
pnpm convex dev --once
```
**Note**: If you encounter errors after running `pnpm install` after cloning this repo, make sure you have added the required environment variables to your `.env.local` file, then run `pnpm convex env set` to set up the variables in Convex.
The `pnpm dev` command will:
- Start Convex development server
- Start Next.js development server
- Open your browser to `http://localhost:3000`
## 🎯 Quick Start Guide
1. **Sign Up**: Create a new account at `/sign-up`
2. **Verify Email**: Check your email and click the verification link
3. **Sign In**: Use your credentials at `/sign-in`
4. **Dashboard**: Access your protected dashboard at `/dashboard`
5. **Settings**: Configure 2FA and other settings at `/settings`
## 📁 Project Structure
```
src/
├── app/
│ ├── (auth)/ # Protected routes (requires authentication)
│ │ ├── dashboard/ # Main user dashboard
│ │ ├── settings/ # User settings (2FA, profile)
│ │ ├── documentation/ # 📚 Built-in documentation page
│ │ └── api-reference/ # 🔧 Built-in API reference
│ ├── (unauth)/ # Public routes
│ │ ├── sign-in/ # Sign in page
│ │ ├── sign-up/ # Registration page
│ │ ├── verify-2fa/ # 2FA verification
│ │ └── reset-password/ # Password reset
│ └── api/auth/[...all]/ # Next.js API route (delegates to Convex)
├── components/
│ ├── client/ # Client components
│ └── server/ # Server components
├── lib/
│ ├── auth.ts # Better Auth server configuration
│ └── auth-client.ts # Better Auth client hooks
└── proxy.ts # Route protection (Next.js 16 proxy pattern)
convex/
├── auth.config.ts # Better Auth domain configuration
├── auth.ts # Better Auth + Convex integration
├── schema.ts # Convex database schema
├── http.ts # HTTP routes for Better Auth
├── users.ts # Internal mutations for user syncing
├── email.tsx # Email templates (React Email)
└── polyfills.ts # Required for Better Auth in Convex
```
## 🔧 Adding New Pages
To add new pages to your dashboard:
1. Create a new directory in `src/app/(auth)/dashboard/`
2. Add a `page.tsx` file
3. Use the provided components:
```tsx
"use client";
import { useQuery } from "convex/react";
import { api } from "../../../../convex/_generated/api";
import { AppContainer } from "@/components/server";
export default function MyPage() {
const user = useQuery(api.auth.getCurrentUser);
return (
<AppContainer>
<h1>Hello {user?.name}!</h1>
{/* Your page content */}
</AppContainer>
);
}
```
## 🚀 Deployment
### Deploy to Vercel
1. Push your code to GitHub
2. Connect your repository to [Vercel](https://vercel.com)
3. Configure build settings:
- **Build Command**: `npx convex deploy --cmd 'pnpm run build'`
- **Install Command**: `pnpm install`
4. Add environment variables in Vercel dashboard:
- All variables from your `.env.local` file
- **Additional variables for production**:
- `CONVEX_SITE_URL=your-domain` (your production domain)
- `CONVEX_DEPLOYMENT=key from convex dashboard` (available in Convex dashboard under Settings > Deployment URL and Deploy Key)
5. Deploy!
### Deploy Convex
```bash
pnpm convex deploy
```
## 📚 Learn More
- [Next.js Documentation](https://nextjs.org/docs)
- [Convex Documentation](https://docs.convex.dev)
- [Better Auth Documentation](https://www.better-auth.com/docs)
- [Resend Documentation](https://resend.com/docs)
## 🤖 For AI Agents & Developers
If you're working with AI coding assistants or need to modify authentication providers:
### Adding/Removing Auth Providers
When adding or removing authentication providers (Google, GitHub, etc.):
1. **Update Environment Variables**: Add or remove the corresponding `CLIENT_ID` and `CLIENT_SECRET` variables in both `.env.local` and Convex
2. **Check Convex Configuration**: Review and update `convex/auth.config.ts` to include/exclude the provider
3. **Update Mutations**: Ensure all related Convex mutations and functions are updated to handle the new/removed provider
4. **Test Authentication Flow**: Verify the complete authentication flow works with the changes
### Quick Provider Management
- **To add a provider**: Configure the provider in `convex/auth.config.ts`, add environment variables, and update any related mutations
- **To remove a provider**: Remove from auth config, clean up environment variables, and update mutations to handle the removal
## 🤝 Contributing
1. Fork the repository
2. Create your feature branch (`git checkout -b feature/amazing-feature`)
3. Commit your changes (`git commit -m 'Add some amazing feature'`)
4. Push to the branch (`git push origin feature/amazing-feature`)
5. Open a Pull Request
## 📄 License
This project is licensed under the MIT License - see the [LICENSE](LICENSE) file for details.
## 🆘 Support
If you encounter any issues:
1. Check the [Issues](https://github.com/podalls97/next-convex-betterauth-template/issues) page
2. Create a new issue with detailed information
3. Join our community discussions
---
**Happy coding! :DD**
看看同类模板
对比同技术栈与用途的模板,找到更适合的视觉与内容结构。
ai-website-cloner-template
Clone any website with one command using AI coding agents
Next.js · 启动器

Next.js SaaS Starter
Next.js SaaS Starter 是 Next.js 官方维护的 SaaS 起点模板,定位介于学习资源和可直接部署的脚手架之间。
Next.js · SaaS

Next.js Commerce
Next.js Commerce 是 Vercel 团队维护的电商启动模板,基于 Next.js App Router 构建,采用服务端渲染、React Server Components、Server Actions …
Next.js · 电商

Next-js-Boilerplate
Next-js-Boilerplate 是一个面向 Next.js 16、Tailwind CSS 4 和 TypeScript 的启动器,核心定位是开发者体验优先。
Next.js · 启动器

tailwind-nextjs-starter-blog
tailwind-nextjs-starter-blog 是一个面向个人技术博客的 Next.js 与 Tailwind CSS 启动模板,其 v2 版本基于 App Router 与 React Server Comp…
Next.js · 博客

next-forge
Production-grade Turborepo template for Next.js apps.
Next.js · 启动器