集成 Auth.js,支持 Google OAuth 与 Resend 邮件 Magic Link 登录
Next.jsReactSaaS启动器
saas-starter-kit — Next.js SaaS模板
作者 stephenw310
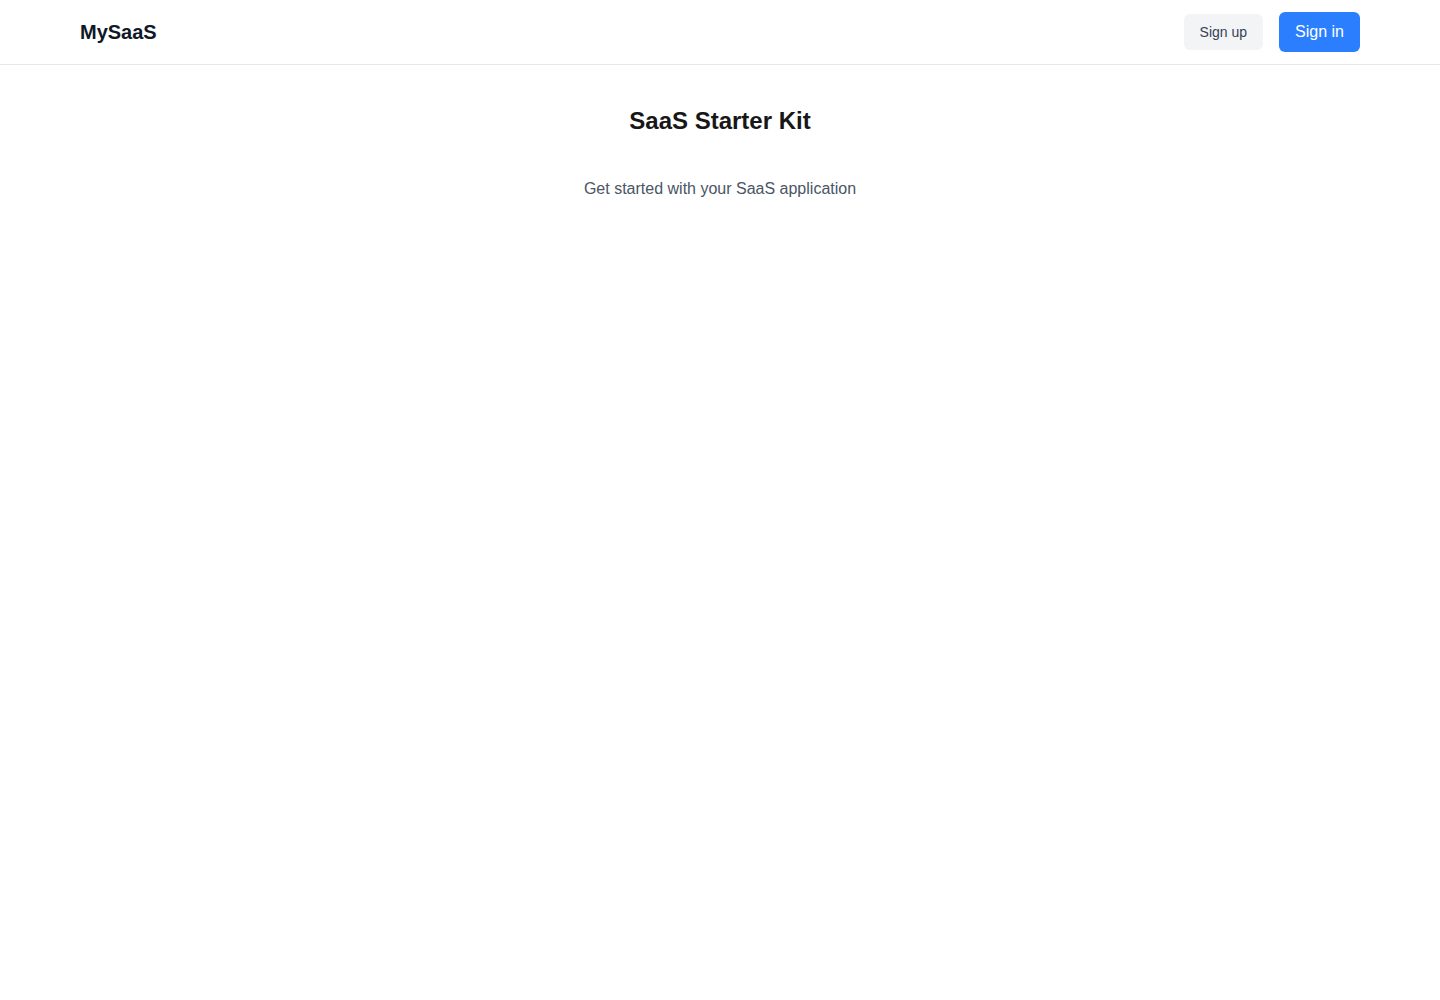
基于 Next.js 的 SaaS 应用起步模板,集成 Auth.js 认证、Drizzle ORM 与 PostgreSQL,界面留空由使用者自行搭建。
看看你的网站会是什么样
浏览真实页面截图,比较内容排版与手机效果。点击下方缩略图切换,放大查看整页细节。
全部页面与视图 2
截图用于了解视觉与布局,交互效果请以实际项目为准。
采集于 2026-10-02查看来源
值得关注的模板亮点
从已有项目资料中,快速了解它的特点。
使用 PostgreSQL 与 Drizzle ORM,schema 基于 @auth/drizzle-adapter 的认证表结构
通过 Drizzle Kit 管理数据库迁移,提供 db:migrate 与 db:studio 脚本
内置 ESLint、Prettier 与 Husky pre-commit 钩子,TypeScript 覆盖全项目
不绑定 UI 框架,界面留空以便自行选择组件方案
README 提供 Vercel、Docker 与 Node.js 服务器三种部署说明
模板详细介绍
这是一个面向 SaaS 应用的 Next.js 起步模板,仓库自述定位为「现代全栈 SaaS starter kit」。它把认证、数据库与开发工具链预先接好,但刻意不提供 UI 组件库,页面样式需要使用者按自己的偏好实现。
技术组成上,模板使用 Next.js App Router 组织代码,TypeScript 贯穿全项目,样式层接入 Tailwind CSS,数据层使用 PostgreSQL 搭配 Drizzle ORM,认证由 Auth.js 承担,并提供 Google OAuth 与基于 Resend 的邮件 Magic Link 两种登录方式。数据库 schema 直接采用 @auth/drizzle-adapter 提供的认证表结构,包含 users、accounts、sessions、verificationTokens 与 authenticators。
工程侧包含 ESLint、Prettier、Husky pre-commit 钩子,以及 Drizzle Kit 负责的数据库迁移;脚本覆盖开发、构建、启动、lint、format、db:migrate 与 db:studio。部署方面 README 给出 Vercel、Docker 与 Node.js 服务器三种方式,并列出生产环境需要配置的环境变量。
限制也比较明确:README 的 TODO 显示 Stripe 支付集成与邮件模板尚未完成,因此模板本身不包含订阅计费能力;UI 需要自行选型搭建;使用前需自备 PostgreSQL 数据库,并自行申请 Google OAuth 凭据与 Resend API Key。仓库 star 数较少,属于个人维护的起步项目。
Next.jsSaaS启动器
适合你的项目吗?
适用场景
- 需要快速搭起带登录能力的 SaaS 项目骨架
- 希望用 Drizzle ORM 管理 PostgreSQL 数据与迁移
- 想自行决定前端 UI 方案,而不接受模板预设组件库
- 需要 Docker 或 Vercel 部署路径的 Next.js 项目起点
适合人群
- 熟悉 Next.js 与 TypeScript、准备从零开发 SaaS 的开发者
- 偏好 Drizzle ORM 而非其他 ORM 的技术选型
- 愿意自行配置 Google OAuth、Resend 与 PostgreSQL 的使用者
- 需要 MIT 许可下可自由修改代码的个人或团队项目
上手与定制指南
结合仓库当前版本的说明,按下面的资料检查内容、配置与运行要求。
- 1
需要 Node.js v20 或更高版本,以及可用的 PostgreSQL 数据库
- 2
复制 .env.example 为 .env,填写 DATABASE_URL、AUTH_SECRET、AUTH_GOOGLE_ID、AUTH_GOOGLE_SECRET 与 RESEND_API_KEY
- 3
安装依赖后运行 npm run db:migrate 执行数据库迁移,再用 npm run dev 启动开发服务器
- 4
Google OAuth 需在 Google Cloud Console 创建凭据,开发环境回调地址为 http://localhost:3000/api/auth/callback/google
- 5
邮件登录需在 Resend 获取 API Key,并在 src/lib/auth.ts 中修改发件域名,同时在 Resend 后台验证该域名
授权与来源资料
使用条件与限制
免费使用 · 保留许可声明本次收录的是公开仓库中采用 MIT 许可的免费版本;免费范围为该版本代码,不代表外部服务或第三方素材免费。
使用时需要遵守
- 允许免费使用、修改、商用和分发该版本代码。
- 分发代码副本或实质性部分时,保留原作者版权声明和完整 MIT 许可声明。
- 代码按现状提供;担保与责任限制以原许可证及适用法律为准。
额外费用与待核对事项
- 邮件 Magic Link 登录依赖第三方服务 Resend,需自行注册账号并获取 API Key,属于外部服务依赖。
- Google OAuth 登录需在 Google Cloud Console 自行创建项目与 OAuth 凭据,属于外部账号与配置要求。
- 使用前需自备可用的 PostgreSQL 数据库,模板本身不提供数据库托管。
- README 的 TODO 显示 Stripe 支付集成尚未完成,模板不包含订阅计费能力。
- 邮件模板尚未完成,邮件相关界面需自行实现。
- 界面刻意留空,不提供 UI 组件库,页面样式需使用者自行选型搭建。
- 演示图片、字体、图标及其他第三方素材需按各自许可核对,不能仅凭代码的 MIT 许可判断。
- 域名、托管、数据库、支付或 AI 等外部服务可能另外收费。
查看原文依据
Permission is hereby granted, free of charge
许可证原文
Sign up for [Resend](https://resend.com/)
README 原文
Create a project in [Google Cloud Console](https://console.cloud.google.com/)
README 原文
[PostgreSQL](https://www.postgresql.org/) database
README 原文
- [ ] Stripe payment integration
README 原文
- [ ] Email templates
README 原文
https://github.com/stephenw310/saas-starter-kit/blob/main/LICENSEhttps://github.com/stephenw310/saas-starter-kit/blob/main/README.mdThe UI is purposely left blank to allow you to build with your preferred library and components.
README 原文
DeepSeek 根据仓库许可证和 README 整理 ·2026-10-02。结果仅覆盖已读取资料,依赖、图片、字体及后续条款变更以各自原文为准。
项目核对记录与介绍依据
模板资料
- 来源平台
- GitHub
- 资料与维护参考分
- 资料较完整 · 82 / 100
- 技术栈
- Next.js · React
- 网站类型
- SaaS · 启动器
这个分数如何计算
本站按许可资料(最高30分)、演示链接(12分)、预览图(10分)、Star数(15分)、记录的维护时间(15分)、描述完整度(8分)、功能记录(5分)和分类资料(5分)计算。它不是代码、安全或性能测试,也不是 Google 评分;有链接不代表已实测可用。
这个项目需要核对什么
- 记录的仓库更新时间
- 2025-06-17
- 截图检查日期
- 2026-10-02
已收录演示链接。请用你的内容与屏幕尺寸检查;有演示不代表表单、认证或支付已经可用。
目录记录的主要技术栈是 Next.js。请通过依赖清单和锁文件核对实际版本与托管要求。这些说明基于收录资料,不代表代码审计或部署实测。
查看具体选型方法 →介绍的制作与核对状态
介绍由 AI 辅助整理目录与仓库资料。仓库作者不等于这篇介绍的审核者。
已完成服务器许可规则与 AI 来源核对;未经过人工编辑审核。
查看当时使用的来源资料
SHA-256: 444b799c27dcab26bfbefe4fa7069a2c3fe40041b353d46ce8b4618dbe4320b6
2026-10-02T22:15:01.696Z
来源文件 / 仓库# SaaS Starter Kit A modern, full-stack SaaS starter kit built with **Next.js 15**, **Tailwind CSS**, **Drizzle ORM**, and **Auth.js**. This template provides a solid foundation for building SaaS applications with authentication, database management, and modern development tooling. The UI is purposely left blank to allow you to build with your preferred library and components. ## 🚀 Features - **Modern Tech Stack**: Next.js 15, React 19, Tailwind CSS v4, Auth.js v5 and more - **Authentication**: Auth.js v5 with Google OAuth and Magic Link email providers (Resend) - **Database**: PostgreSQL with Drizzle ORM - **Code Quality**: ESLint, Prettier, Husky pre-commit hooks - **Type Safety**: Full TypeScript support - **Database Migrations**: Automated with Drizzle Kit - **Flexible UI**: No UI framework dependency - build with your preferred components ## 🛠️ Tech Stack - **Framework**: [Next.js](https://nextjs.org/) - **Language**: [TypeScript](https://www.typescriptlang.org/) - **Database**: [PostgreSQL](https://www.postgresql.org/) - **ORM**: [Drizzle ORM](https://orm.drizzle.team/) - **Authentication**: [Auth.js](https://authjs.dev/) - **Styling**: [Tailwind CSS](https://tailwindcss.com/) - **Code Formatting**: [Prettier](https://prettier.io/) - **Linting**: [ESLint](https://eslint.org/) - **Git Hooks**: [Husky](https://typicode.github.io/husky/) ## 📋 Prerequisites Before you begin, ensure you have the following installed: - [Node.js](https://nodejs.org/) (v20 or higher) - [PostgreSQL](https://www.postgresql.org/) database - [Git](https://git-scm.com/) ## 🎯 Quick Start ### 1. Clone the Repository ```bash git clone https://github.com/stephenw310/saas-starter-kit.git cd saas-starter-kit ``` ### 2. Install Dependencies ```bash npm install ``` ### 3. Environment Setup Copy the `.env.example` file to `.env` and update the values: ### 4. Database Setup Run the database migrations: ```bash npm run db:migrate ``` ### 5. Start Development Server ```bash npm run dev ``` Visit [http://localhost:3000](http://localhost:3000) to see your application running. ## 🔧 Available Scripts - `npm run dev` - Start development server - `npm run build` - Build for production - `npm run start` - Start production server - `npm run lint` - Run ESLint - `npm run format` - Format code with Prettier - `npm run db:migrate` - Generate and run database migrations - `npm run db:studio` - Open Drizzle Studio for database management ## 🔐 Authentication This template supports multiple authentication methods: ### 1. Google OAuth 1. Create a project in [Google Cloud Console](https://console.cloud.google.com/) 2. Navigate to APIs & Services > Credentials 3. Configure the OAuth consent screen 4. Create OAuth 2.0 credentials (Web application) 5. Add authorized redirect URI: `http://localhost:3000/api/auth/callback/google` for development 6. Copy the client ID and secret 7. Add to `.env` For more details, see the [Auth.js OAuth Guide](https://authjs.dev/getting-started/authentication/oauth) ### 2. Email Magic Link (Resend) 1. Sign up for [Resend](https://resend.com/) 2. Get your API key from the dashboard 3. Add it to your `.env` file 4. Update the sender domain in `src/lib/auth.ts` (currently set to "[email protected]") 5. Verify the sender domain in the Resend portal ## 🗄️ Database Schema The template uses the authentication schema provided by the [@auth/drizzle-adapter](https://authjs.dev/getting-started/adapters/drizzle) package, which includes: - **users** - Core user accounts and profile data - **accounts** - OAuth provider account links - **sessions** - Active user sessions - **verificationTokens** - Email verification tokens for magic links - **authenticators** - WebAuthn authenticators ## 📁 Project Structure ``` src/ ├── app/ # Next.js App Router │ ├── api/ # API routes │ ├── globals.css # Global styles │ ├── layout.tsx # Root layout │ └── page.tsx # Home page ├── components/ # React components │ └── auth/ # Authentication components ├── db/ # Database configuration │ ├── drizzle/ # Migration files │ └── schema.ts # Database schema ├── lib/ # Utility functions │ └── auth.ts # Authentication configuration └── middleware.ts # Middleware ``` ## 🔄 Development Workflow This template includes several development tools to ensure code quality: - **Pre-commit hooks**: Automatic code formatting and linting with Husky - **Type checking**: Full TypeScript support across the entire codebase - **Database migrations**: Automated schema management with Drizzle Kit - **Code formatting**: Prettier with Tailwind CSS plugin for consistent styling - **Linting**: ESLint with Next.js and Prettier configurations ## 🚀 Deployment ### Environment Variables Make sure to set all required environment variables in your production environment: - `DATABASE_URL` - PostgreSQL connection URL - `AUTH_SECRET` - Random string used to encrypt cookies and tokens - `AUTH_GOOGLE_ID` - Google OAuth client ID - `AUTH_GOOGLE_SECRET` - Google OAuth client secret - `RESEND_API_KEY` - API key from Resend for email authentication **Important**: Remember to update the authorized redirect URI in your Google Cloud Console to match your production domain: `https://your-domain.com/api/auth/callback/google` ### Vercel Deployment [](https://vercel.com/new/clone?repository-url=https%3A%2F%2Fgithub.com%2Fstephenw310%2Fsaas-starter-kit) ### Docker Deployment 1. [Install Docker](https://docs.docker.com/get-started/get-docker/) on your machine. 2. Set `NEXTAUTH_URL` in your `.env` file to the URL of your Docker container. For example, if you are running the container on your local machine, you can set it to `http://localhost:3000`. 3. Build your container: `docker build -t saas-starter-kit .` 4. Run your container: `docker run -p 3000:3000 saas-starter-kit` ### Node.js Server Deployment ```bash npm run build npm run start ``` ## 📝 TODO - [x] ~~Docker deployment configuration~~ - [ ] Stripe payment integration - [ ] Email templates ## 🤝 Contributing 1. Fork the repository 2. Create a feature branch (`git checkout -b feature/amazing-feature`) 3. Commit your changes (`git commit -m 'Add some amazing feature'`) 4. Push to the branch (`git push origin feature/amazing-feature`) 5. Open a Pull Request ## 📄 License This project is licensed under the MIT [LICENSE](LICENSE). ## 🆘 Support If you have any questions or need help getting started, you can: - Check the [Next.js documentation](https://nextjs.org/docs) - Review the [Auth.js documentation](https://authjs.dev/) - Open an [issue](https://github.com/stephenw310/saas-starter-kit/issues) --- **Happy coding!** 🎉
看看同类模板
对比同技术栈与用途的模板,找到更适合的视觉与内容结构。
ai-website-cloner-template
Clone any website with one command using AI coding agents
Next.js · 启动器

Next.js SaaS Starter
Next.js SaaS Starter 是 Next.js 官方维护的 SaaS 起点模板,定位介于学习资源和可直接部署的脚手架之间。
Next.js · SaaS

Next.js Commerce
Next.js Commerce 是 Vercel 团队维护的电商启动模板,基于 Next.js App Router 构建,采用服务端渲染、React Server Components、Server Actions …
Next.js · 电商

Next-js-Boilerplate
Next-js-Boilerplate 是一个面向 Next.js 16、Tailwind CSS 4 和 TypeScript 的启动器,核心定位是开发者体验优先。
Next.js · 启动器

tailwind-nextjs-starter-blog
tailwind-nextjs-starter-blog 是一个面向个人技术博客的 Next.js 与 Tailwind CSS 启动模板,其 v2 版本基于 App Router 与 React Server Comp…
Next.js · 博客

next-forge
Production-grade Turborepo template for Next.js apps.
Next.js · 启动器