nextjs/saas-starter 的 fork,MIT 许可的免费起步代码
Next.jsReactSaaS启动器
ghostlark-frontend — Next.js SaaS模板
作者 bankszach
GhostLark frontend 是 nextjs/saas-starter 的 fork,基于 Next.js 的 SaaS 起步模板,包含营销页、Stripe 订阅结算、登录仪表盘与基础团队权限。
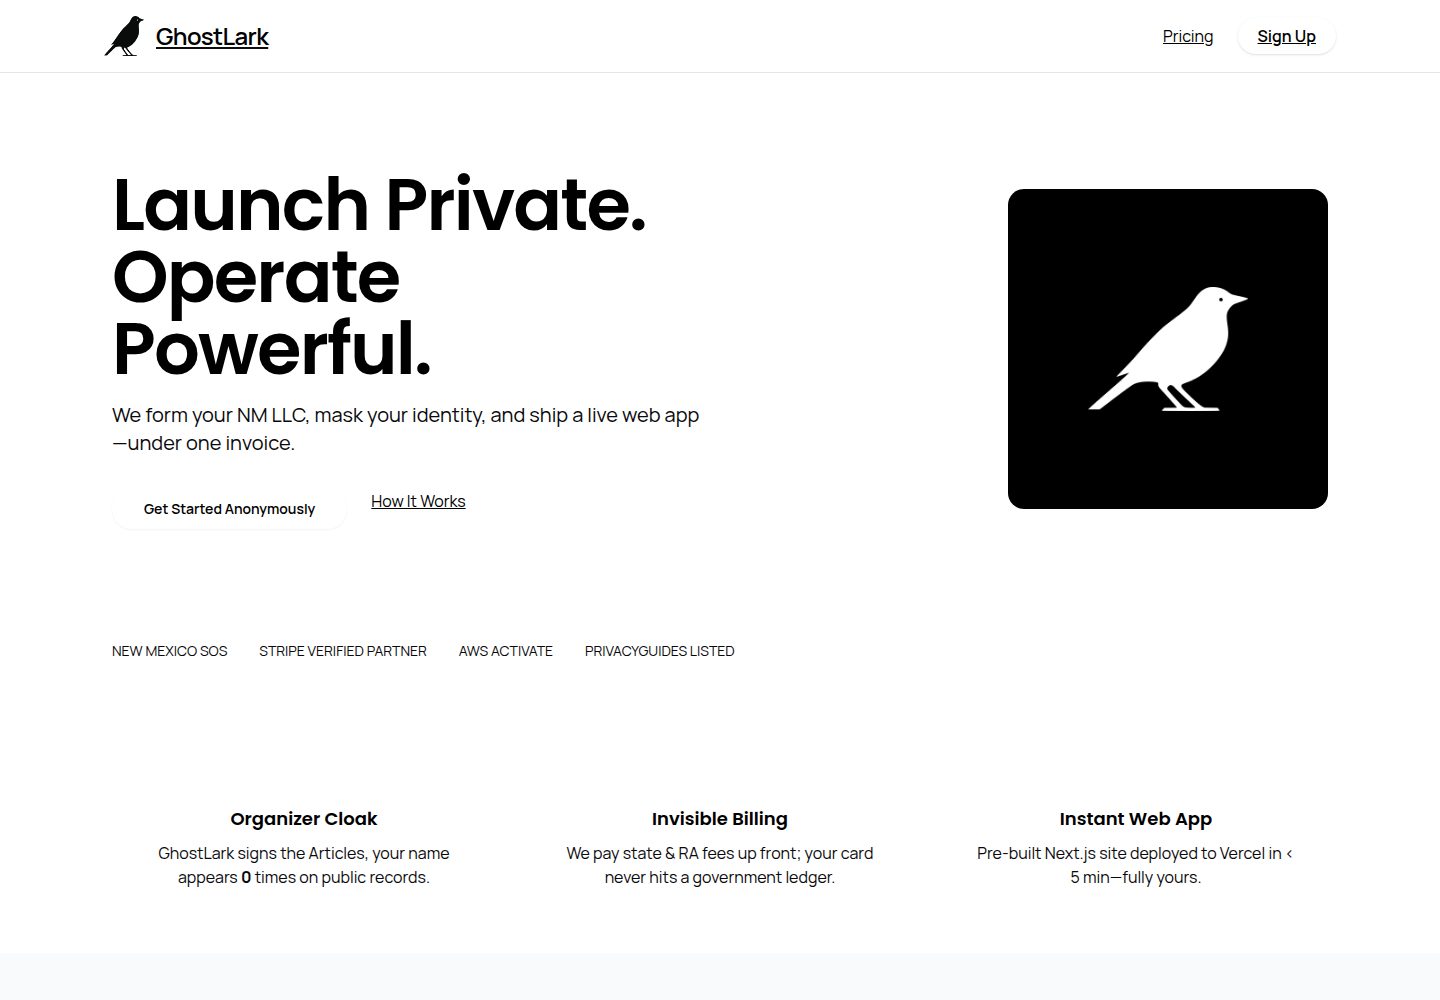
看看你的网站会是什么样
浏览真实页面截图,比较内容排版与手机效果。点击下方缩略图切换,放大查看整页细节。
全部页面与视图 2
截图用于了解视觉与布局,交互效果请以实际项目为准。
采集于 2026-10-02查看来源
值得关注的模板亮点
从已有项目资料中,快速了解它的特点。
营销落地页、连接 Stripe Checkout 的定价页与登录后仪表盘
邮箱密码认证,JWT 存于 cookie,全局与局部中间件保护路由
内置 Owner 与 Member 两种角色的基础 RBAC
通过 Stripe Customer Portal 管理订阅,并含用户事件活动日志
数据库使用 Postgres 与 Drizzle ORM,UI 基于 shadcn/ui
模板详细介绍
GhostLark frontend 是 bankszach 对 nextjs/saas-starter 的 fork,仓库采用 MIT 许可,定位为构建 SaaS 应用的起步模板。它提供营销落地页(含动画终端元素)、连接 Stripe Checkout 的定价页、登录后的仪表盘页面,以及对用户和团队进行增删改查的界面。权限方面内置 Owner 与 Member 两种角色的基础 RBAC,订阅管理通过 Stripe Customer Portal 完成。认证采用邮箱加密码方式,JWT 存放在 cookie 中;全局中间件保护登录后路由,局部中间件用于保护 Server Actions 或校验 Zod schema。项目还包含记录用户事件的活动日志系统。技术栈为 Next.js,数据库使用 Postgres,ORM 为 Drizzle,支付为 Stripe,UI 库为 shadcn/ui。README 说明该模板有意保持精简,作为学习资源使用,社区中存在功能更完整的付费版本;本次收录的是公开仓库中的免费代码,不包含付费升级,演示图片、字体、图标等第三方素材需单独核对许可,域名、托管、数据库、支付或 AI 等外部服务可能另外收费。
Next.jsSaaS启动器
适合你的项目吗?
适用场景
- 搭建带订阅付费的 SaaS 产品前端骨架
- 学习 Next.js 中认证、中间件与 Server Actions 的配合方式
- 为团队型应用快速准备用户与团队的增删改查界面
- 接入 Stripe 测试支付与订阅变更 webhook 的本地验证
适合人群
- 希望以现成模板起步的 Next.js 开发者
- 需要 Stripe 订阅与基础团队权限的 SaaS 项目
- 把该模板作为学习参考而非直接上线的个人或团队
上手与定制指南
结合仓库当前版本的说明,按下面的资料检查内容、配置与运行要求。
- 1
克隆仓库后使用 pnpm install 安装依赖
- 2
登录 Stripe CLI 并运行 pnpm db:setup 生成 .env 文件
- 3
执行 pnpm db:migrate 与 pnpm db:seed,种子数据包含 [email protected] / admin123
- 4
运行 pnpm dev 启动开发服务器,访问 http://localhost:3000
- 5
本地测试支付可使用测试卡号 4242 4242 4242 4242,任意未来有效期与三位 CVC
授权与来源资料
使用条件与限制
免费使用 · 保留许可声明本次收录的是公开仓库中采用 MIT 许可的免费版本;免费范围为该版本代码,不代表外部服务或第三方素材免费。
使用时需要遵守
- 允许免费使用、修改、商用和分发该版本代码。
- 分发代码副本或实质性部分时,保留原作者版权声明和完整 MIT 许可声明。
- 代码按现状提供;担保与责任限制以原许可证及适用法律为准。
额外费用与待核对事项
- 本地运行需注册并登录 Stripe 账户,使用 Stripe CLI 才能完成支付相关配置。
- 需运行 pnpm db:setup 生成 .env 环境变量文件,并自行配置数据库等连接信息。
- 上线前必须在 Stripe 后台创建生产环境 webhook 并配置回调地址。
- 部署流程依赖 Vercel 平台,托管服务可能产生额外费用。
- README 明确说明社区中存在功能更完整的付费版本,本仓库仅提供精简的免费学习用代码。
- 项目资料提及可选付费版本或功能;本次仅收录公开免费代码,不包含付费升级。
- 演示图片、字体、图标及其他第三方素材需按各自许可核对,不能仅凭代码的 MIT 许可判断。
- 域名、托管、数据库、支付或 AI 等外部服务可能另外收费。
查看原文依据
Permission is hereby granted, free of charge
许可证原文
log in to your Stripe account
README 原文
Use the included setup script to create your `.env` file
README 原文
Set the endpoint URL to your production API route
README 原文
Connect your repository to [Vercel](https://vercel.com/) and deploy it.
README 原文
https://github.com/bankszach/ghostlark-frontend/blob/main/LICENSEhttps://github.com/bankszach/ghostlark-frontend/blob/main/README.mdthere are other paid versions in the community which are more full-featured
README 原文
DeepSeek 根据仓库许可证和 README 整理 ·2026-10-02。结果仅覆盖已读取资料,依赖、图片、字体及后续条款变更以各自原文为准。
项目核对记录与介绍依据
模板资料
- 来源平台
- GitHub
- 资料与维护参考分
- 资料较完整 · 79 / 100
- 技术栈
- Next.js · React
- 网站类型
- SaaS · 启动器
这个分数如何计算
本站按许可资料(最高30分)、演示链接(12分)、预览图(10分)、Star数(15分)、记录的维护时间(15分)、描述完整度(8分)、功能记录(5分)和分类资料(5分)计算。它不是代码、安全或性能测试,也不是 Google 评分;有链接不代表已实测可用。
这个项目需要核对什么
- 记录的仓库更新时间
- 2025-07-28
- 截图检查日期
- 2026-10-02
已收录演示链接。请用你的内容与屏幕尺寸检查;有演示不代表表单、认证或支付已经可用。
目录记录的主要技术栈是 Next.js。请通过依赖清单和锁文件核对实际版本与托管要求。这些说明基于收录资料,不代表代码审计或部署实测。
查看具体选型方法 →介绍的制作与核对状态
介绍由 AI 辅助整理目录与仓库资料。仓库作者不等于这篇介绍的审核者。
已完成服务器许可规则与 AI 来源核对;未经过人工编辑审核。
查看当时使用的来源资料
SHA-256: fa5ca24285adf44bb5061de1904b6651d9d294598ae5f495c2fbe31dd317aca7
2026-10-02T14:03:51.599Z
来源文件 / 仓库# Next.js SaaS Starter This is a starter template for building a SaaS application using **Next.js** with support for authentication, Stripe integration for payments, and a dashboard for logged-in users. **Demo: [https://next-saas-start.vercel.app/](https://next-saas-start.vercel.app/)** ## Features - Marketing landing page (`/`) with animated Terminal element - Pricing page (`/pricing`) which connects to Stripe Checkout - Dashboard pages with CRUD operations on users/teams - Basic RBAC with Owner and Member roles - Subscription management with Stripe Customer Portal - Email/password authentication with JWTs stored to cookies - Global middleware to protect logged-in routes - Local middleware to protect Server Actions or validate Zod schemas - Activity logging system for any user events ## Tech Stack - **Framework**: [Next.js](https://nextjs.org/) - **Database**: [Postgres](https://www.postgresql.org/) - **ORM**: [Drizzle](https://orm.drizzle.team/) - **Payments**: [Stripe](https://stripe.com/) - **UI Library**: [shadcn/ui](https://ui.shadcn.com/) ## Getting Started ```bash git clone https://github.com/nextjs/saas-starter cd saas-starter pnpm install ``` ## Running Locally [Install](https://docs.stripe.com/stripe-cli) and log in to your Stripe account: ```bash stripe login ``` Use the included setup script to create your `.env` file: ```bash pnpm db:setup ``` Run the database migrations and seed the database with a default user and team: ```bash pnpm db:migrate pnpm db:seed ``` This will create the following user and team: - User: `[email protected]` - Password: `admin123` You can also create new users through the `/sign-up` route. Finally, run the Next.js development server: ```bash pnpm dev ``` Open [http://localhost:3000](http://localhost:3000) in your browser to see the app in action. You can listen for Stripe webhooks locally through their CLI to handle subscription change events: ```bash stripe listen --forward-to localhost:3000/api/stripe/webhook ``` ## Testing Payments To test Stripe payments, use the following test card details: - Card Number: `4242 4242 4242 4242` - Expiration: Any future date - CVC: Any 3-digit number ## Going to Production When you're ready to deploy your SaaS application to production, follow these steps: ### Set up a production Stripe webhook 1. Go to the Stripe Dashboard and create a new webhook for your production environment. 2. Set the endpoint URL to your production API route (e.g., `https://yourdomain.com/api/stripe/webhook`). 3. Select the events you want to listen for (e.g., `checkout.session.completed`, `customer.subscription.updated`). ### Deploy to Vercel 1. Push your code to a GitHub repository. 2. Connect your repository to [Vercel](https://vercel.com/) and deploy it. 3. Follow the Vercel deployment process, which will guide you through setting up your project. ### Add environment variables In your Vercel project settings (or during deployment), add all the necessary environment variables. Make sure to update the values for the production environment, including: 1. `BASE_URL`: Set this to your production domain. 2. `STRIPE_SECRET_KEY`: Use your Stripe secret key for the production environment. 3. `STRIPE_WEBHOOK_SECRET`: Use the webhook secret from the production webhook you created in step 1. 4. `POSTGRES_URL`: Set this to your production database URL. 5. `AUTH_SECRET`: Set this to a random string. `openssl rand -base64 32` will generate one. ## Other Templates While this template is intentionally minimal and to be used as a learning resource, there are other paid versions in the community which are more full-featured: - https://achromatic.dev - https://shipfa.st - https://makerkit.dev - https://zerotoshipped.com - https://turbostarter.dev
看看同类模板
对比同技术栈与用途的模板,找到更适合的视觉与内容结构。
ai-website-cloner-template
Clone any website with one command using AI coding agents
Next.js · 启动器

Next.js SaaS Starter
Next.js SaaS Starter 是 Next.js 官方维护的 SaaS 起点模板,定位介于学习资源和可直接部署的脚手架之间。
Next.js · SaaS

Next.js Commerce
Next.js Commerce 是 Vercel 团队维护的电商启动模板,基于 Next.js App Router 构建,采用服务端渲染、React Server Components、Server Actions …
Next.js · 电商

Next-js-Boilerplate
Next-js-Boilerplate 是一个面向 Next.js 16、Tailwind CSS 4 和 TypeScript 的启动器,核心定位是开发者体验优先。
Next.js · 启动器

tailwind-nextjs-starter-blog
tailwind-nextjs-starter-blog 是一个面向个人技术博客的 Next.js 与 Tailwind CSS 启动模板,其 v2 版本基于 App Router 与 React Server Comp…
Next.js · 博客

next-forge
Production-grade Turborepo template for Next.js apps.
Next.js · 启动器