Google OAuth 登录,不存储或处理用户密码
Next.jsReact启动器
webapp-template — Next.js 启动器模板
作者 faiyazpilot
一个基于 Next.js 与 Supabase 的启动器模板,提供 Google 登录、数据库 RLS 角色控制与安全头配置,适合作为需要真实用户体系的应用起点。
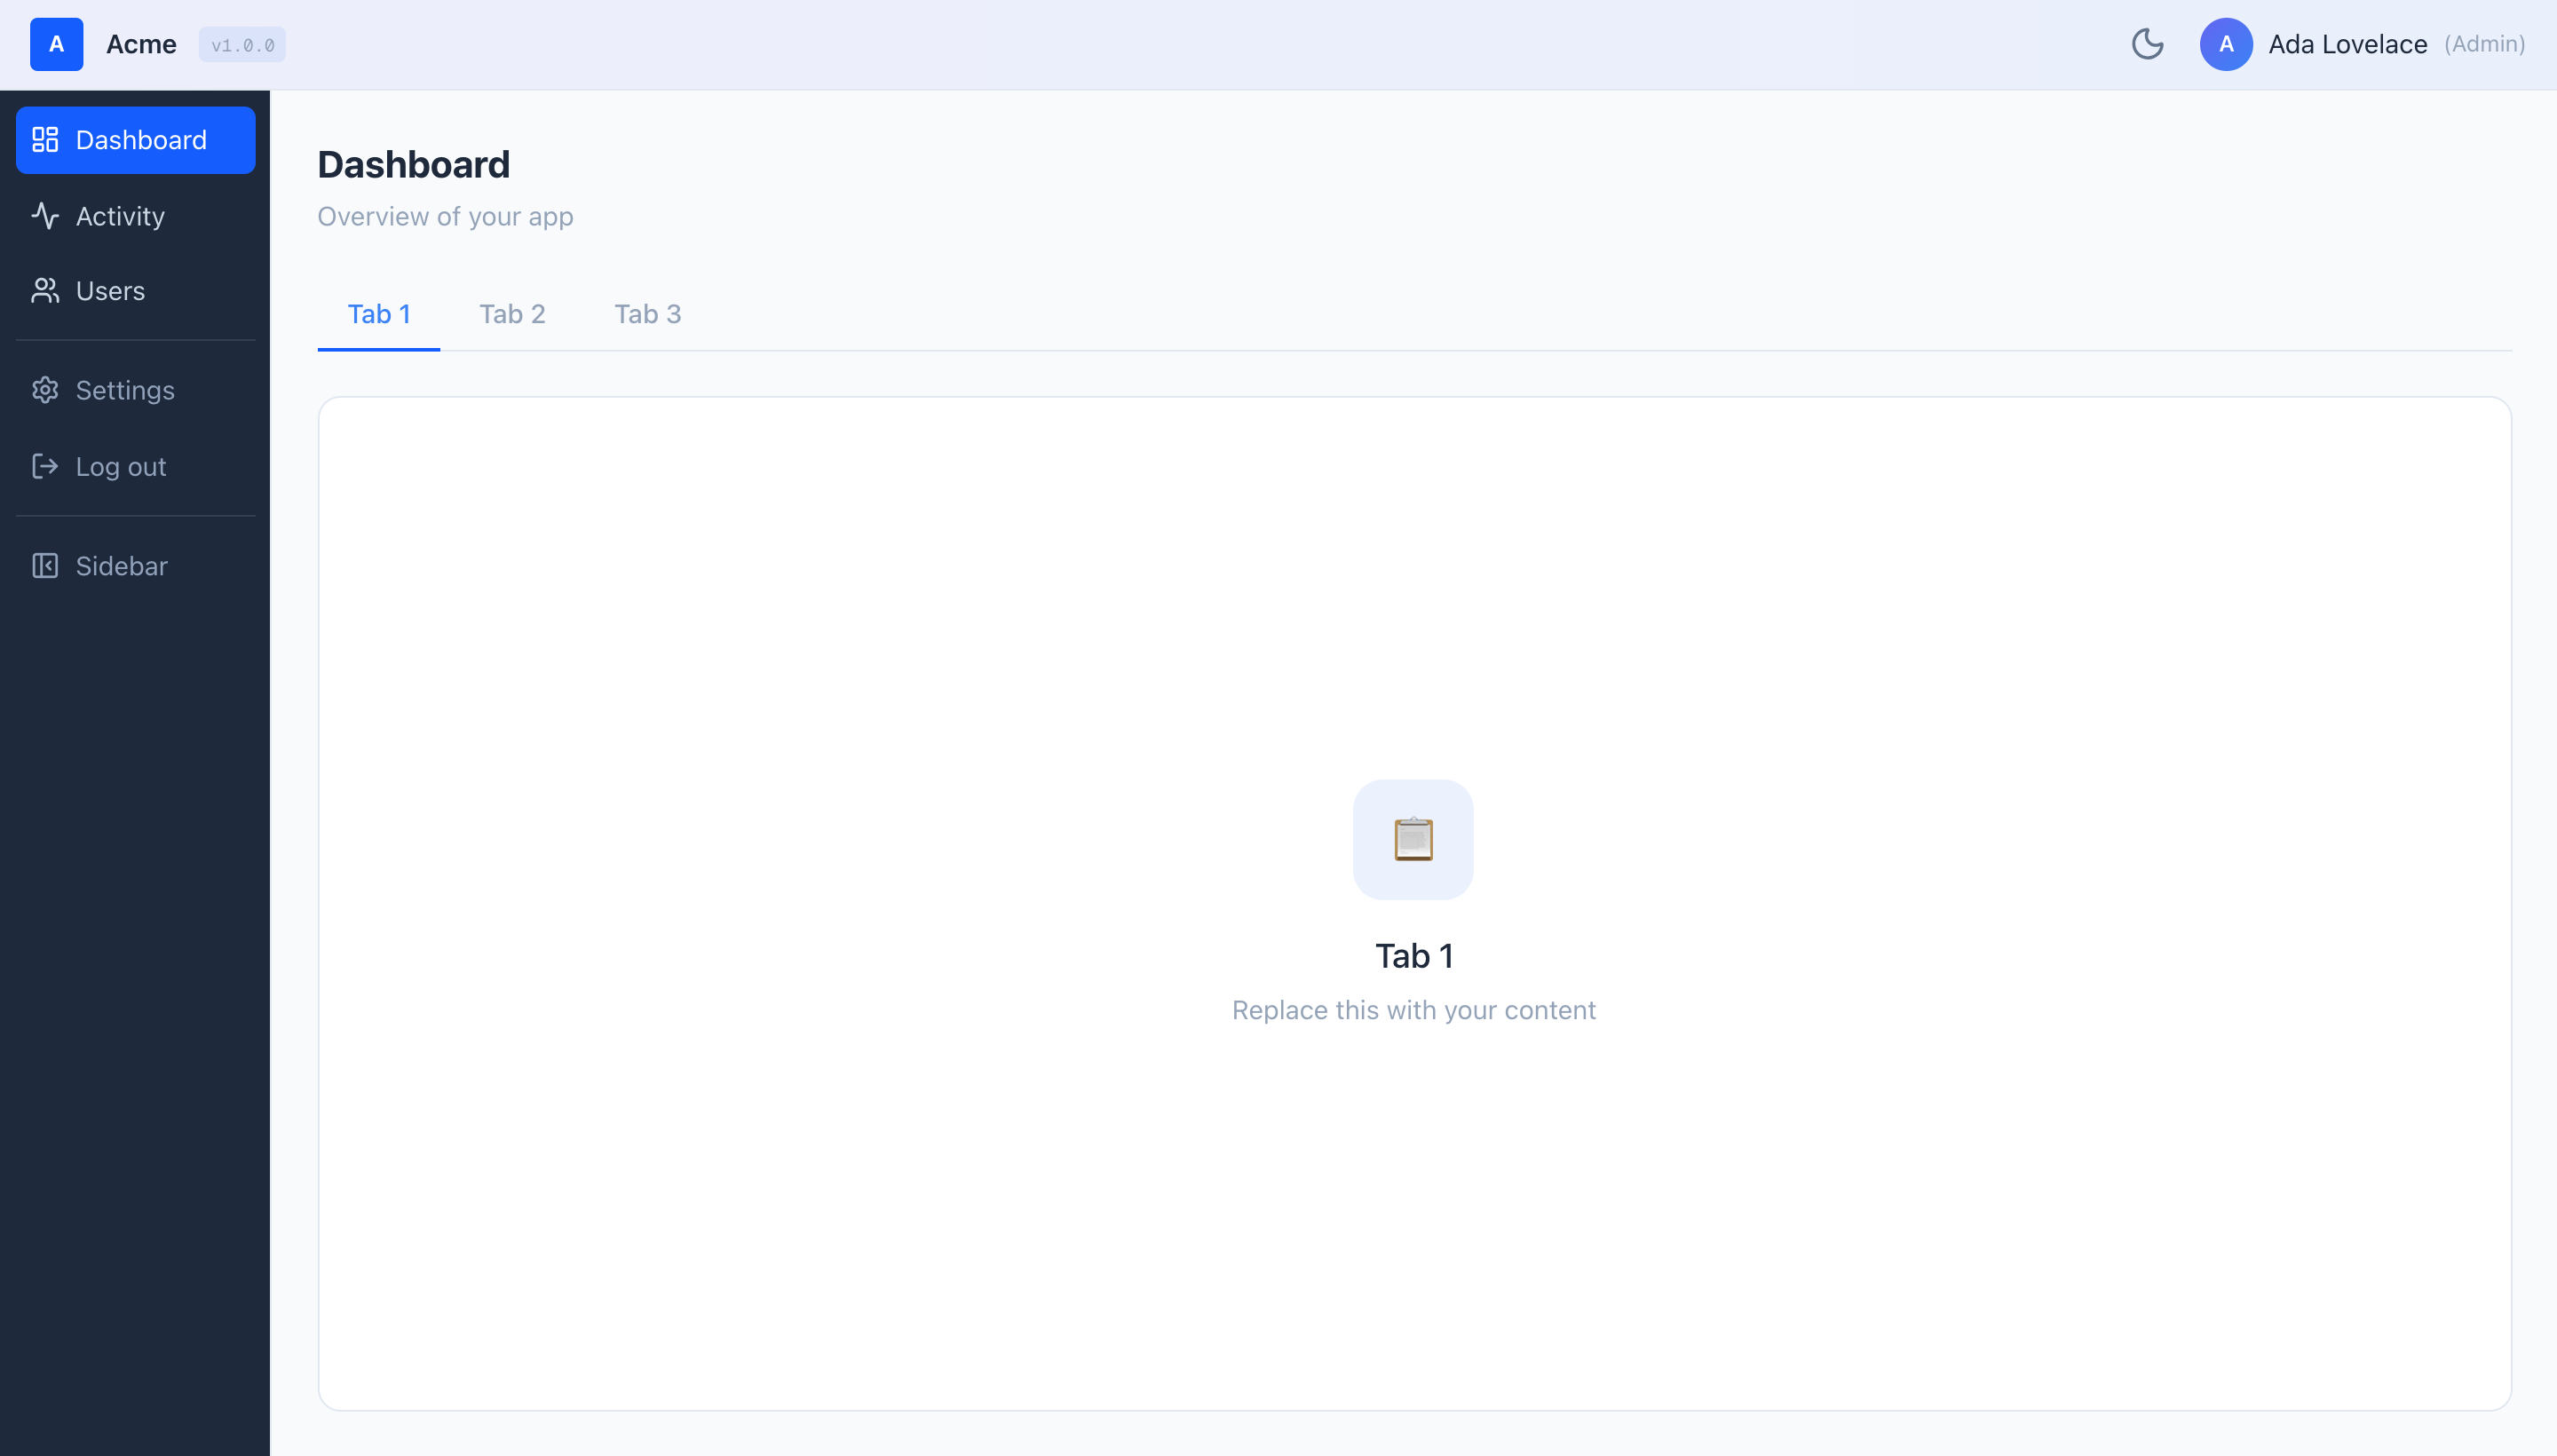
看看你的网站会是什么样
浏览真实页面截图,比较内容排版与手机效果。点击下方缩略图切换,放大查看整页细节。
目前有 1 张原始预览,可打开完整图片查看设计细节。
截图用于了解视觉与布局,交互效果请以实际项目为准。
采集于 2026-09-29查看来源
值得关注的模板亮点
从已有项目资料中,快速了解它的特点。
admin/manager/viewer 三种角色由 Postgres RLS 策略在数据库层强制执行
新注册用户通过数据库触发器自动获得 viewer 角色
提供管理员用户管理页,可下拉修改角色,manager 只读查看
预配置安全响应头与 Content-Security-Policy,认证回调防开放重定向
CI 已接入,每次拉取请求运行 lint、类型检查、测试与构建
模板详细介绍
该模板面向使用 AI 工具快速原型、但希望获得真实登录与权限基础的项目。它使用 Next.js App Router 与 TypeScript,样式为 Tailwind CSS,认证与数据库由 Supabase 承担,推荐部署到 Vercel。核心安全模型是三层:浏览器 UI 仅隐藏不可用页面,Next.js 中间件检查登录状态,Postgres 的 RLS 策略在每次读写时实际执行权限判定。模板不包含 service_role 密钥,浏览器端只使用公开的 anon/publishable 密钥。
功能上,模板提供 Google OAuth 登录、admin/manager/viewer 三种角色、新用户自动成为 viewer 的数据库触发器、管理员用户管理页、顶栏与可折叠侧边栏、明暗模式、Dashboard/Activity/Settings 占位页、安全响应头与 CSP、防开放重定向的认证回调,以及覆盖 lint、类型检查、测试和构建的 CI。
使用前需要自行准备 Google Cloud OAuth 凭据、Supabase 项目与 Vercel 账号,并按 README 的七个步骤依次配置环境变量、执行 SQL 架构、设置回调 URL 和手动提升管理员。模板的免费范围仅限 MIT 许可的代码,域名、托管、数据库等外部服务可能另行收费;演示图片、字体、图标等第三方素材需单独核对许可。
Next.js启动器
适合你的项目吗?
适用场景
- 用 AI 工具生成原型后,需要一个带真实登录和权限的代码基础继续开发
- 需要区分管理员、经理和普通查看者权限的内部工具或小型应用
- 希望将项目部署到 Vercel 并通过 Supabase 管理用户与数据
- 作为学习 Next.js App Router 与 Supabase RLS 配合方式的参考项目
适合人群
- 熟悉 JavaScript/TypeScript 并愿意按步骤配置 Google Cloud、Supabase 和 Vercel 的开发者
- 需要数据库层角色控制而非仅前端隐藏按钮的项目
- 希望以 MIT 许可代码为起点进行修改和分发的个人或团队
上手与定制指南
结合仓库当前版本的说明,按下面的资料检查内容、配置与运行要求。
- 1
需要 Node.js 20 或更高版本,先运行 npm install 安装依赖
- 2
需创建 Supabase 项目,复制 Project URL 与 anon/publishable 密钥到 .env.local
- 3
Google Cloud OAuth 的授权重定向 URI 必须填 Supabase 的回调地址,而非应用自身的 /auth/callback
- 4
在 Supabase SQL Editor 中执行 supabase-schema.sql 以创建 app_roles 表、RLS 策略、is_admin() 函数和触发器
- 5
新账号默认为 viewer,需在 Supabase 表编辑器或 SQL 中手动将自己的角色改为 admin
授权与来源资料
使用条件与限制
免费使用 · 保留许可声明本次收录的是公开仓库中的免费 MIT 版本;免费范围为该版本代码,不代表外部服务或第三方素材免费。
使用时需要遵守
- 使用、修改或分发代码时,保留原作者版权声明和完整 MIT 许可证。
- 允许免费使用、修改及商用,也允许分发代码;分发时仍需随附版权与许可声明。
- 代码按现状提供,作者不承诺担保或承担使用责任。
额外费用与待核对事项
- 使用该模板需要自行注册 Supabase 账号并创建项目,认证与数据库均依赖该外部服务,免费额度用尽或项目暂停后需付费。
- 部署到线上 URL 需要 Vercel 账号,超出免费带宽或构建分钟数后可能产生费用。
- Google 登录功能要求自行创建 Google Cloud 项目并配置 OAuth 凭据,未配置前无法登录。
- Google 同意屏幕处于测试模式时,只有被列入测试用户的邮箱才能登录,需发布应用或逐个添加测试用户。
- Supabase 免费项目在闲置一周后会被暂停,恢复或长期使用可能需要付费计划。
- 模板不包含服务端 API 路由示例,接入需要密钥的第三方服务(如支付、邮件、AI)需自行实现服务端调用。
- 模板未实现应用内多因素认证,账号安全完全依赖 Google 账号自身的 2FA 设置。
- 项目资料提及可选付费版本或功能;本次仅收录公开免费代码,不包含付费升级。
- 演示图片、字体、图标及其他第三方素材需按各自许可核对,不能仅凭代码的 MIT 许可判断。
- 域名、托管、数据库、支付或 AI 等外部服务可能另外收费。
查看原文依据
Permission is hereby granted, free of charge
许可证原文
A free **Supabase** account — [supabase.com](https://supabase.com)
README 原文
A free **Vercel** account — [vercel.com](https://vercel.com) (only needed for Part 6)
README 原文
Go to [console.cloud.google.com](https://console.cloud.google.com) → create a new project
README 原文
**Testing mode is fine while it's just you.** Add your own Gmail under **Test users**. Until you publish the app, *only* the emails you list as test users can sign in.
README 原文
Project pauses after 1 week of inactivity; paid plan ~$25/month
README 原文
**No external API pattern.** There are no Next.js API routes (`/api/`) in the template.
README 原文
https://github.com/faiyazpilot/webapp-template/blob/main/LICENSEhttps://github.com/faiyazpilot/webapp-template/blob/main/README.md**No MFA.** Authentication relies entirely on Google OAuth.
README 原文
依据完整 MIT 许可证与仓库 README 核对 · 2026-09-29。结果仅覆盖已读取资料,依赖、图片、字体及后续条款变更以各自原文为准。
项目核对记录与介绍依据
模板资料
- 来源平台
- GitHub
- 资料与维护参考分
- 资料一般 · 68 / 100
- 技术栈
- Next.js · React
- 网站类型
- 启动器
这个分数如何计算
本站按许可资料(最高30分)、演示链接(12分)、预览图(10分)、Star数(15分)、记录的维护时间(15分)、描述完整度(8分)、功能记录(5分)和分类资料(5分)计算。它不是代码、安全或性能测试,也不是 Google 评分;有链接不代表已实测可用。
这个项目需要核对什么
- 记录的仓库更新时间
- 2026-09-28
- 截图检查日期
- 2026-09-29
目前没有记录演示链接。请依据仓库说明在本地评估;仅凭截图无法确认交互行为。
目录记录的主要技术栈是 Next.js。请通过依赖清单和锁文件核对实际版本与托管要求。这些说明基于收录资料,不代表代码审计或部署实测。
查看具体选型方法 →介绍的制作与核对状态
介绍由 AI 辅助整理目录与仓库资料。仓库作者不等于这篇介绍的审核者。
已完成服务器许可规则与 AI 来源核对;未经过人工编辑审核。
查看当时使用的来源资料
SHA-256: 626570032aa71e9cb1a1e2a216a3a6983e3ba5605e792f5ca9e49447e9bf0b48
2026-09-29T01:07:06.321Z
来源文件 / 仓库# webapp-template
> AI lets anyone prototype an app in an afternoon. Almost nobody ships a *secure* one. This is the production-grade shell you build your idea on top of.
[](https://github.com/faiyazpilot/webapp-template/actions/workflows/ci.yml)
[](LICENSE)
[](CONTRIBUTING.md)

**Who this is for:**
- You're prototyping with **Claude, Cursor, or v0** and want a real foundation instead of throwaway demo code.
- You need **real login and user roles** — not a fake "logged in as Admin" button that anyone can flip.
- You want to **deploy to a real URL today** and start sharing it.
> **Not a developer?** Read [BLUEPRINT.md](BLUEPRINT.md) instead — it's a step-by-step guide written for non-technical builders, with copy-paste AI prompts for every feature and phase.
---
## What you get
- **Google sign-in** — users log in with their Google account; you never store or handle passwords.
- **Three roles — admin / manager / viewer — enforced by the database (RLS), not just hidden in the UI.** Hiding a button is decoration; the database refusing the write is the actual lock.
- **New sign-ins become `viewer` automatically, via a database trigger** — so the rule holds even if someone bypasses your app and calls the API directly.
- **Admin user-management page** — admins change anyone's role from a dropdown; managers can view the list read-only.
- **App shell** — top bar + collapsible sidebar, ready for your own pages.
- **Light / dark mode** — follows the system setting, with a manual toggle.
- **Dashboard, Activity, and Settings scaffolds** — placeholder pages to replace with your idea.
- **Security headers + Content-Security-Policy** preconfigured.
- **Open-redirect-safe auth callback** — login can only ever send users to a page inside your own app.
- **CI already wired** — lint, type-check, tests, and build run on every pull request.
## Stack
| Layer | Choice |
|---|---|
| Framework | Next.js 16 (App Router) |
| Language | TypeScript |
| Styling | Tailwind CSS v4 |
| Auth + DB | Supabase |
| Hosting | Vercel (recommended) |
| Tests | Vitest |
---
## How the security works
This is the part most AI-built apps get wrong. Read it once — it's the difference between a demo and something you can actually put real users on.
**1. "Wait, the database key is in the browser?"** Yes — on purpose. The key shipped to the browser (Supabase calls it the *anon* or *publishable* key) is like a lobby key card: it gets you to the front desk, but every single row in every table has its own lock on top of it. Those locks are **RLS policies** — rules that live *inside* Postgres and decide who may read or change each row. The all-powerful `service_role` key, which can ignore those locks, **never appears anywhere in this template.**
**2. "What if someone opens DevTools and calls the API directly?"** They can — and the database still says no. Concretely: an attacker copies the public key out of the page and sends a request to the REST API trying to set their own `role` to `admin`. Postgres rejects it. Why? Because role rows can *only* be created by a trusted database trigger, and *only* an existing admin is allowed to change one. The UI hiding the admin page is cosmetic. **The database refusing the write is the security.**
**3. The three layers.** Each does a job; only the last one is load-bearing.
```mermaid
flowchart TD
A[Browser UI<br/>hides pages you can't use<br/><i>cosmetic only</i>] --> B[Next.js middleware<br/>checks you're logged in<br/><i>convenience gate</i>]
B --> C[Postgres RLS policies<br/>checks every read and write<br/><b>the real enforcement</b>]
```
**4. The login flow — and the two callbacks that confuse everyone.**
```mermaid
sequenceDiagram
participant U as You
participant G as Google
participant S as Supabase
participant A as Your app
U->>G: Click "Continue with Google", consent
G->>S: Redirect to https://<ref>.supabase.co/auth/v1/callback
Note over G,S: Supabase's callback — this is the one Google knows about
S->>A: Redirect to https://your-app.com/auth/callback
Note over S,A: Your app's callback — Supabase hands the user over here
A->>U: Land on dashboard
```
> **Two different callbacks exist. Google only ever knows about Supabase's.** This trips up almost everyone during setup — keep it in mind for Part 2.
---
## Set it up (~20 minutes)
**Before you start, create these free accounts (no credit card needed):**
- A **Google account** (you almost certainly have one).
- A free **Supabase** account — [supabase.com](https://supabase.com)
- A free **Vercel** account — [vercel.com](https://vercel.com) (only needed for Part 6)
- **Node.js 20 or newer** installed — check with `node -v`. Get it at [nodejs.org](https://nodejs.org).
Do the parts in order. Each one names the exact buttons and labels you'll click.
### Part 0 — Get the code
1. On the [GitHub repo](https://github.com/faiyazpilot/webapp-template), click the green **Use this template** button → **Create a new repository**. (Or, if you prefer the command line: `git clone https://github.com/faiyazpilot/webapp-template.git`.)
2. Open the folder in your terminal and install dependencies:
```bash
npm install
```
3. You need **Node 20+** for this to work. If `npm install` errors, run `node -v` and upgrade if it's below 20.
### Part 1 — Create a Supabase project
1. Go to [supabase.com](https://supabase.com) → sign in → **New project**.
2. Give it a **Name**, set a **Database Password** (save it somewhere — you won't need it for this template, but you can't see it again), and pick a **Region** near you. Click **Create new project**.
3. Wait ~2 minutes while it provisions.
4. Go to **Project Settings → API**. Copy two values:
- **Project URL** — looks like `https://abcdefgh.supabase.co`
- The **anon** / **publishable** key — Supabase shows one or the other name depending on your project; either way it's the public-safe key meant for browsers.
5. Note your **project ref**: it's the subdomain of your Project URL. In `https://abcdefgh.supabase.co`, the ref is `abcdefgh`. **Write it down — you need it in Part 2.**
### Part 2 — Google Cloud OAuth (take your time here)
<details>
<summary><b>Expand the careful, step-by-step Google setup</b></summary>
This is the fiddliest part. Go slowly and the rest is easy.
1. Go to [console.cloud.google.com](https://console.cloud.google.com) → create a new project (top-left project dropdown → **New Project**).
2. Open the **OAuth consent screen** (newer Google dashboards label this **Google Auth Platform**):
- **Audience:** choose **External**.
- Fill in the **App name**, a **User support email**, and a **Developer contact** email.
- Leave the **scopes** at the defaults — you don't need to add any.
- **Testing mode is fine while it's just you.** Add your own Gmail under **Test users**. Until you publish the app, *only* the emails you list as test users can sign in.
3. Go to **Credentials → Create credentials → OAuth client ID**:
- **Application type:** **Web application**.
- **Authorized JavaScript origins:** add `https://<your-project-ref>.supabase.co`
- **Authorized redirect URIs:** add `https://<your-project-ref>.supabase.co/auth/v1/callback`
> **This is Supabase's callback URL, not your app's.** Your app's `/auth/callback` never goes into Google. Google hands the user to Supabase, and Supabase hands them to your app. Putting `http://localhost:3000/auth/callback` here is the #1 cause of the `redirect_uri_mismatch` error — don't do it.
4. Click **Create** and copy the **Client ID** and **Client secret**.
5. Back in the **Supabase Dashboard → Authentication → Sign In / Providers → Google**: toggle it **on**, paste the **Client ID** and **Client secret**, and click **Save**.
</details>
### Part 3 — Environment variables
1. Make your local config file (it's gitignored, so your keys never get committed):
```bash
cp .env.example .env.local
```
2. Open `.env.local` and paste in the two values from Part 1 (the Project URL and the anon/publishable key).
3. The `NEXT_PUBLIC_` prefix means a value is **visible in the browser on purpose** — that's expected and safe for these two values. ([Here's why](#how-the-security-works).) Never put a secret key behind a `NEXT_PUBLIC_` name.
4. **If `npm run dev` is already running, stop it and restart** — environment values are read at startup.
### Part 4 — Run the database schema
1. In Supabase, go to **SQL Editor → New query**.
2. Open `supabase-schema.sql` from this repo, copy **all** of it, paste it into the editor, and click **Run**.
3. You should see **"Success. No rows returned."**
4. Confirm it worked: go to **Table Editor** — you should now see an `app_roles` table.
This one file sets up everything the security depends on: the `app_roles` table, the RLS policies, the `is_admin()` helper function, and the trigger that gives every new sign-in a `viewer` row automatically.
> **Already ran an older version? Just re-run this file — it upgrades in place** (it drops the old policies and recreates everything safely; your data is untouched).
### Part 5 — Run locally
1. **Before your first login**, go to **Supabase → Authentication → URL Configuration → Redirect URLs** and add:
```
http://localhost:3000/auth/callback
```
2. Start the app:
```bash
npm run dev
```
3. Open [http://localhost:3000](http://localhost:3000), click **Continue with Google**, sign in, and you'll land on the dashboard as a **viewer**.

### Part 6 — Deploy to Vercel
<details>
<summary><b>Expand the deploy + production-URL steps</b></summary>
1. Go to [vercel.com](https://vercel.com) → **Add New… → Project** → **Import** your GitHub repo.
2. Before clicking Deploy, expand **Environment Variables** and add your two values (`NEXT_PUBLIC_SUPABASE_URL` and `NEXT_PUBLIC_SUPABASE_ANON_KEY`). Apply them to **all environments**. **Add them now** — adding them later means a redeploy.
3. Click **Deploy** and wait for it to finish. You'll get a URL like `https://your-app.vercel.app`.
4. Tell Supabase about the new URL — **Supabase → Authentication → URL Configuration**:
- Set **Site URL** to `https://your-app.vercel.app`
- Add `https://your-app.vercel.app/auth/callback` to **Redirect URLs**
- *(Optional)* To let Vercel **preview deployments** log in too, also add a wildcard like `https://your-app-*.vercel.app/auth/callback`.
5. **Custom domain?** Add it in **Vercel → Settings → Domains**, then repeat step 4's Supabase URL additions with your real domain.
> Two things people forget: (a) changing a Vercel env var requires a **redeploy** to take effect, and (b) your Google consent screen is still in **Testing mode**, so only your listed test users can log in until you publish it.
</details>
### Part 7 — Make yourself admin
New accounts start as `viewer`, including yours. Promote yourself one of two ways:
- **Easy way (UI):** Supabase → **Table Editor → `app_roles`** → find your row → change `role` to `admin` → **Save**.
- **SQL way:** Supabase → SQL Editor → run:
```sql
update app_roles set role = 'admin' where email = '[email protected]';
```
Refresh the app and the admin navigation (the **Users** page) appears. It's deliberately manual — there's no automatic "first user becomes admin" rule, which avoids a race where the wrong person could grab admin during signup.
---
## Customizing
| What you want to change | Where |
|---|---|
| App name (top bar, sidebar, login, browser tab) | `.env.local` → `NEXT_PUBLIC_APP_NAME` |
| Sidebar navigation | `navItems` / `adminNavItems` in `src/components/AppShell.tsx` |
| Dashboard tabs | `TABS` in `src/app/dashboard/page.tsx` |
| Theme colors | CSS variables at the top of `src/app/globals.css` — change `--accent`, `--sidebar-bg`, etc. |
| Font | Replace the `Geist` import in `src/app/layout.tsx` with any [Google Font](https://fonts.google.com) |
| Logo | Replace the `{/* Placeholder logo */}` blocks in `AppShell.tsx` and `src/app/login/page.tsx` with `<img src="/logo.png" />` and drop your file in `public/` |
| Favicon | Replace `public/favicon.ico` — convert any PNG at [favicon.io](https://favicon.io) |
| Social card (link preview image) | Replace `public/og.png` with a 1200×630 PNG |
| Page metadata (title, description) | `src/app/layout.tsx` |
| **Add a new page** | Create `src/app/<name>/page.tsx`, add it to `navItems` — the middleware protects it automatically |
| **Add a new table** | Enable RLS + write policies (copy the pattern in `supabase-schema.sql`) before any client code touches it |
> For a complete branding and feature-building walkthrough with AI prompts, see [BLUEPRINT.md](BLUEPRINT.md).
> Using **Claude Code** or **Cursor**? `CLAUDE.md` gives your AI assistant full project context — edit it as your app grows so the AI stays accurate.
## Role system
| Role | Can do |
|---|---|
| **admin** | See everything, *and* change other users' roles |
| **manager** | Read the user list (read-only — no role changes) |
| **viewer** | Dashboard only |
> Enforced in Postgres via RLS — the UI checks are just for niceness. If a viewer hand-crafts an API request to read the user list, Postgres still says no.
Admins manage roles right from the **Users** page (an admin can't change their own role, so you can't accidentally lock yourself out):

## Troubleshooting
| Symptom | Likely cause | Fix |
|---|---|---|
| `redirect_uri_mismatch` from Google | Wrong redirect URI in Google credentials | In Google → Credentials, the redirect URI must be `https://<ref>.supabase.co/auth/v1/callback` — **Supabase's** URL, not your app's. |
| Bounced back to login: "Authentication failed" | Your app's `/auth/callback` isn't allowed in Supabase | Add `http://localhost:3000/auth/callback` (and your prod URL) under Supabase → Authentication → URL Configuration → Redirect URLs. |
| Works locally, but Vercel sends you to `localhost` | Supabase **Site URL** is still localhost | Set Site URL to your `https://your-app.vercel.app` in Supabase → URL Configuration. |
| "App configuration error" | Env vars missing or mistyped | Check `.env.local` (local) or your Vercel env vars, then restart/redeploy. |
| Stuck spinner, or "not set up yet" / "not authorized" | The database schema hasn't been run | Run `supabase-schema.sql` in the Supabase SQL Editor (Part 4). |
| "Access blocked: app not verified", or a second account can't log in | Consent screen is in Testing mode | Add that person under Test users, or publish the consent screen in Google. |
| Changed an env value and nothing happened | `NEXT_PUBLIC_*` values are baked in at start/build time | Restart `npm run dev` locally, or redeploy on Vercel. |
| Users page is empty | You're a viewer, or on an old schema | Only admins/managers see users; promote yourself (Part 7) and re-run the schema. |
| Changed someone's role but their screen is stale | Roles are loaded once, at sign-in | Have them refresh the page (or sign out and back in). |
| Login page never appears / blank screen | Dev server not running, or wrong Node version | Run `npm run dev`; confirm `node -v` is 20 or newer. |
---
## Contributing
PRs welcome — see [CONTRIBUTING.md](CONTRIBUTING.md) and the [Code of Conduct](CODE_OF_CONDUCT.md). Have a question? See [SUPPORT.md](SUPPORT.md).
## Security
Found a vulnerability? See [SECURITY.md](SECURITY.md) — please **don't** open a public issue.
## Free tier limits
| Service | Free limit | What happens after |
|---|---|---|
| Supabase | 2 active projects, 500 MB database, 5 GB bandwidth/month | Project pauses after 1 week of inactivity; paid plan ~$25/month |
| Vercel | 100 GB bandwidth/month, 6,000 build minutes/month | Email warning; rarely an issue for early-stage apps |
| Google OAuth | Unlimited | Consent screen stays in Testing mode until you publish it (only your listed test users can log in until then) |
## Known gaps
Things that are missing and matter — documented here so you're not surprised:
- **No external API pattern.** There are no Next.js API routes (`/api/`) in the template. Any call to a third-party service (Stripe, email, AI APIs) that requires a secret key must go server-side — calling it from the browser exposes the key. Until a worked example lands, see [BLUEPRINT.md § "Connecting to external services"](BLUEPRINT.md#1-connecting-to-external-services-stripe-hubspot-email-apis-ai-apis) for the prompt to use with AI.
- **No data-querying guide.** The two Supabase clients (browser vs. server) are undocumented. There is also a silent failure mode when a database security rule (RLS) blocks a write — it returns an empty array instead of an error. See [BLUEPRINT.md § "Querying your own data"](BLUEPRINT.md#2-querying-your-own-data--the-pattern-and-a-known-trap) for the correct pattern.
- **No MFA.** Authentication relies entirely on Google OAuth. Users who want a second factor should enable 2FA on their Google account. In-app TOTP MFA is not implemented.
## Roadmap
No dates — this is open source with limited maintainer bandwidth. Suggest priorities in [Discussions](https://github.com/faiyazpilot/webapp-template/discussions) or open a PR:
- Worked example: server-side API route calling an external service (e.g. Resend for email).
- Magic-link / passwordless email login alongside Google.
- Audit-log example wired up to the Activity page.
- More OAuth providers (GitHub, Microsoft).
- Real-time data with Supabase channel subscriptions.
## License
[MIT](LICENSE) — free to use, modify, and build on.
看看同类模板
对比同技术栈与用途的模板,找到更适合的视觉与内容结构。
ai-website-cloner-template
Clone any website with one command using AI coding agents
Next.js · 启动器

Next.js SaaS Starter
Next.js SaaS Starter 是 Next.js 官方维护的 SaaS 起点模板,定位介于学习资源和可直接部署的脚手架之间。
Next.js · SaaS

Next.js Commerce
Next.js Commerce 是 Vercel 团队维护的电商启动模板,基于 Next.js App Router 构建,采用服务端渲染、React Server Components、Server Actions …
Next.js · 电商

Next-js-Boilerplate
Next-js-Boilerplate 是一个面向 Next.js 16、Tailwind CSS 4 和 TypeScript 的启动器,核心定位是开发者体验优先。
Next.js · 启动器

tailwind-nextjs-starter-blog
tailwind-nextjs-starter-blog 是一个面向个人技术博客的 Next.js 与 Tailwind CSS 启动模板,其 v2 版本基于 App Router 与 React Server Comp…
Next.js · 博客

next-forge
Production-grade Turborepo template for Next.js apps.
Next.js · 启动器