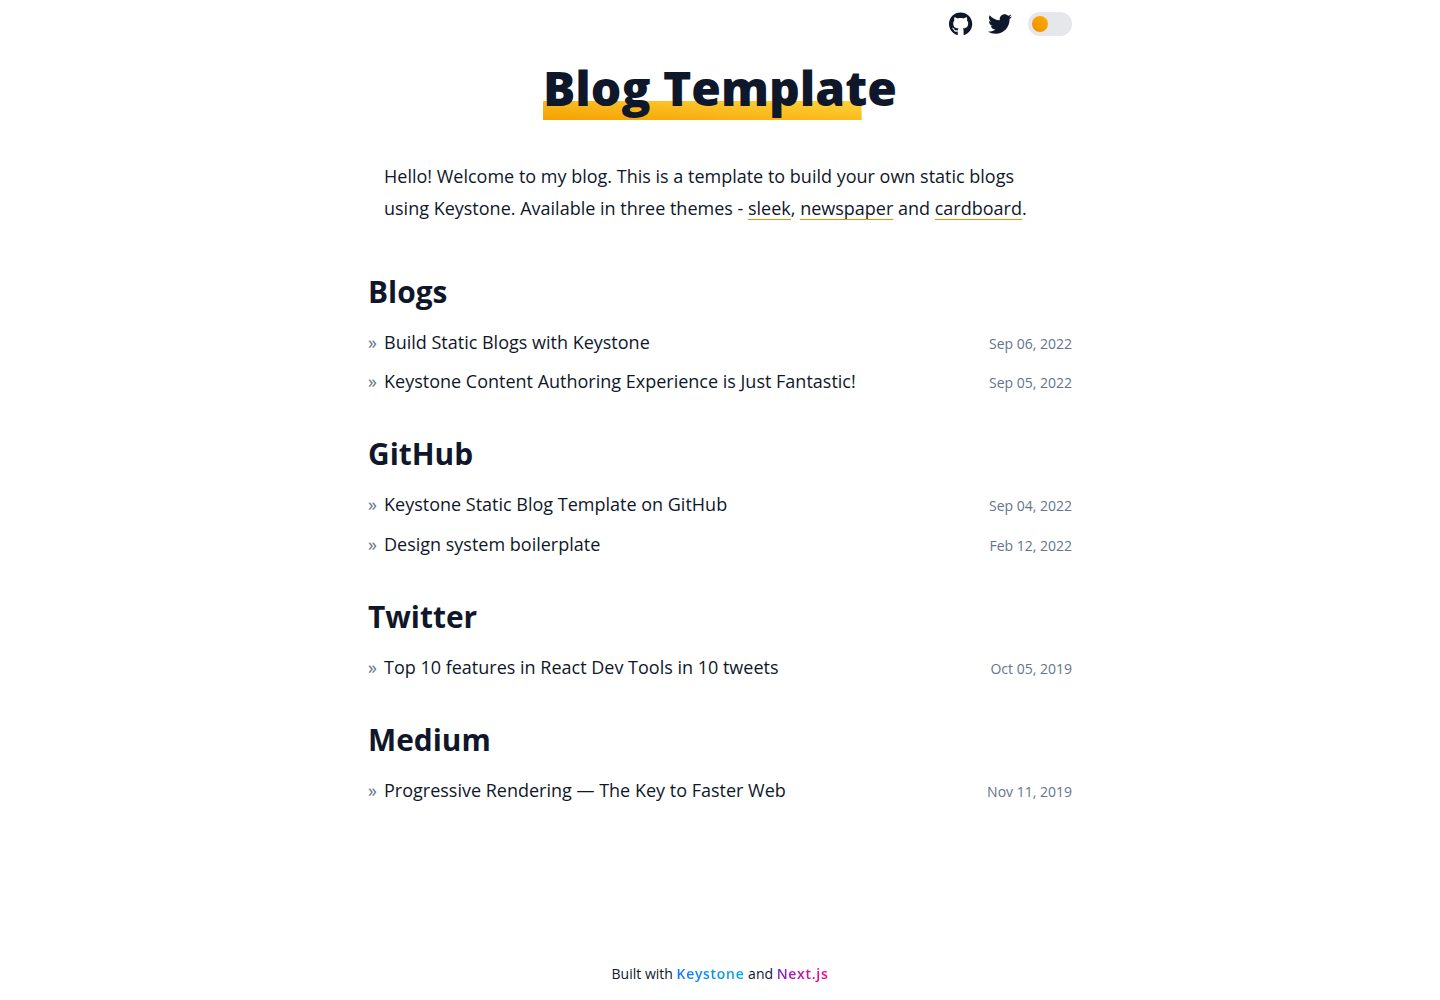
monorepo 结构,keystone-server 与 blog-sleek 两个工作区分别负责内容服务与前端
Next.jsReact博客启动器
keystone-static-blog — Next.js 博客模板
作者 flexdinesh
基于 Keystone 与 Next.js 的静态博客启动模板,内容在本地用 Keystone 可视化编辑器撰写,构建时导出为纯静态站点。
看看你的网站会是什么样
浏览真实页面截图,比较内容排版与手机效果。点击下方缩略图切换,放大查看整页细节。
全部页面与视图 3
截图用于了解视觉与布局,交互效果请以实际项目为准。
采集于 2026-10-03查看来源
值得关注的模板亮点
从已有项目资料中,快速了解它的特点。
内容在本地 Keystone 管理后台可视化撰写,构建时静态导出为纯静态站点
使用 Keystone document field,预置 hero 图片、引用块、推文嵌入、YouTube 嵌入、callout、语法高亮代码块等自定义组件
样式基于 Tailwind 配置式主题,便于扩展和自定义
附带 GitHub Actions 自动部署到 Netlify 的配置示例
模板详细介绍
这是一个用于搭建静态博客网站的启动模板,仓库为 monorepo 结构:keystone-server 工作区运行 Keystone 内容服务,blog-sleek 工作区是 Next.js 前端(主题目录按 blog-{theme} 命名)。内容在本地 Keystone 管理后台中可视化撰写,构建时由 Keystone 提供内容、Next.js 执行静态导出,生成 html、js、css 文件,可部署到任意静态托管。
模板使用 Keystone 的 document field 来组织文章内容,并预置了若干自定义组件,例如 hero 图片、自定义引用块、嵌入推文、嵌入 YouTube 视频、callout 提示块和语法高亮代码块。相比 MDX 博客,其差异在于内容通过可视化编辑器撰写并即时预览,自定义组件只需用 React 编写。样式基于 Tailwind 的配置式主题,便于扩展和调整。
使用上有一些明确限制:需要安装 yarn;本地开发时 Keystone 服务默认在 3000 端口,Next.js 前端在 8000 端口;构建时需要 Keystone 服务处于运行状态,因此在 CI 中构建需要 Docker 支持(模板提供 yarn export:docker),不支持 Docker 的 CI 可改用 GitHub Actions 构建后再发布。仓库附带 Netlify 部署所需的 GitHub Actions 配置示例。
Next.js博客启动器
适合你的项目吗?
适用场景
- 用可视化编辑器撰写内容、希望构建时生成静态博客的个人站点
- 需要在文章中插入轮播、视频嵌入、推文嵌入、语法高亮代码等自定义组件的博客
- 希望把生成结果部署到 Netlify、Vercel、Cloudflare Pages、Fastly 或 AWS S3 等静态托管的项目
- 想通过 GitHub Actions 在提交后自动构建并发布博客的工作流
适合人群
- 接受在本地运行 Keystone 服务并自行构建静态文件的开发者
- 使用 yarn 作为包管理器的项目
- 需要内容可视化编辑与自定义 React 内容组件的博客作者
- 计划将静态产物托管在任意静态托管平台上的用户
上手与定制指南
结合仓库当前版本的说明,按下面的资料检查内容、配置与运行要求。
- 1
需先安装 yarn,然后在项目根目录执行 yarn 安装依赖
- 2
根目录 yarn dev 会同时启动 Keystone 服务(http://localhost:3000)与 sleek 模板(http://localhost:8000);推荐分别在 keystone-server 与 blog-sleek 目录中单独运行
- 3
内容在 http://localhost:3000 的 Keystone 管理后台撰写,Posts 用于新建博客文章,Links 用于外部链接
- 4
生成静态站点需保持 Keystone 服务运行,在 blog-sleek 目录执行 yarn export,产物输出到 blog-sleek/out;可用 yarn serve 本地预览
- 5
在 CI 中构建需要 Docker 支持,使用 yarn export:docker;不支持 Docker 的 CI 可参考仓库中的 GitHub Actions 工作流
授权与来源资料
使用条件与限制
免费使用 · 保留许可声明本次收录的是公开仓库中采用 MIT 许可的免费版本;免费范围为该版本代码,不代表外部服务或第三方素材免费。
使用时需要遵守
- 允许免费使用、修改、商用和分发该版本代码。
- 分发代码副本或实质性部分时,保留原作者版权声明和完整 MIT 许可声明。
- 代码按现状提供;担保与责任限制以原许可证及适用法律为准。
额外费用与待核对事项
- 使用该模板需先在本机安装 yarn 包管理器,未安装 yarn 无法安装依赖和启动项目。
- 在 CI 中构建时,由于构建过程需要本地 Keystone 服务运行,并非所有静态托管 CI 都支持,需使用 Docker 环境(yarn export:docker)才能完成构建。
- 使用仓库自带的自动部署工作流需要注册 Netlify 账号,并创建个人访问令牌与站点 ID 配置到 GitHub Secrets。
- 自动部署到 Netlify 需要生成 Netlify 个人访问令牌(API 密钥)并配置为仓库密钥,属于外部服务凭据要求。
- 同步上游模板更新时若发生冲突,可能需要执行破坏性的 git reset --hard 重置,会丢失本地数据,需提前用 yarn backup 备份。
- 演示图片、字体、图标及其他第三方素材需按各自许可核对,不能仅凭代码的 MIT 许可判断。
- 域名、托管、数据库、支付或 AI 等外部服务可能另外收费。
查看原文依据
Permission is hereby granted, free of charge
许可证原文
You will need to have [yarn MacOS install using Homebrew](https://formulae.brew.sh/formula/yarn) installed in your machine to get started.
README 原文
Not all static hosting CI's support running a local server. So the build process needs to be dockerised.
README 原文
Create an account with Netlify.
README 原文
Goto Netlify _User Settings -> OAuth -> Personal access tokens_ and create a new access token and copy the value.
README 原文
https://github.com/flexdinesh/keystone-static-blog/blob/main/LICENSEhttps://github.com/flexdinesh/keystone-static-blog/blob/main/README.mdAlternately you can run this destructive `git reset --hard upstream/main` to reset everything from the fork without having to worry about merging conflicts but you'll lose your data so remember to take a backup if needed.
README 原文
DeepSeek 根据仓库许可证和 README 整理 ·2026-10-03。结果仅覆盖已读取资料,依赖、图片、字体及后续条款变更以各自原文为准。
项目核对记录与介绍依据
模板资料
- 来源平台
- GitHub
- 资料与维护参考分
- 资料较完整 · 77 / 100
- 技术栈
- Next.js · React
- 网站类型
- 博客 · 启动器
这个分数如何计算
本站按许可资料(最高30分)、演示链接(12分)、预览图(10分)、Star数(15分)、记录的维护时间(15分)、描述完整度(8分)、功能记录(5分)和分类资料(5分)计算。它不是代码、安全或性能测试,也不是 Google 评分;有链接不代表已实测可用。
这个项目需要核对什么
- 记录的仓库更新时间
- 2022-10-09
- 截图检查日期
- 2026-10-03
已收录演示链接。请用你的内容与屏幕尺寸检查;有演示不代表表单、认证或支付已经可用。
目录记录的主要技术栈是 Next.js。请通过依赖清单和锁文件核对实际版本与托管要求。这些说明基于收录资料,不代表代码审计或部署实测。
查看具体选型方法 →介绍的制作与核对状态
介绍由 AI 辅助整理目录与仓库资料。仓库作者不等于这篇介绍的审核者。
已完成服务器许可规则与 AI 来源核对;未经过人工编辑审核。
查看当时使用的来源资料
SHA-256: 9e77276889ecbaef590c9403c520a208ae918952be836cb0c1f34de7b762c6b3
2026-10-03T00:13:05.126Z
来源文件 / 仓库# Static Blogs with Keystone
<p align="center">
<img src="blog-sleek/public/images/meta-image.png" alt="Static Blogs with Keystone" width="75%"/>
</p>
This is a starter template to build statically generated blog-like websites with [Keystone](https://keystonejs.com/) and [Next.js](https://nextjs.org/). The template is built with and styled using [Tailwind's configuration based theme](https://tailwindcss.com/docs/theme) which makes it easy to extend and customise it.
> Check it out here — [Static Blogs with Keystone](https://staticblogswithkeystone.netlify.app).
## Getting started
The project is a monorepo with Keystone server in `keystone-server` workspace and the next frontend in `blog-sleek` (any `blog-{theme}`) workspace.
You will need to have [yarn MacOS install using Homebrew](https://formulae.brew.sh/formula/yarn) installed in your machine to get started.
1. `yarn` at project root installs the dependencies for the server and all theme templates.
2. `yarn dev` at project root starts the Keystone server at http://localhost:3000 and the sleek template at http://localhost:8000
_Recommended approach is to open two terminal tabs and run yarn dev individually within `keystone-server` and `blog-sleek` (any `blog-{theme}`) directories_.
## How does it work?
The short version is that the blog is entirely generated during build-time using Next.js static site generation and the content for the blog is made available during build-time using Keystone's powerful content server along with the magic of zero configuration file-system based SQLite database.
- The blog is generated statically using [Next.js static HTML export](https://nextjs.org/docs/advanced-features/static-html-export).
- The content for the blog is fetched from a [local Keystone server](https://keystonejs.com). Keystone is a fantastic content server that auto-magically generates GraphQL API based on schema definitions.
- Usually content servers need to be connected to a database and hosted somewhere which often comes with hosting, configuration and maintenance cost. [Keystone supports SQLite database](https://keystonejs.com/docs/apis/config#sqlite) and we make use of that to avoid having to configure, host or maintain anything. **You can get started with zero configuration and commit your database along with your code like any other file.** 🤯 This is what makes this whole _generate blogs locally without having to host a server anywhere_ possible.
- Author your content visually in your local environment using [Keystone's powerful document editor](https://keystonejs.com/docs/guides/document-field-demo) and admin dashboard. Once your content is ready, just run a local build and your blog will be exported as a static website. Now you can easily host this static website anywhere. I created [my blog](https://dineshpandiyan.com) using this template and hosted it in [Netlify](https://www.netlify.com/). Every time I make a change to my content, all I gotta do is push my changes to the repo and Netlify automatically deploys it in less than a minute.
- The generated blog and content is styled using [Tailwind](https://tailwindcss.com/) and could be easily customised easily.
## How is this different from mdx based blogs?
The idea is same - you statically generate your blog using content made available during build-time. The difference however, is that, MDX authored content is passed through a plugin system during the build and the content is made available in your pages to be built. This is easy as long as you only need the default out-of-the-box markdown syntax content. The moment you want to customise your content with fancier components (Eg. carousel, YouTube video, Twitter embed, syntax highlighted code, Hero image, etc) you will either have to find a plugin that supports that or build them yourself which sometimes can get quite cumbersome.
This is where [Keystone's all powerful document field](https://keystonejs.com/docs/guides/document-field-demo#document-fields-demo) comes into play. You can author content using a visual editor and see how your content is going to look while authoring it. And most importantly Keystone's document field makes it easy to add custom components (Eg. carousel, YouTube video, Twitter embed, syntax highlighted code, Hero image, etc). All you need to know to add a custom component is to know how to code in React and voila. 🥳 This template is setup with a few custom components (hero image, custom blockquote, embed tweet, embed youtube videos, callouts and syntax highlighted code blocks). You can see them in action here — [Keystone Content Authoring Experience is Just Fantastic!](https://staticblogswithkeystone.netlify.app/blog/keystone-content-authoring).
Keystone's document editor stands out in a handful of ways over MDX based content —
- Ability to visually see your content while authoring it.
- Keystone's admin dashboard makes it easy to publish/unpublish content, go through all your content visually for editing, author SEO information along with your post, etc.
- Complete control over how you render and style your content. Default out-of-the-box elements and your custom elements can be styled however you want.
- Multi-column layouts for your content.
- And more. Keystone's document editor is friggin' fantastic.
### Authoring content
Open your keystone admin dashboard locally at http://localhost:3000 and start authoring content.
- If you want to create a new blog post, you can create one in **Posts**.
- If you want to link to an external blog post or a link you can create one in **Links**.
### Generating blog
Once your content is ready, keep the keystone server running and open the Next.js app at http://localhost:8000.
- Generate your blog by running `yarn export`. This will export your website in `blog-sleek/out` directory.
- You can check out your generated content locally by running `yarn serve` in `blog-sleek` dir.
### Deploying
The generated website is just a bunch of html, js and css files. You can host it where ever you want. You can choose one of these three methods to deploy.
**1. Build in local and push the built files to your repo**
You can run `yarn export` in your local environment and it will export the static website to `blog-sleek/out` dir. You can just commit these static files and ask your CI to deploy these files. _Eg. If you're using Netlify, you'll tell Netlify that just publish the files in `blog-sleek/out` dir on every new commit to the repo. Check netlify.toml file for more info on how to do it._
**2. Build in CI**
You can choose to automate your deploy process by building your website in a CI. There's a limitation with this though. During build, the content is fetched from a running local keystone server. Not all static hosting CI's support running a local server. So the build process needs to be dockerised. You will need to run `yarn export:docker` to build your website in a docker environment. But remember not all CIs support docker either. So if your CI supports docker, you can just run `yarn export:docker` in your CI and the site will be exported at `blog-sleek/out` dir. If your CI doesn't support docker (_like Netlify where this template is hosted_) you could use GitHub Actions to build your website in GitHub's CI and publish it to your hosting using their CLI. Eg. This template is hosted in Netlify, so there's a GitHub action at [.github/workflows/build-and-release.yml](.github/workflows/build-and-release.yml) that builds the website on every push to main and deploys to Netlify using Netlify's CLI.
## Where do I deploy?
The generated website is just a bunch of html, js and css files. You can host it where ever you want. Here are a few options that will automatically deploy the website as soon as you push the generated files to your repo.
- [Netlify](https://www.netlify.com/)
- [Vercel](https://vercel.com/)
- [Cloudflare Pages](https://pages.cloudflare.com/)
- [Fastly](https://docs.fastly.com/en/fundamentals/1-introduction)
- [AWS S3](https://aws.amazon.com/s3/)
## Easy deploy to Netlify using GitHub Actions (FREE)
The repo is setup with GitHub actions to auto deploy your blog to Netlify after each commit.
1. Create an account with Netlify.
2. Goto Netlify _User Settings -> OAuth -> Personal access tokens_ and create a new access token and copy the value.
3. Goto your GitHub repo _Settings -> Secrets -> Actions_ and add a new Repository Secret with name _NETLIFY\_AUTH\_TOKEN_ and paste the value your copied from step 2.
4. Go back to Netlify dashboard and create a new site (manual deploy site should be enough since we use GitHub Actions to deploy). After creating the site, open Site Settings and copy _Site ID_.
5. Go back to GitHub repo _Settings -> Secrets -> Actions_ and add a new Repository Secret with name _NETLIFY\_SITE\_ID_ and paste the value your copied from step 4.
You're all done now. Every time you commit a change to your repo GitHub actions will automatically deploy to your Netlify site. By default the action `.github/workflows/build-and-release.yml` will deploy `blog-sleek` but you can change it to whatever theme you want by editing the file. You can delete the other `.github/workflows/build-and-release-{theme}.yml` files because they are there only for demo purposes of the template repo.
## Reset your repo to get latest template changes
Run these commands from your forked repo.
1. Add template repo as a new remote `git remote add upstream [email protected]:flexdinesh/keystone-static-blog.git`
2. Fetch changes `git fetch upstream`
3. Merge changes to your main `git merge upstream/main`.
I'm constantly improving the content model of this template in a backward compatible way. But sometimes I have to make a change in a breaking way. So if you run into conflicts in `keystone-server` dir during merge, I'm sorry about that and you can need to backup your data and reset your `keystone-server`dir. Alternately you can run this destructive `git reset --hard upstream/main` to reset everything from the fork without having to worry about merging conflicts but you'll lose your data so remember to take a backup if needed. The command to backup your data is `yarn backup` in `keystone-server` dir.
## License
MIT © Dinesh Pandiyan
看看同类模板
对比同技术栈与用途的模板,找到更适合的视觉与内容结构。
ai-website-cloner-template
Clone any website with one command using AI coding agents
Next.js · 启动器

Next.js SaaS Starter
Next.js SaaS Starter 是 Next.js 官方维护的 SaaS 起点模板,定位介于学习资源和可直接部署的脚手架之间。
Next.js · SaaS

Next.js Commerce
Next.js Commerce 是 Vercel 团队维护的电商启动模板,基于 Next.js App Router 构建,采用服务端渲染、React Server Components、Server Actions …
Next.js · 电商

Next-js-Boilerplate
Next-js-Boilerplate 是一个面向 Next.js 16、Tailwind CSS 4 和 TypeScript 的启动器,核心定位是开发者体验优先。
Next.js · 启动器

tailwind-nextjs-starter-blog
tailwind-nextjs-starter-blog 是一个面向个人技术博客的 Next.js 与 Tailwind CSS 启动模板,其 v2 版本基于 App Router 与 React Server Comp…
Next.js · 博客

next-forge
Production-grade Turborepo template for Next.js apps.
Next.js · 启动器