使用 MDX 作为文章格式,正文中可混写 Markdown 与 JSX
Next.jsReact博客启动器
nextjs-mdx-blog-starter — Next.js 博客模板
作者 iamericdev
一个基于 Next.js 的博客启动模板,使用 MDX 编写文章内容,包含文章目录、布局组件与全局样式,可部署到 Vercel。
看看你的网站会是什么样
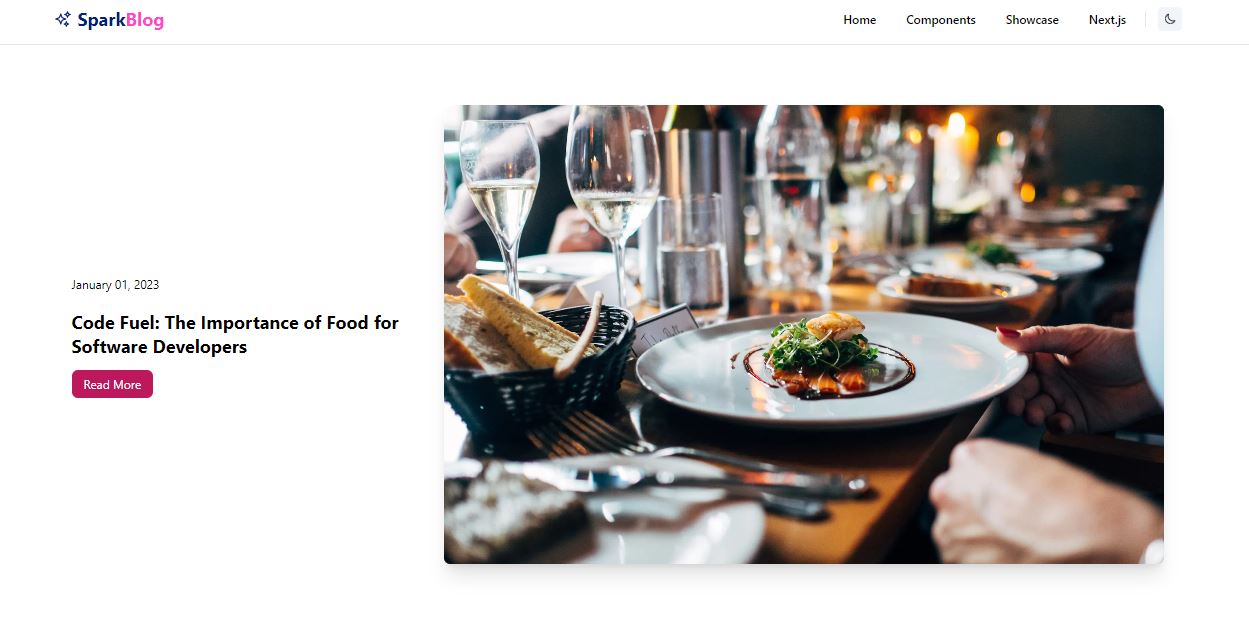
浏览真实页面截图,比较内容排版与手机效果。点击下方缩略图切换,放大查看整页细节。
目前有 1 张原始预览,可打开完整图片查看设计细节。
截图用于了解视觉与布局,交互效果请以实际项目为准。
采集于 2026-10-03查看来源
值得关注的模板亮点
从已有项目资料中,快速了解它的特点。
文章存放于 /posts 目录,文件名直接作为文章 URL
front matter 支持 title、tags、date、excerpt、image 等元数据
页面与组件分离:页面在 /pages,组件在 /components,主布局在 /components/layout
全局样式集中在 /components/styles/global.css,便于统一调整外观
采用 MIT 许可,可免费使用、修改、商用和分发该版本代码
模板详细介绍
该模板用于快速搭建一个以 MDX 为内容格式的 Next.js 博客。文章放在 /posts 目录下,以 .mdx 为扩展名,文件名即文章 URL;每篇文章通过 front matter 设置标题、作者、日期、标签、摘要和封面图等元数据,正文可同时使用 Markdown 与 JSX,因此能在文章中引入 React 组件。
模板的页面代码位于 /pages,组件位于 /components,主布局在 /components/layout,全局样式在 /components/styles/global.css,可通过修改这些文件调整外观。README 给出的部署方式为 Vercel,连接 GitHub 仓库后可自动构建与部署,也支持绑定自定义域名。
仓库采用 MIT 许可,可免费使用、修改、商用和分发该版本代码,分发时需保留版权声明与许可声明。演示图片、字体、图标等第三方素材需单独核对其许可;域名、托管等外部服务可能另外收费。模板资料未说明测试、可访问性、SEO 或内容规模方面的具体能力,使用前建议自行核对依赖与代码现状。
Next.js博客启动器
适合你的项目吗?
适用场景
- 搭建个人技术博客或写作站点
- 作为学习 Next.js 与 MDX 结合方式的参考项目
- 在已有 React 组件基础上撰写带交互内容的文章
- 将博客部署到 Vercel 并绑定自定义域名
适合人群
- 希望用 Markdown/MDX 管理文章内容的开发者
- 熟悉 React 与 Next.js、想快速起步博客项目的人
- 需要可自由修改和商用代码的个人或团队
- 计划使用 Vercel 部署静态或服务端渲染博客的用户
上手与定制指南
结合仓库当前版本的说明,按下面的资料检查内容、配置与运行要求。
- 1
克隆仓库后执行 npm install 或 yarn 安装依赖
- 2
运行 npm run dev 或 yarn dev 启动开发服务器,默认地址为 http://localhost:3000
- 3
在 /posts 目录新建 .mdx 文件撰写文章,文件名将作为文章 URL
- 4
通过 front matter 填写 title、tags、date、excerpt、image 等元数据
- 5
部署可连接 Vercel 与 GitHub 仓库实现自动构建,并可按需配置自定义域名
授权与来源资料
使用条件与限制
免费使用 · 保留许可声明本次收录的是公开仓库中采用 MIT 许可的免费版本;免费范围为该版本代码,不代表外部服务或第三方素材免费。
使用时需要遵守
- 允许免费使用、修改、商用和分发该版本代码。
- 分发代码副本或实质性部分时,保留原作者版权声明和完整 MIT 许可声明。
- 代码按现状提供;担保与责任限制以原许可证及适用法律为准。
额外费用与待核对事项
- 部署依赖 Vercel 等外部托管服务,需自行注册账号;此类外部服务可能产生费用,与 MIT 代码许可无关。
- 使用 Vercel 自动部署需拥有 Vercel 账号并连接 GitHub 仓库,属于外部服务账号要求。
- 演示图片、字体、图标及其他第三方素材需按各自许可核对,不能仅凭代码的 MIT 许可判断。
- 域名、托管、数据库、支付或 AI 等外部服务可能另外收费。
查看原文依据
Permission is hereby granted, free of charge
许可证原文
To deploy your blog, you can use a service like [Vercel](https://vercel.com). Vercel makes it easy to deploy Next.js apps with automatic builds and deployments.
README 原文
https://github.com/iamericdev/nextjs-mdx-blog-starter/blob/main/LICENSE.txthttps://github.com/iamericdev/nextjs-mdx-blog-starter/blob/main/README.mdOnce you have an account, you can connect your GitHub repository and set up automatic deployments.
README 原文
DeepSeek 根据仓库许可证和 README 整理 ·2026-10-03。结果仅覆盖已读取资料,依赖、图片、字体及后续条款变更以各自原文为准。
项目核对记录与介绍依据
模板资料
- 来源平台
- GitHub
- 资料与维护参考分
- 资料较完整 · 77 / 100
- 技术栈
- Next.js · React
- 网站类型
- 博客 · 启动器
这个分数如何计算
本站按许可资料(最高30分)、演示链接(12分)、预览图(10分)、Star数(15分)、记录的维护时间(15分)、描述完整度(8分)、功能记录(5分)和分类资料(5分)计算。它不是代码、安全或性能测试,也不是 Google 评分;有链接不代表已实测可用。
这个项目需要核对什么
- 记录的仓库更新时间
- 2023-01-01
- 截图检查日期
- 2026-10-03
已收录演示链接。请用你的内容与屏幕尺寸检查;有演示不代表表单、认证或支付已经可用。
目录记录的主要技术栈是 Next.js。请通过依赖清单和锁文件核对实际版本与托管要求。这些说明基于收录资料,不代表代码审计或部署实测。
查看具体选型方法 →介绍的制作与核对状态
介绍由 AI 辅助整理目录与仓库资料。仓库作者不等于这篇介绍的审核者。
审核声明: [email protected] · 2026-10-04
查看当时使用的来源资料
SHA-256: 7288c591997bae9b71356ca18e7d20e1721bfabea9204c1947347a762a51fa9b
2026-10-03T17:01:06.416Z
来源文件 / 仓库<div id="top"></div> [![MIT License][license-shield]][license-url] [![LinkedIn][linkedin-shield]][linkedin-url] ## Welcome to Your Next.js + MDX Blog Starter! This starter template is designed to get you up and running with a Next.js-powered blog that uses MDX for content. You can use this as a starting point for your own blog or as a reference for how to use Next.js and MDX together. ![Product Preview][product-preview-light] ![Product Preview][product-preview-dark] ### Getting Started To get started, clone the repository and install the dependencies: ```sh git clone https://github.com/eric-ricky/nextjs-mdx-blog-starter.git cd nextjs-mdx-blog-starter npm install or yarn ``` Once the dependencies are installed, you can start the development server by running: ```sh npm run dev or yarn dev ``` This will start the development server at http://localhost:3000. You can view and edit the source code in the /pages and /components directories. ### Writing Blog Posts Blog posts go in the **/posts** directory. To create a new blog post, create a new file in this directory using the **.mdx** file extension. The file name will be used as the URL for the blog post, so choose a descriptive and meaningful name. In the front matter of the blog post, you can set various metadata such as the title, author, and date: ``` --- title: My First Blog Post tags: - nextjs - reactjs date: 2022-12-30 excerpt: Some excerpt image: '/image-location' --- ``` After the front matter, you can write the body of the blog post using MDX syntax. MDX is a format that allows you to write both Markdown and JSX in the same file, so you can include React components in your blog posts. ### Customizing the Template You can customize the look and feel of the blog by editing the components in the **/components** directory. The main layout of the blog is in /components/layout, and the styles are in /components/styles/global.css. You can also add your own React components and use them in your blog posts. ### Deploying Your Blog To deploy your blog, you can use a service like [Vercel](https://vercel.com). Vercel makes it easy to deploy Next.js apps with automatic builds and deployments. Once you have an account, you can connect your GitHub repository and set up automatic deployments. You can also set up a custom domain if you have one. That's it! You now have a Next.js + MDX blog up and running. Happy blogging! [Demo](https://sparkblog.vercel.app/) <!-- ================== contact ================= --> ## Contact Website - [website](https://erick-otieno-portfolio.vercel.app/) Linked In - [Eric Otieno](https://linkedin.com/in/erick-otieno-7532b01b9) <p align="right">(<a href="#top">back to top</a>)</p> <!-- MARKDOWN LINKS & IMAGES --> [license-shield]: https://img.shields.io/github/license/othneildrew/Best-README-Template.svg?style=for-the-badge [license-url]: LICENSE.txt [linkedin-shield]: https://img.shields.io/badge/-LinkedIn-black.svg?style=for-the-badge&logo=linkedin&colorB=555 [linkedin-url]: https://linkedin.com/in/erick-otieno-7532b01b9 [product-preview-dark]: preview-dark.jpeg [product-preview-light]: preview-light.jpeg
看看同类模板
对比同技术栈与用途的模板,找到更适合的视觉与内容结构。
ai-website-cloner-template
Clone any website with one command using AI coding agents
Next.js · 启动器

Next.js SaaS Starter
Next.js SaaS Starter 是 Next.js 官方维护的 SaaS 起点模板,定位介于学习资源和可直接部署的脚手架之间。
Next.js · SaaS

Next.js Commerce
Next.js Commerce 是 Vercel 团队维护的电商启动模板,基于 Next.js App Router 构建,采用服务端渲染、React Server Components、Server Actions …
Next.js · 电商

Next-js-Boilerplate
Next-js-Boilerplate 是一个面向 Next.js 16、Tailwind CSS 4 和 TypeScript 的启动器,核心定位是开发者体验优先。
Next.js · 启动器

tailwind-nextjs-starter-blog
tailwind-nextjs-starter-blog 是一个面向个人技术博客的 Next.js 与 Tailwind CSS 启动模板,其 v2 版本基于 App Router 与 React Server Comp…
Next.js · 博客

next-forge
Production-grade Turborepo template for Next.js apps.
Next.js · 启动器