集成 NextAuth 认证,提供注册、登录、登出及客户端/服务端受保护路由示例
Next.jsReact启动器
neon-oss-starter — Next.js 启动器模板
作者 iamspruce
NEON OSS Next.js Starter Kit 是一个全栈应用模板,集成 NextAuth 认证、Prisma 与 NEON 无服务器 PostgreSQL,提供客户端与服务端受保护路由示例。
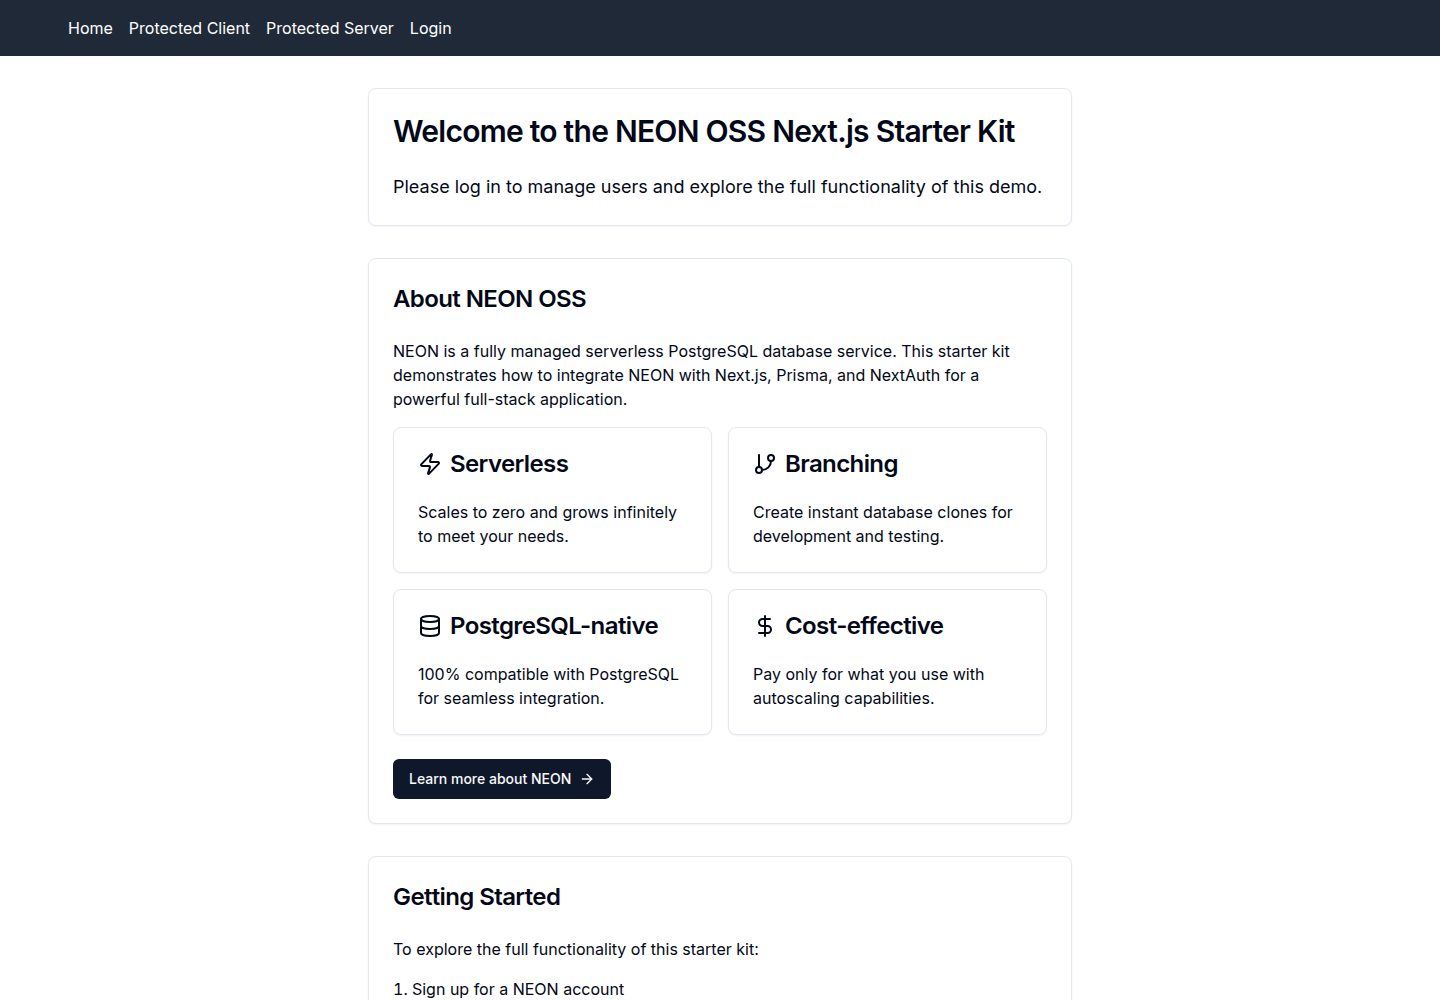
看看你的网站会是什么样
浏览真实页面截图,比较内容排版与手机效果。点击下方缩略图切换,放大查看整页细节。
全部页面与视图 2
截图用于了解视觉与布局,交互效果请以实际项目为准。
采集于 2026-10-04查看来源
值得关注的模板亮点
从已有项目资料中,快速了解它的特点。
通过 Prisma 连接 NEON 无服务器 PostgreSQL,包含 User、Account、Session 等基础模型
使用 shadcn/ui 与 Tailwind CSS 构建可复用 UI 组件,支持深色模式与响应式布局
提供 .env.local 环境变量配置方式,以及 Vercel、Netlify、Heroku 一键部署入口
README 包含从零手动搭建的完整步骤,涵盖 Prisma 初始化、认证配置与页面创建
模板详细介绍
该模板基于 Next.js 构建,面向需要快速搭建带用户认证与数据库交互的全栈应用。它内置 NextAuth 认证方案,包含注册、登录、登出以及客户端和服务端两种受保护路由的实现示例;通过 Prisma 与 NEON 无服务器 PostgreSQL 连接,提供用户、账户、会话等基础数据模型。UI 层使用 shadcn/ui 与 Tailwind CSS 组件,并支持深色模式与响应式布局。
使用前需要准备 Node.js 18+ 环境与 NEON 账户,将 .env.example 复制为 .env.local 并填入 NEON 连接串等变量,再执行 Prisma 迁移。模板提供 Vercel、Netlify、Heroku 的一键部署入口,也包含从零手动搭建的步骤说明。
需要注意:代码采用 MIT 许可,可免费使用、修改、商用和分发,但演示图片、字体、图标等第三方素材需单独核对许可;域名、托管、数据库等外部服务可能产生费用。README 中出现的具体依赖版本号仅为示例,实际安装时应以当前可用版本为准。
Next.js启动器
适合你的项目吗?
适用场景
- 需要快速启动一个带用户认证与数据库读写能力的 Next.js 全栈项目
- 希望参考客户端与服务端两种受保护路由的实现方式
- 使用 NEON 无服务器 PostgreSQL 并希望通过 Prisma 管理数据模型
- 需要一套基于 shadcn/ui 与 Tailwind CSS 的响应式界面基础
适合人群
- 熟悉 Next.js 与 TypeScript,准备搭建全栈应用的开发者
- 需要认证与数据库集成起点、不想从零配置的项目
- 使用 NEON 作为 PostgreSQL 提供方并接受 Prisma 作为 ORM 的团队
- 希望以 MIT 许可代码为基础进行修改和分发的个人或组织
上手与定制指南
结合仓库当前版本的说明,按下面的资料检查内容、配置与运行要求。
- 1
需要 Node.js 18+ 与 npm,并注册 NEON 账户获取数据库连接串
- 2
复制 .env.example 为 .env.local,填入 NEON 连接串及其他必需变量
- 3
执行 npx prisma migrate dev 应用数据库迁移,再运行 npm run dev 启动开发服务器
- 4
默认访问 http://localhost:3000 查看应用
- 5
第三方素材与外部服务(域名、托管、数据库等)需单独核对许可与费用
授权与来源资料
使用条件与限制
免费使用 · 保留许可声明本次收录的是公开仓库中采用 MIT 许可的免费版本;免费范围为该版本代码,不代表外部服务或第三方素材免费。
使用时需要遵守
- 允许免费使用、修改、商用和分发该版本代码。
- 分发代码副本或实质性部分时,保留原作者版权声明和完整 MIT 许可声明。
- 代码按现状提供;担保与责任限制以原许可证及适用法律为准。
额外费用与待核对事项
- 使用该模板需注册 NEON 账户并获取数据库连接串,NEON 为外部托管服务,可能产生费用。
- 必须配置 NEON 数据库连接串等环境变量,否则无法运行。
- 启用 GitHub 登录需自行申请并配置 GITHUB_ID 与 GITHUB_SECRET。
- 启用 Google 登录需自行申请并配置 GOOGLE_ID 与 GOOGLE_SECRET。
- 部署推荐使用 Vercel 等外部托管平台,可能产生相应服务费用。
- 演示图片、字体、图标及其他第三方素材需按各自许可核对,不能仅凭代码的 MIT 许可判断。
- 域名、托管、数据库、支付或 AI 等外部服务可能另外收费。
查看原文依据
Permission is hereby granted, free of charge
许可证原文
A NEON account (sign up at https://neon.tech if you don't have one)
README 原文
Update the `.env.local` file with your NEON database URL and other required values.
README 原文
GithubProvider({ clientId: process.env.GITHUB_ID, clientSecret: process.env.GITHUB_SECRET, }),
README 原文
GoogleProvider({ clientId: process.env.GOOGLE_ID, clientSecret: process.env.GOOGLE_SECRET, }),
README 原文
https://github.com/iamspruce/neon-oss-starter/blob/main/LICENSEhttps://github.com/iamspruce/neon-oss-starter/blob/main/README.mdThis starter kit is optimized for deployment on Vercel
README 原文
DeepSeek 根据仓库许可证和 README 整理 ·2026-10-04。结果仅覆盖已读取资料,依赖、图片、字体及后续条款变更以各自原文为准。
项目核对记录与介绍依据
模板资料
- 来源平台
- GitHub
- 资料与维护参考分
- 资料一般 · 72 / 100
- 技术栈
- Next.js · React
- 网站类型
- 启动器
这个分数如何计算
本站按许可资料(最高30分)、演示链接(12分)、预览图(10分)、Star数(15分)、记录的维护时间(15分)、描述完整度(8分)、功能记录(5分)和分类资料(5分)计算。它不是代码、安全或性能测试,也不是 Google 评分;有链接不代表已实测可用。
这个项目需要核对什么
- 记录的仓库更新时间
- 2024-08-30
- 截图检查日期
- 2026-10-04
已收录演示链接。请用你的内容与屏幕尺寸检查;有演示不代表表单、认证或支付已经可用。
目录记录的主要技术栈是 Next.js。请通过依赖清单和锁文件核对实际版本与托管要求。这些说明基于收录资料,不代表代码审计或部署实测。
查看具体选型方法 →介绍的制作与核对状态
介绍由 AI 辅助整理目录与仓库资料。仓库作者不等于这篇介绍的审核者。
审核声明: [email protected] · 2026-10-04
查看当时使用的来源资料
SHA-256: 3976dc0a4734e258172fc4197623512a8249d14b6823f7321eb41ec068d7df9f
2026-10-04T00:20:36.940Z
来源文件 / 仓库# NEON OSS Next.js Starter Kit
## Overview
The NEON OSS Starter Kit is a full-stack application template designed to help developers kickstart their projects with modern technologies. It features built-in user authentication, database management, and a fully responsive design, all powered by NEON, Next.js, Prisma, and Tailwind CSS. This starter kit is ideal for building scalable, serverless applications with ease, enabling you to focus on adding your unique features without worrying about the initial setup.
## Tech Stack
- **[Next.js 14](https://nextjs.org/)**: React framework for building web applications
- **[NEON](https://neon.tech/)**: Serverless PostgreSQL database
- **[Prisma](https://www.prisma.io/?via=spruce)**: Next-generation ORM for Node.js and TypeScript
- **[NextAuth v5](https://next-auth.js.org/)**: Authentication for Next.js
- **[shadcn/ui](https://ui.shadcn.com/)**: Re-usable components built with Radix UI and Tailwind CSS
- **[Tailwind CSS](https://tailwindcss.com/)**: Utility-first CSS framework
## Features
- **User Authentication**: Includes sign-up, login, and logout functionality with protected routes for both client-side and server-side authentication, leveraging NextAuth.js.
- **Database Management**: Integrated with Prisma for seamless interaction with the NEON PostgreSQL database, allowing for easy CRUD operations.
- **Responsive Design**: Optimized for all devices with built-in dark mode support, ensuring a consistent user experience across platforms.
- **Serverless Architecture**: Powered by NEON, the app scales automatically with zero configuration, providing a hassle-free environment for developers.
- **Reusable UI Components**: Pre-built with shadcn/ui and Tailwind CSS for rapid UI development and consistency across your application.
- **Environment Configuration**: Simplified setup with a `.env.local` file to manage all your environment variables securely.
## Getting Started
### Prerequisites
- Node.js 18+ and npm
- A NEON account (sign up at https://neon.tech if you don't have one)
### Quick Start
1. **Clone the repository:**
```bash
git clone https://github.com/iamspruce/neon-oss-starter.git
cd neon-oss-starter
```
2. **Install dependencies:**
```bash
npm install
# or
yarn install
```
3. **Configure your environment:**
- Copy `.env.example` to `.env.local`:
```bash
cp .env.example .env.local
```
- Update the `.env.local` file with your NEON database URL and other required values. You can find your NEON connection string in the NEON dashboard under your project settings.
4. **Run Prisma migrations:**
```bash
npx prisma migrate dev
```
5. **Start the development server:**
```bash
npm run dev
# or
yarn dev
```
6. **Access the app:**
Open [http://localhost:3000](http://localhost:3000) in your browser to see the application in action.
## One-Click Deploy
Choose your preferred deployment platform:
- **Vercel**: [](https://vercel.com/import/project?template=https://github.com/iamspruce/neon-oss-starter)
- **Netlify**: [](https://app.netlify.com/start/deploy?repository=https://github.com/iamspruce/neon-oss-starter)
- **Heroku**: [](https://heroku.com/deploy?template=https://github.com/iamspruce/neon-oss-starter)
## Do It Yourself
This section provides a step-by-step guide to setting up the NEON OSS Starter from scratch. Follow these steps to install dependencies, set up the database, configure authentication, and more.
1. **Install Next.js:**
First, install a new Next.js project by running the following command:
```bash
npx create-next-app@latest
```
When prompted, select "Yes" to use TypeScript, "Yes" to use TailwindCSS, and choose your preferred options for the other prompts.
2. **Create your NEON database:**
- Sign up for a NEON account at [https://neon.tech](https://neon.tech)
- Create a new project in the NEON console
- Once created, navigate to the "Connection Details" section
- Copy the connection string provided
3. **Set up your environment variables:**
- In your project root, create a `.env` file
- Add your NEON database URL:
```plaintext
DATABASE_URL="your-neon-connection-string"
```
4. **Install Prisma:**
```shellscript
npm install prisma --save-dev
```
5. **Initialize Prisma:**
```shellscript
npx prisma init
```
6. **Install NextAuth v5 and Prisma adapter:**
```shellscript
npm install [email protected] @auth/[email protected] @prisma/[email protected]
```
7. **Set up Prisma client:**
Create a file `src/lib/prisma.ts`:
```typescript
import { PrismaClient } from "@prisma/client";
const globalForPrisma = globalThis as unknown as { prisma: PrismaClient };
export const prisma = globalForPrisma.prisma || new PrismaClient();
if (process.env.NODE_ENV !== "production") globalForPrisma.prisma = prisma;
```
8. **Set up authentication:**
Create a file `src/auth/index.ts`:
```typescript
import NextAuth, { User, NextAuthConfig } from "next-auth";
import CredentialsProvider from "next-auth/providers/credentials";
import GithubProvider from "next-auth/providers/github";
import GoogleProvider from "next-auth/providers/google";
import { PrismaAdapter } from "@auth/prisma-adapter";
import { prisma } from "../lib/prisma";
const authOptions: NextAuthConfig = {
session: {
strategy: "jwt",
},
adapter: PrismaAdapter(prisma),
providers: [
CredentialsProvider({
name: "Email and Password",
credentials: {
email: {
label: "Email",
type: "email",
placeholder: "[email protected]",
},
password: { label: "Password", type: "password" },
},
async authorize(credentials): Promise<User | null> {
if (
!credentials ||
typeof credentials.email !== "string" ||
typeof credentials.password !== "string"
) {
throw new Error("Invalid credentials.");
}
let user = await prisma.user.findUnique({
where: {
email: credentials.email,
},
});
if (!user) {
user = await prisma.user.create({
data: {
email: credentials.email,
},
});
}
return user;
},
}),
GithubProvider({
clientId: process.env.GITHUB_ID,
clientSecret: process.env.GITHUB_SECRET,
}),
GoogleProvider({
clientId: process.env.GOOGLE_ID,
clientSecret: process.env.GOOGLE_SECRET,
}),
],
secret: process.env.AUTH_SECRET,
};
export const { auth, handlers, signIn, signOut } = NextAuth(authOptions);
```
9. **Add a route handler for NextAuth:**
Create a file `app/api/auth/[...nextauth]/route.ts`:
```typescript
import { handlers } from "@/auth";
export const { GET, POST } = handlers;
```
10. **Create your Prisma schema:**
Update `prisma/schema.prisma`:
```plaintext
generator client {
provider = "prisma-client-js"
}
datasource db {
provider = "postgresql"
url = env("DATABASE_URL")
}
model User {
id String @id @default(cuid())
name String?
email String @unique
emailVerified DateTime?
image String?
accounts Account[]
sessions Session[]
createdAt DateTime @default(now())
updatedAt DateTime @updatedAt
}
model Account {
userId String
type String
provider String
providerAccountId String
refresh_token String?
access_token String?
expires_at Int?
token_type String?
scope String?
id_token String?
session_state String?
createdAt DateTime @default(now())
updatedAt DateTime @updatedAt
user User @relation(fields: [userId], references: [id], onDelete: Cascade)
@@id([provider, providerAccountId])
}
model Session {
sessionToken String @unique
userId String
expires DateTime
user User @relation(fields: [userId], references: [id], onDelete: Cascade)
createdAt DateTime @default(now())
updatedAt DateTime @updatedAt
}
model VerificationToken {
identifier String
token String
expires DateTime
@@id([identifier, token])
}
```
11. **Generate Prisma client:**
```shellscript
npx prisma generate
```
12. **Apply the schema (create migration):**
```shellscript
npx prisma migrate dev
```
13. **Wrap components with SessionProvider:**
Update `src/app/layout.tsx`:
```typescriptreact
import type { Metadata } from "next";
import { Inter as FontSans } from "next/font/google";
import "../styles/globals.css";
import { Toaster } from "@/components/ui/toaster";
import { auth } from "@/auth";
import { SessionProvider } from "next-auth/react";
import { cn } from "@/lib/utils";
import Header from "@/components/Header";
const fontSans = FontSans({
subsets: ["latin"],
variable: "--font-sans",
});
export const metadata: Metadata = {
title: "NEON OSS NEXTJS",
description: "NEON OSS NEXTJS STARTER TEMPLATE",
};
export default async function RootLayout({
children,
}: Readonly<{
children: React.ReactNode;
}>) {
const session = await auth();
return (
<SessionProvider session={session}>
<html lang="en">
<body
className={cn(
"min-h-screen bg-background font-sans antialiased",
fontSans.variable
)}
>
<Header />
<main className="container">{children}</main>
<Toaster />
</body>
</html>
</SessionProvider>
);
}
```
14. **Create protected client page:**
Create `src/app/protected-client/page.tsx`:
```typescriptreact
"use client";
import { useSession } from "next-auth/react";
import { useRouter } from "next/navigation";
import { useEffect } from "react";
export default function ProtectedClientPage() {
const { data: session, status } = useSession();
const router = useRouter();
useEffect(() => {
if (status === "unauthenticated") {
router.push("/api/auth/signin");
}
}, [status, router]);
if (status === "loading") {
return <div>Loading...</div>;
}
if (!session) {
return null;
}
return (
<div>
<h1 className="text-2xl font-bold mb-4">Protected Client Page</h1>
<p>You can only see this page if you are logged in.</p>
</div>
);
}
```
15. **Create protected server page:**
Create `src/app/protected-server/page.tsx`:
```typescriptreact
import { auth } from "@/auth";
import { redirect } from "next/navigation";
export default async function ProtectedServerPage() {
const session = await auth();
if (!session) {
redirect("/api/auth/signin");
}
return (
<div>
<h1 className="text-2xl font-bold mb-4">Protected Server Page</h1>
<p>You can only see this page if you are logged in.</p>
<p>This page is protected on the server side.</p>
</div>
);
}
```
16. **Create Header component:**
Create `src/components/Header.tsx`:
```typescriptreact
import { auth } from "@/auth";
import Link from "next/link";
export default async function Header() {
const session = await auth();
return (
<header className="bg-gray-800 text-white ">
<div className="container">
<nav className="p-4">
<ul className="flex space-x-4">
<li>
<Link href="/">Home</Link>
</li>
<li>
<Link href="/protected-client">Protected Client</Link>
</li>
<li>
<Link href="/protected-server">Protected Server</Link>
</li>
{session ? (
<li>
<Link href="/api/auth/signout">Logout</Link>
</li>
) : (
<li>
<Link href="/api/auth/signin">Login</Link>
</li>
)}
</ul>
</nav>
</div>
</header>
);
}
```
17. **Install and set up shadcn/ui:**
```shellscript
npx shadcn-ui@latest init
```
Follow the prompts to set up shadcn/ui. This will update your `tailwind.config.js` and add necessary configurations.
After initialization, you can add components as needed:
```shellscript
npx shadcn-ui@latest add button
npx shadcn-ui@latest add card
npx shadcn-ui@latest add input
# Add more components as needed
```
18. **Update your pages and components to use shadcn/ui components.**
19. **Start the development server:**
```shellscript
npm run dev
```
Your NEON OSS Next.js starter should now be up and running with authentication, protected routes, and a basic UI using shadcn/ui components.
## Deployment
This starter kit is optimized for deployment on Vercel, leveraging its seamless integration with Next.js and NEON's serverless PostgreSQL. However, you can deploy to other platforms that support Node.js applications.
### Deploying to Vercel (Recommended)
1. **Connect your repository:**
- Fork this repository to your GitHub account.
- Sign up or log in to [Vercel](https://vercel.com).
- Click "New Project" and select your forked repository.
2. **Configure your project:**
- Vercel will automatically detect that you're using Next.js.
- In the "Environment Variables" section, add all variables from your `.env.local` file:
- `DATABASE_URL`: Your NEON database connection string
- `AUTH_SECRET`: A secure random string for NextAuth
- `GITHUB_ID` and `GITHUB_SECRET`: If using GitHub authentication
- `GOOGLE_ID` and `GOOGLE_SECRET`: If using Google authentication
3. **Deploy:**
- Click "Deploy" and wait for the build to complete.
- Vercel will provide you with a deployment URL.
4. **Set up NEON for production:**
- In your NEON dashboard, create a new branch for production.
- Update the `DATABASE_URL` in your Vercel project settings with the new production branch URL.
5. **Enjoy your deployed application:**
- Visit your Vercel deployment URL to see your live application.
- Your app now benefits from Vercel's global CDN and NEON's serverless database scaling.
### Alternative Deployment Options
While Vercel offers the smoothest experience, you can deploy to other platforms:
- **Railway**: Offers easy PostgreSQL setup and deployment.
1. Create a new project on Railway.
2. Add a PostgreSQL database to your project.
3. Connect your GitHub repository.
4. Set up environment variables in the Railway dashboard.
5. Deploy your application.
- **Heroku**: Supports Node.js applications and offers a PostgreSQL add-on.
1. Create a new app on Heroku.
2. Connect your GitHub repository.
3. Add the Heroku Postgres add-on.
4. Set up config vars in the Heroku dashboard.
5. Deploy your application using the Heroku CLI or GitHub integration.
Remember to update your `DATABASE_URL` and other environment variables according to your chosen hosting provider's guidelines.
## Screenshots


## Live Demo
Check out the live demo at: [https://neon-oss-starter.vercel.app](https://neon-oss-starter.vercel.app)
## Contributing
We welcome contributions from the community! Whether it's fixing a bug, adding new features, or improving documentation, your input is valuable. Please follow these steps to contribute:
1. Fork the repository
2. Create a new branch (`git checkout -b feature/your-feature`)
3. Make your changes and commit them (`git commit -m 'Add some feature'`)
4. Push to the branch (`git push origin feature/your-feature`)
5. Open a Pull Request
We review all contributions and appreciate your efforts to improve this project!
## License
This project is licensed under the MIT License. See the [LICENSE](LICENSE) file for more details.
## Acknowledgements
- [NEON](https://neon.tech/) for providing a top-notch serverless PostgreSQL solution.
- [Vercel](https://vercel.com/) for the Next.js framework and seamless deployment experience.
- [Prisma](https://www.prisma.io/?via=spruce) for making database management a breeze.
- [NextAuth.js](https://next-auth.js.org/) for simplifying authentication in Next.js.
- [shadcn/ui](https://ui.shadcn.com/) for the elegant and reusable UI components.
- All the open-source projects and contributors who made this starter kit possible.
看看同类模板
对比同技术栈与用途的模板,找到更适合的视觉与内容结构。
ai-website-cloner-template
Clone any website with one command using AI coding agents
Next.js · 启动器

Next.js SaaS Starter
Next.js SaaS Starter 是 Next.js 官方维护的 SaaS 起点模板,定位介于学习资源和可直接部署的脚手架之间。
Next.js · SaaS

Next.js Commerce
Next.js Commerce 是 Vercel 团队维护的电商启动模板,基于 Next.js App Router 构建,采用服务端渲染、React Server Components、Server Actions …
Next.js · 电商

Next-js-Boilerplate
Next-js-Boilerplate 是一个面向 Next.js 16、Tailwind CSS 4 和 TypeScript 的启动器,核心定位是开发者体验优先。
Next.js · 启动器

tailwind-nextjs-starter-blog
tailwind-nextjs-starter-blog 是一个面向个人技术博客的 Next.js 与 Tailwind CSS 启动模板,其 v2 版本基于 App Router 与 React Server Comp…
Next.js · 博客

next-forge
Production-grade Turborepo template for Next.js apps.
Next.js · 启动器