React 与 Tailwind CSS 构建,页面模块通过 siteConfig.js 中的开关启用或禁用
React启动器
wedding-invite — React 启动器模板
作者 kbichave
基于 React 与 Tailwind CSS 的婚礼邀请网站模板,通过 Google Sheets 与 Google Drive 存储祝福和照片,支持 RSVP、活动展示与多文化婚礼配置。
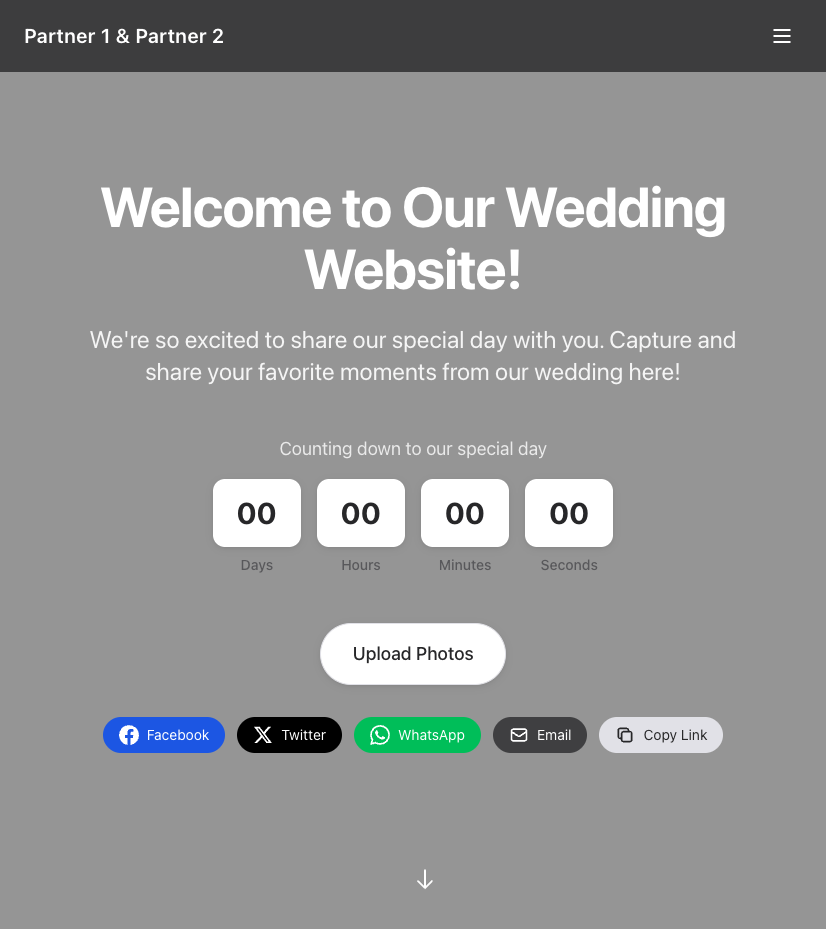
看看你的网站会是什么样
浏览真实页面截图,比较内容排版与手机效果。点击下方缩略图切换,放大查看整页细节。
目前有 1 张原始预览,可打开完整图片查看设计细节。
截图用于了解视觉与布局,交互效果请以实际项目为准。
采集于 2026-10-02查看来源
值得关注的模板亮点
从已有项目资料中,快速了解它的特点。
祝福留言写入 Google Sheets,宾客上传照片存入 Google Drive 并在画廊中展示
提供 RSVP、活动列表、婚礼团队、礼物登记、旅行住宿、FAQ 与时间线等页面
预置 Hindu 与 Christian 婚礼的活动与术语配置,并支持自定义婚礼类型
提供 env.example.txt 与逐步的 Google Cloud、Sheets、Drive 配置说明
模板详细介绍
这是一个用 React 和 Tailwind CSS 构建的婚礼邀请网站模板,采用 ISC 许可发布,可自行部署。模板将祝福留言存入 Google Sheets,将宾客上传的照片存入 Google Drive,并提供 RSVP、活动展示、照片画廊、婚礼团队、礼物登记、旅行住宿、FAQ 和关系时间线等页面模块。所有功能模块在 src/siteConfig.js 中通过开关控制,默认全部启用。模板预置了 Hindu 和 Christian 两种婚礼类型的活动与术语配置,也支持自定义婚礼类型。内容与图片路径集中在 siteConfig.js 中修改,样式基于 Tailwind CSS 调整。使用前需要自行准备 Google Cloud 服务账号并配置 Drive 与 Sheets API,部署可选用 Netlify。模板本身不包含后端服务,数据存储依赖上述 Google 服务,第三方素材的许可需单独核对。
React启动器
适合你的项目吗?
适用场景
- 希望自行托管婚礼邀请网站并收集宾客 RSVP 与祝福留言的准新人
- 需要宾客上传婚礼现场照片并集中展示在画廊中的场景
- 想以 Hindu 或 Christian 婚礼流程为起点快速搭建活动页面的用户
- 需要按模块开关裁剪页面、只保留部分功能的定制需求
适合人群
- 具备基本 React 与 npm 使用经验、能按文档配置环境变量的开发者
- 接受使用 Google Sheets 与 Google Drive 作为数据存储的部署方式
- 需要免费、可自行部署的婚礼邀请网站模板的个人项目
上手与定制指南
结合仓库当前版本的说明,按下面的资料检查内容、配置与运行要求。
- 1
需要 Node.js 环境,克隆仓库后执行 npm install,并通过 npm start 在本地启动开发服务器
- 2
需在 Google Cloud Console 创建项目、启用 Drive 与 Sheets API,并创建服务账号与 JSON 密钥
- 3
将 Google Drive 文件夹和 Google Sheets 表格共享给服务账号邮箱并授予编辑权限
- 4
复制 env.example.txt 为 .env,填入 GOOGLE_SERVICE_ACCOUNT_JSON、GOOGLE_DRIVE_FOLDER_ID、GOOGLE_SPREADSHEET_ID 等变量,且不要提交 .env
- 5
部署到 Netlify 时需在站点设置中添加相同的环境变量,构建命令为 npm run build,发布目录为 build
授权与来源资料
使用条件与限制
免费使用 · 保留许可声明本次收录的是公开仓库中采用 ISC 许可的免费版本;免费范围为该版本代码,不代表外部服务或第三方素材免费。
使用时需要遵守
- 允许为任何目的免费使用、复制、修改和分发,包括商用。
- 所有副本均需保留原版权声明和许可声明。
- 代码按现状提供;担保与责任限制以原许可证及适用法律为准。
额外费用与待核对事项
- 使用该模板需拥有 Google 账号,用于 Google Drive 与 Google Sheets 存储数据。
- 部署托管需要 Netlify 账号,模板本身不提供后端托管服务。
- 需在 Google Cloud Console 创建项目并启用 Google Drive API 与 Google Sheets API,否则照片上传与祝福留言功能无法使用。
- 必须创建 Google Cloud 服务账号并生成 JSON 密钥,用于访问 Drive 与 Sheets。
- 需将 Google Drive 文件夹与 Google Sheets 表格共享给服务账号邮箱并授予编辑权限,否则读写会失败。
- 必须在 .env 中配置 GOOGLE_SERVICE_ACCOUNT_JSON 等环境变量,模板依赖这些外部凭据才能运行。
- 照片画廊正常显示要求将 Google Drive 文件夹设为“任何拥有链接的人”可查看,涉及公开分享设置。
- 自定义域名需自行付费(约每年 10-15 美元),非必需但属于额外成本。
- 演示图片、字体、图标及其他第三方素材需按各自许可核对,不能仅凭代码的 ISC 许可判断。
- 域名、托管、数据库、支付或 AI 等外部服务可能另外收费。
查看原文依据
for any purpose with or without fee is hereby granted
许可证原文
A Google account (FREE) - for Drive and Sheets
README 原文
A Netlify account (FREE) - for hosting
README 原文
Enable API access for Drive and Sheets
README 原文
Create Service Account:
README 原文
Share Folders/Sheets with Service Account
README 原文
GOOGLE_SERVICE_ACCOUNT_JSON={"type":"service_account","project_id":"your-project",...}
README 原文
Make sure your Google Drive folder is shared with "Anyone with the link" (Viewer permission) for photos to display properly
README 原文
https://github.com/kbichave/wedding-invite/blob/main/LICENSEhttps://github.com/kbichave/wedding-invite/blob/main/README.mdCustom Domain (optional) - ~$10-15/year (not required)
README 原文
DeepSeek 根据仓库许可证和 README 整理 ·2026-10-02。结果仅覆盖已读取资料,依赖、图片、字体及后续条款变更以各自原文为准。
项目核对记录与介绍依据
模板资料
- 来源平台
- GitHub
- 资料与维护参考分
- 资料一般 · 71 / 100
- 技术栈
- React
- 网站类型
- 启动器
这个分数如何计算
本站按许可资料(最高30分)、演示链接(12分)、预览图(10分)、Star数(15分)、记录的维护时间(15分)、描述完整度(8分)、功能记录(5分)和分类资料(5分)计算。它不是代码、安全或性能测试,也不是 Google 评分;有链接不代表已实测可用。
这个项目需要核对什么
- 记录的仓库更新时间
- 2025-12-12
- 截图检查日期
- 2026-10-02
目前没有记录演示链接。请依据仓库说明在本地评估;仅凭截图无法确认交互行为。
目录记录的主要技术栈是 React。请通过依赖清单和锁文件核对实际版本与托管要求。这些说明基于收录资料,不代表代码审计或部署实测。
查看具体选型方法 →介绍的制作与核对状态
介绍由 AI 辅助整理目录与仓库资料。仓库作者不等于这篇介绍的审核者。
已完成服务器许可规则与 AI 来源核对;未经过人工编辑审核。
查看当时使用的来源资料
SHA-256: 58636cb0d769e8420dfa28d79f6e9d60611e90da0b4eeb20913b419607b4fe9e
2026-10-02T08:53:39.542Z
来源文件 / 仓库# Wedding Invite Website - Free & Open Source Template
A beautiful, fully customizable wedding website template built with React and Tailwind CSS. **100% FREE** - no credit card required! Perfect for couples who want to share their special day with guests through a modern, self-hostable web application.
## ✨ Features
- 🎨 **Beautiful, Modern UI** - Apple-inspired design that looks great on all devices
- 📸 **Photo Upload & Gallery** - Guests can upload photos and view them in the gallery (stored in Google Drive - FREE, automatically displayed)
- 💌 **Blessings & Messages** - Collect heartfelt messages (stored in Google Sheets - FREE)
- 📅 **Event Management & RSVP** - Display multiple events with RSVP functionality
- 📖 **Our Story** - Share your love story with customizable sections
- 👥 **Wedding Party** - Showcase bridesmaids and groomsmen
- 🎁 **Registry** - Link to gift registries and cash funds
- ✈️ **Travel & Accommodation** - Share hotel info and travel details
- ❓ **FAQ** - Answer common questions
- ⏱️ **Timeline** - Show relationship milestones
- 🌍 **Multi-Cultural Support** - Pre-configured for Hindu and Christian weddings
- ⚙️ **Fully Configurable** - Enable/disable features, customize everything
- 🚀 **Free Deployment** - Deploy to Netlify (FREE tier)
## 📸 Screenshots
### Homepage

### Our Story

### Events & RSVP

### Photo Gallery

### Upload Photos

### Blessings

### Wedding Party

### Registry

### Travel & Accommodation

### FAQ

### Timeline

## 🎯 Quick Start
### Prerequisites
- Node.js (v14 or higher) - [Download here](https://nodejs.org/)
- A Google account (FREE) - for Drive and Sheets
- A Netlify account (FREE) - for hosting
**That's it! No credit card needed for any service.**
### Installation
1. **Clone the repository**
```bash
git clone <your-repo-url>
cd wedding-invite
```
2. **Install dependencies**
```bash
npm install
```
3. **Configure your site**
- Edit `src/siteConfig.js` to customize all content
- Copy `env.example.txt` to `.env` and add your secrets (see setup guide below)
4. **Start the development server**
```bash
npm start
```
The app will open at `http://localhost:3000`
## 📋 Feature Toggle Guide
All features are **enabled by default**. To disable any feature, edit `src/siteConfig.js`:
```javascript
features: {
homepage: { enabled: true, label: "Home" },
ourStory: { enabled: true, label: "Our Story" },
events: { enabled: true, label: "Events & RSVP" },
photoGallery: { enabled: true, label: "Photo Gallery" },
uploadPhotos: { enabled: true, label: "Upload Photos" },
blessings: { enabled: true, label: "Blessings" },
weddingParty: { enabled: true, label: "Wedding Party" },
registry: { enabled: true, label: "Registry" },
travel: { enabled: true, label: "Travel & Accommodation" },
faq: { enabled: true, label: "FAQ" },
timeline: { enabled: true, label: "Timeline" },
}
```
**To disable a feature:** Change `enabled: true` to `enabled: false`
## 🎭 Wedding Type Configuration
The template supports multiple wedding traditions. Set your wedding type in `src/siteConfig.js`:
```javascript
weddingType: "hindu", // Options: "hindu", "christian", "custom"
```
### Hindu Wedding
- Pre-configured events: Engagement, Haldi, Mehndi, Sangeet, Baraat, Vidhi, Reception
- Traditional terminology and dress codes
- See `src/examples/hindu-wedding-config.js` for example
### Christian Wedding
- Pre-configured events: Rehearsal Dinner, Ceremony, Cocktail Hour, Reception, After Party
- Church-friendly content
- See `src/examples/christian-wedding-config.js` for example
### Custom Wedding
- Create your own event list
- Fully customizable for any tradition or style
## 🔐 FREE Setup Guide - Step by Step
### Step 1: Google Sheets Setup (FREE)
**Purpose:** Store blessings/messages and RSVP data
1. Go to [Google Sheets](https://sheets.google.com/)
2. Create a new spreadsheet
3. Name it "Wedding Blessings" (or any name you prefer)
4. Add headers in row 1 (optional but recommended):
- Column A: `Name`
- Column B: `Email`
- Column C: `Message`
- Column D: `Timestamp`
5. Copy the Spreadsheet ID from the URL:
```
https://docs.google.com/spreadsheets/d/SPREADSHEET_ID_HERE/edit
```
The part after `/d/` and before `/edit` is your Spreadsheet ID
6. Save this ID - you'll need it later
**Cost:** FREE (unlimited spreadsheets)
### Step 2: Google Drive Setup (FREE)
**Purpose:** Store uploaded photos
1. Go to [Google Drive](https://drive.google.com/)
2. Create a new folder (name it "Wedding Photos" or similar)
3. Open the folder
4. Copy the Folder ID from the URL:
```
https://drive.google.com/drive/folders/FOLDER_ID_HERE
```
The part after `/folders/` is your Folder ID
5. Save this ID - you'll need it later
**Cost:** FREE (15GB free storage - more than enough for wedding photos)
### Step 3: Google Cloud Setup (FREE - No Billing Required)
**Purpose:** Enable API access for Drive and Sheets
1. Go to [Google Cloud Console](https://console.cloud.google.com/)
2. Sign in with your Google account
3. **Create a new project:**
- Click the project dropdown at the top
- Click "New Project"
- Name it "Wedding Website" (or any name)
- Click "Create"
- **Important:** No billing account needed - click "Skip" if asked
4. **Enable APIs:**
- Go to "APIs & Services" > "Library"
- Search for "Google Drive API" and click "Enable"
- Search for "Google Sheets API" and click "Enable"
5. **Create Service Account:**
- Go to "IAM & Admin" > "Service Accounts"
- Click "Create Service Account"
- Name: "wedding-website" (or any name)
- Click "Create and Continue"
- Skip role assignment (click "Continue")
- Click "Done"
6. **Create Key:**
- Click on your newly created service account
- Go to "Keys" tab
- Click "Add Key" > "Create new key"
- Choose "JSON" format
- Click "Create"
- The JSON file will download automatically
7. **Get Service Account Email:**
- In the service account details, copy the email address (looks like `[email protected]`)
- You'll need this to share folders/sheets
**Cost:** FREE (free tier includes more than enough API calls for a wedding website)
### Step 4: Share Folders/Sheets with Service Account
1. **Share Google Drive Folder:**
- Open your Google Drive folder
- Click "Share"
- Paste your service account email
- Give it "Editor" permissions
- Click "Send"
2. **Share Google Sheet:**
- Open your Google Sheet
- Click "Share"
- Paste your service account email
- Give it "Editor" permissions
- Click "Send"
### Step 5: Configure Environment Variables
1. Copy `env.example.txt` to `.env`:
```bash
cp env.example.txt .env
```
2. Open `.env` and fill in your values:
**GOOGLE_SERVICE_ACCOUNT_JSON:**
- Open the JSON file you downloaded from Google Cloud
- Copy the ENTIRE contents (it's one long line)
- Paste it in `.env` after the `=` sign
- Example:
```
GOOGLE_SERVICE_ACCOUNT_JSON={"type":"service_account","project_id":"your-project",...}
```
**GOOGLE_DRIVE_FOLDER_ID:**
- Paste the folder ID you saved from Step 2
- Example:
```
GOOGLE_DRIVE_FOLDER_ID=ABC123XYZ789
```
**GOOGLE_SPREADSHEET_ID:**
- Paste the spreadsheet ID you saved from Step 1
- Example:
```
GOOGLE_SPREADSHEET_ID=XYZ789ABC123
```
**REACT_APP_RSVP_API_URL:**
- Leave empty if not using Google Apps Script
- Or add your Google Apps Script URL if you have one
3. Save the `.env` file
**Important:** Never commit your `.env` file to git! It's already in `.gitignore`.
### Step 6: Test Locally
1. Start the development server:
```bash
npm start
```
2. Test the features:
- Upload a photo (should appear in your Google Drive folder)
- Check Photo Gallery page - uploaded photos should appear there
- Submit a blessing (should appear in your Google Sheet)
- Check RSVP functionality
**Important for Photo Gallery:**
- Uploaded photos will automatically appear in the Photo Gallery
- Make sure your Google Drive folder is shared with "Anyone with the link" (Viewer permission) for photos to display properly
- Or share each uploaded file individually with "Anyone with the link"
- You can disable showing uploaded photos by setting `showUploadedPhotos: false` in `siteConfig.js`
## 🚀 FREE Deployment to Netlify
### Option 1: Deploy via Netlify Dashboard (Easiest)
1. **Push your code to GitHub:**
- Create a GitHub repository
- Push your code (make sure `.env` is NOT committed)
2. **Connect to Netlify:**
- Go to [Netlify](https://www.netlify.com/)
- Sign up/login (FREE)
- Click "Add new site" > "Import an existing project"
- Connect to GitHub
- Select your repository
3. **Configure Build Settings:**
- Build command: `npm run build`
- Publish directory: `build`
- Click "Deploy site"
4. **Add Environment Variables:**
- Go to Site Settings > Environment Variables
- Add each variable from your `.env` file:
- `GOOGLE_SERVICE_ACCOUNT_JSON` (paste the entire JSON)
- `GOOGLE_DRIVE_FOLDER_ID`
- `GOOGLE_SPREADSHEET_ID`
- `REACT_APP_RSVP_API_URL` (if using)
5. **Redeploy:**
- Go to Deploys tab
- Click "Trigger deploy" > "Clear cache and deploy site"
6. **Your site is live!**
- Netlify will give you a URL like `your-site.netlify.app`
- You can add a custom domain (FREE) in Site Settings > Domain Management
**Cost:** FREE (Netlify free tier includes 100GB bandwidth/month - more than enough)
### Option 2: Deploy via Netlify CLI
```bash
# Install Netlify CLI
npm install -g netlify-cli
# Login to Netlify
netlify login
# Deploy
netlify deploy --prod
```
## 📝 Configuration Guide
### Site Content (`src/siteConfig.js`)
All customizable content is in `src/siteConfig.js`. Edit this file to personalize:
- **Couple Information:** Names, display name, photos
- **Wedding Date:** For countdown timer
- **Homepage:** Title, subtitle, call-to-action
- **Our Story:** Partner stories, how we met, proposal, milestones
- **Events:** Event details, dates, venues, maps, dress codes
- **Wedding Party:** Bridesmaids and groomsmen
- **Registry:** Gift registries and cash funds
- **Travel:** Hotels, transportation, local attractions
- **FAQ:** Common questions and answers
- **Timeline:** Relationship milestones
### Example Configurations
See `src/examples/` folder for:
- `hindu-wedding-config.js` - Hindu wedding template
- `christian-wedding-config.js` - Christian wedding template
- `minimal-config.js` - Minimal setup template
## 🎨 Customization
### Adding Your Photos
1. Replace placeholder images in `public/images/`:
- `partner1.svg` → Your photo
- `partner2.svg` → Your photo
- `photo1.svg` through `photo4.svg` → Your memory photos
- `homage_page_background.png` → Your background image
2. Update image paths in `src/siteConfig.js` if using different filenames
### Styling
The project uses Tailwind CSS. Customize styles by:
- Editing component files directly
- Modifying `tailwind.config.js` for theme customization
- Adding custom CSS in `src/index.css`
## 📊 Understanding Your Data
### Google Sheets Structure
Your blessings will be stored with columns:
- **Name:** Guest's name
- **Email:** Guest's email
- **Message:** Their blessing/message
- **Timestamp:** When it was submitted
### Google Drive Structure
Uploaded photos will be stored in your specified folder with:
- Original filename
- Upload timestamp
- Any captions (if enabled)
## 🔧 Troubleshooting
### Google API Errors
- **"Permission denied":** Ensure service account has Editor access to Drive folder and Sheet
- **"Invalid credentials":** Check that `GOOGLE_SERVICE_ACCOUNT_JSON` is valid JSON (one line, no breaks)
- **"Folder not found":** Verify `GOOGLE_DRIVE_FOLDER_ID` is correct (from URL after `/folders/`)
- **"Spreadsheet not found":** Verify `GOOGLE_SPREADSHEET_ID` is correct (from URL after `/d/`)
### Build Errors
- **Module not found:** Run `npm install`
- **Environment variables not loading:**
- Ensure `.env` file exists in root directory
- For Netlify: Add variables in dashboard, not `.env` file
- Variable names must match exactly (case-sensitive)
### Deployment Issues
- **Netlify functions not working:** Check environment variables are set in Netlify dashboard
- **Photos not uploading:** Verify `GOOGLE_DRIVE_FOLDER_ID` and service account permissions
- **Blessings not saving:** Verify `GOOGLE_SPREADSHEET_ID` and service account permissions
## 💰 Cost Breakdown
**Everything is FREE:**
- ✅ Google Account - FREE
- ✅ Google Drive (15GB) - FREE
- ✅ Google Sheets (unlimited) - FREE
- ✅ Google Cloud APIs (free tier) - FREE
- ✅ Netlify Hosting (100GB bandwidth/month) - FREE
- ✅ Custom Domain (optional) - ~$10-15/year (not required)
**Total Cost: $0** (or ~$10-15/year if you want a custom domain)
## 📚 Additional Resources
- [Google Cloud Console](https://console.cloud.google.com/)
- [Google Drive](https://drive.google.com/)
- [Google Sheets](https://sheets.google.com/)
- [Netlify Documentation](https://docs.netlify.com/)
- [React Documentation](https://react.dev/)
- [Tailwind CSS Documentation](https://tailwindcss.com/)
## 🤝 Contributing
Contributions are welcome! Please see [CONTRIBUTING.md](CONTRIBUTING.md) for guidelines on how to contribute.
## 📄 License
ISC License - feel free to use this template for your wedding website!
## 💬 Support
For issues and questions, please open an issue on GitHub.
---
Made with ❤️ for couples celebrating their special day
**Remember:** This entire setup is FREE. No credit card required. No hidden costs. Just follow the steps above and you'll have a beautiful wedding website in no time!
看看同类模板
对比同技术栈与用途的模板,找到更适合的视觉与内容结构。
ant-design-pro
Ant Design Pro 是 Ant Design 官方推出的企业级中后台前端脚手架,基于 React 19、Umi Max 4 和 antd 6 构建,内置 TypeScript 支持。
React · 后台

react-boilerplate
react-boilerplate 是一个为有一定 React 和 Redux 经验的开发者设计的启动器,目标是快速搭建可扩展、离线优先的 Web 应用。
React · 启动器
fastapi-react
fastapi-react 是一个基于 Cookiecutter 的模板,用于快速搭建 FastAPI 与 React(TypeScript)的全栈项目。
React · 后台
shadcn-landing-page
Free Landing page template using Shadcn, React, Typescript and Tailwind
React · 企业官网
start-ui-web
Start UI [web] 是 BearStudio 团队维护的一个有主见的全栈启动器,用于快速搭建 Web 应用。
React · 启动器
React-Landing-Page-Template
A simple react one page landing page templates for startups/companies
React · 企业官网