使用 OpenNext Cloudflare 适配器将 Next.js 应用部署到 Cloudflare Workers
Next.jsReact企业官网启动器
waitlist-cloudflare — Next.js 企业官网模板
作者 Metareignity
基于 Next.js 的候补名单(waitlist)模板,使用 Cloudflare Workers、D1 SQL 与 OpenNext 适配器,在边缘完成注册、推荐码追踪与基于 D1 的 IP 限流。
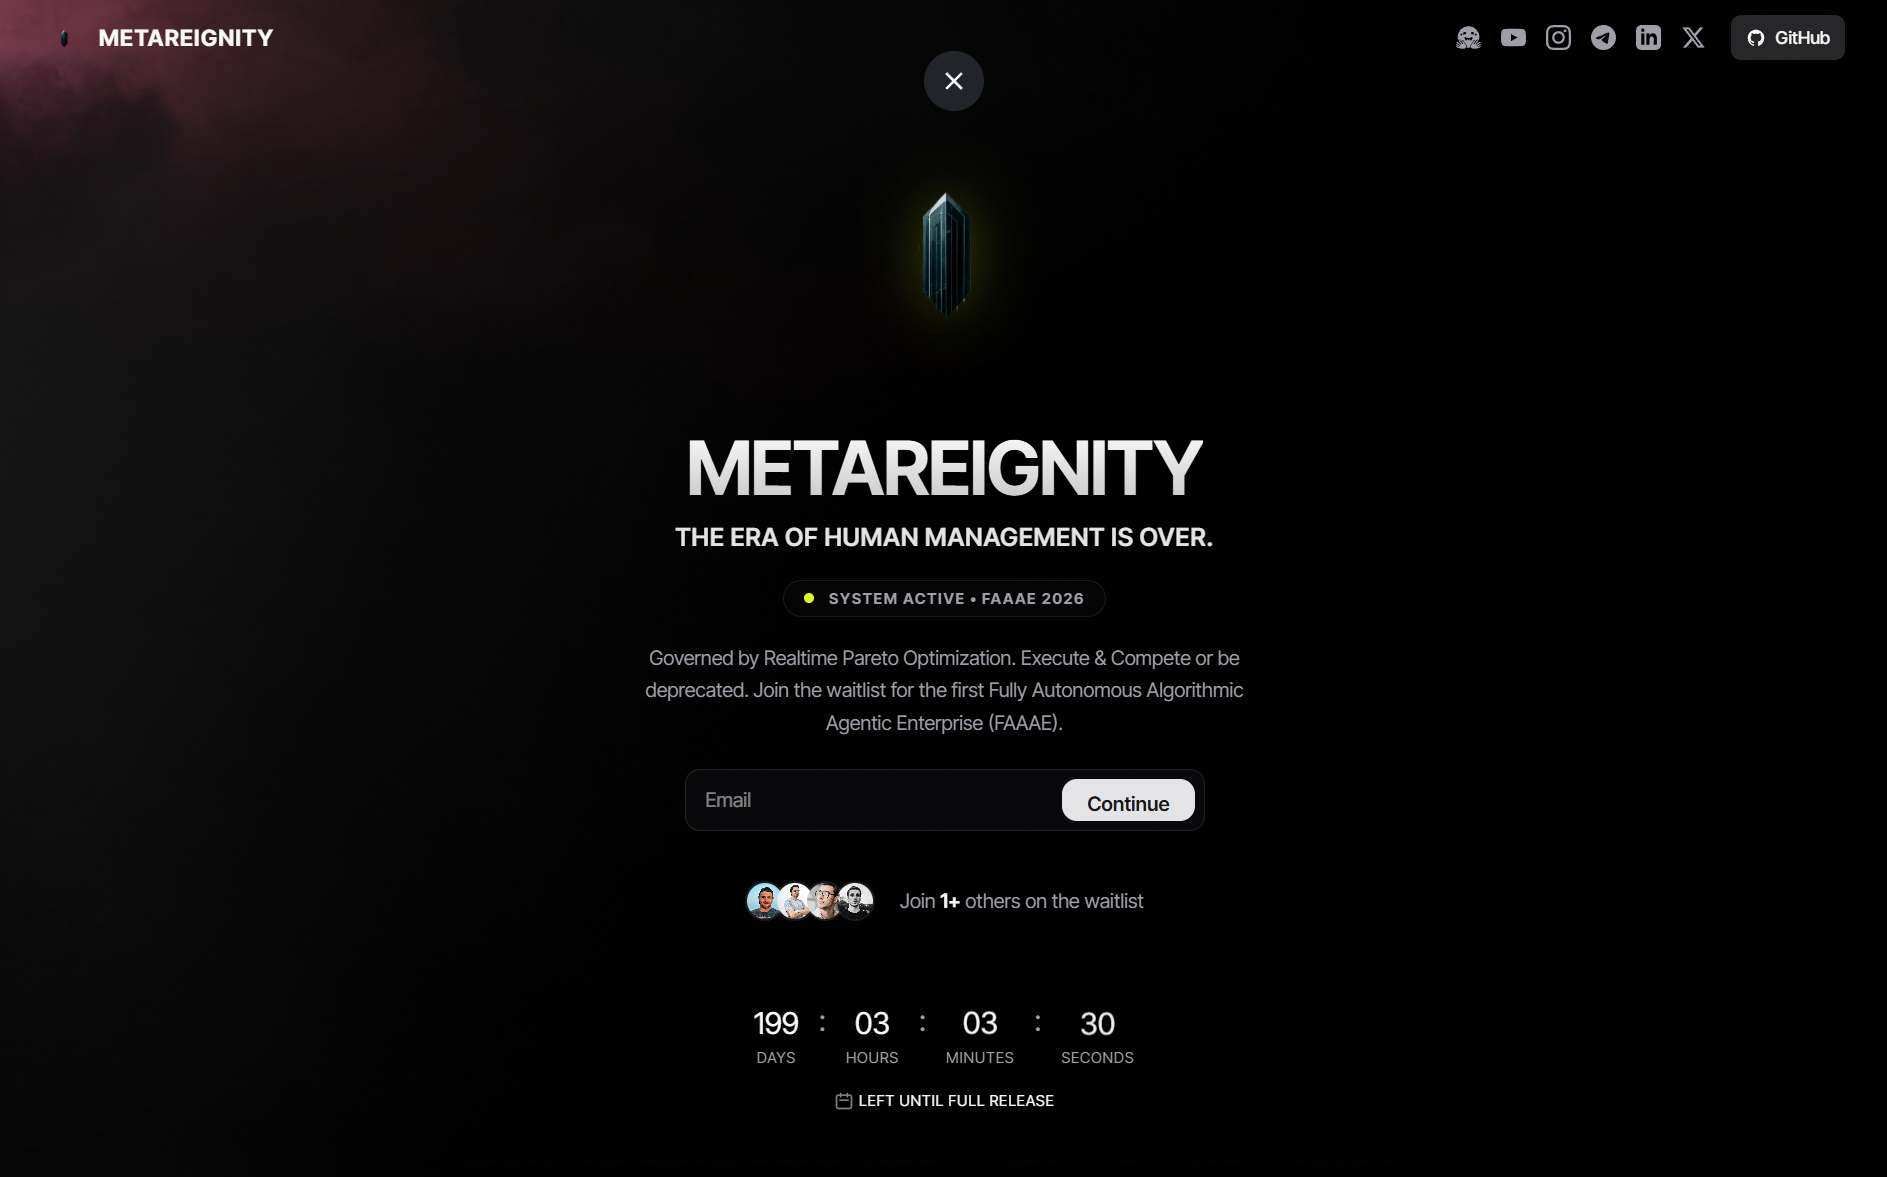
看看你的网站会是什么样
浏览真实页面截图,比较内容排版与手机效果。点击下方缩略图切换,放大查看整页细节。
目前有 1 张原始预览,可打开完整图片查看设计细节。
截图用于了解视觉与布局,交互效果请以实际项目为准。
采集于 2026-10-03查看来源
值得关注的模板亮点
从已有项目资料中,快速了解它的特点。
使用 Cloudflare D1 SQL 数据库存储候补名单记录,仓库包含 schema.sql 与迁移命令
自动为注册者生成推荐码并记录推荐来源节点
在 D1 中实现基于 IP 的限流表,用于减少垃圾提交
README 提供本地开发、线上迁移与部署到 Cloudflare 的 wrangler 命令步骤
包含 llm.txt 文件,为 Cursor、Copilot 等编码工具提供架构与目录上下文
模板详细介绍
waitlist-cloudflare 是一个面向 Cloudflare 边缘部署的候补名单页面模板。它使用 Next.js 与 React 构建前端,通过 OpenNext Cloudflare 适配器部署到 Cloudflare Workers,数据存储使用 Cloudflare D1 SQL 数据库,不依赖外部数据库或 Redis 等服务。
模板内置候补名单注册、自动生成推荐码并记录推荐来源、以及基于 D1 的 IP 限流表,用于减少重复提交。仓库提供 schema.sql 与 wrangler 命令,可在本地和线上初始化数据库结构。README 还给出了多域名部署的两种配置管理方式,以及供 LLM 编码工具读取的 llm.txt 文件。
需要注意:该项目定位为候补名单模板,不是完整的企业官网系统;使用前需自行创建 Cloudflare 账号与 D1 数据库,并配置 wrangler.jsonc 中的绑定与路由。演示图片、字体等第三方素材的授权需单独核对。
Next.jsReact企业官网启动器
适合你的项目吗?
适用场景
- 为新产品或新服务搭建候补名单收集页面,并部署在 Cloudflare 边缘
- 需要记录推荐来源、通过推荐码追踪邀请关系的注册场景
- 希望使用 Cloudflare D1 作为唯一数据存储、避免引入外部数据库或 Redis 的项目
- 在同一代码仓库下通过不同 wrangler 配置维护多个域名的候补名单页面
适合人群
- 已有 Cloudflare 账号并熟悉 wrangler CLI 的开发者
- 使用 Next.js 与 React 构建前端、希望部署到 Cloudflare Workers 的团队
- 需要轻量候补名单页面并接受以 D1 作为数据层的项目
- 希望以 MIT 许可代码为基础进行修改和二次开发的个人或组织
上手与定制指南
结合仓库当前版本的说明,按下面的资料检查内容、配置与运行要求。
- 1
需要 Cloudflare 账号,并通过 npx wrangler login 完成本地认证
- 2
使用 npx wrangler d1 create waitlist-db 创建 D1 数据库,并将生成的 database_id 与名称填入 wrangler.jsonc
- 3
本地开发前执行 npx wrangler d1 execute waitlist-db --file=schema.sql --local 初始化本地 SQLite 结构
- 4
线上部署前执行 npx wrangler d1 execute waitlist-db --file=schema.sql --remote 应用生产数据库结构
- 5
部署使用 pnpm run deploy,README 说明无需在 Cloudflare Dashboard 配置生产环境变量或密钥
授权与来源资料
使用条件与限制
免费使用 · 保留许可声明本次收录的是公开仓库中采用 MIT 许可的免费版本;免费范围为该版本代码,不代表外部服务或第三方素材免费。
使用时需要遵守
- 允许免费使用、修改、商用和分发该版本代码。
- 分发代码副本或实质性部分时,保留原作者版权声明和完整 MIT 许可声明。
- 代码按现状提供;担保与责任限制以原许可证及适用法律为准。
额外费用与待核对事项
- 使用该模板必须拥有 Cloudflare 账号,并依赖 Cloudflare Workers 与 D1 服务;无法在非 Cloudflare 环境独立运行。
- 需自行创建 Cloudflare D1 数据库,并将生成的 database_id 与名称填入 wrangler.jsonc 后才能运行。
- 本地开发前需通过 wrangler CLI 登录 Cloudflare 账号完成认证。
- 线上部署前需对生产 D1 实例执行迁移以创建数据库结构。
- 演示图片、字体、图标及其他第三方素材需按各自许可核对,不能仅凭代码的 MIT 许可判断。
- 域名、托管、数据库、支付或 AI 等外部服务可能另外收费。
查看原文依据
Permission is hereby granted, free of charge
许可证原文
To run this boilerplate, you only need a Cloudflare Account.
README 原文
npx wrangler d1 create waitlist-db
README 原文
npx wrangler login
README 原文
https://github.com/Metareignity/waitlist-cloudflare/blob/main/LICENSEhttps://github.com/Metareignity/waitlist-cloudflare/blob/main/README.mdnpx wrangler d1 execute waitlist-db --file=schema.sql --remote
README 原文
DeepSeek 根据仓库许可证和 README 整理 ·2026-10-03。结果仅覆盖已读取资料,依赖、图片、字体及后续条款变更以各自原文为准。
项目核对记录与介绍依据
模板资料
- 来源平台
- GitHub
- 资料与维护参考分
- 资料较完整 · 92 / 100
- 技术栈
- Next.js · React
- 网站类型
- 企业官网 · 启动器
这个分数如何计算
本站按许可资料(最高30分)、演示链接(12分)、预览图(10分)、Star数(15分)、记录的维护时间(15分)、描述完整度(8分)、功能记录(5分)和分类资料(5分)计算。它不是代码、安全或性能测试,也不是 Google 评分;有链接不代表已实测可用。
这个项目需要核对什么
- 记录的仓库更新时间
- 2026-07-20
- 截图检查日期
- 2026-10-03
已收录演示链接。请用你的内容与屏幕尺寸检查;有演示不代表表单、认证或支付已经可用。
目录记录的主要技术栈是 Next.js。请通过依赖清单和锁文件核对实际版本与托管要求。这些说明基于收录资料,不代表代码审计或部署实测。
查看具体选型方法 →介绍的制作与核对状态
介绍由 AI 辅助整理目录与仓库资料。仓库作者不等于这篇介绍的审核者。
审核声明: [email protected] · 2026-10-04
查看当时使用的来源资料
SHA-256: f9db04b60c6ed95128bd46d9b4dcac76e7b2c6ee3e7263f799f76bc42c046849
2026-10-03T21:03:46.044Z
来源文件 / 仓库# waitlist-cloudflare

`waitlist-cloudflare` is a lightweight, high-performance, and secure Next.js 15 waitlist boilerplate designed for native serverless edge deployment on **Cloudflare Workers** using the **OpenNext Cloudflare adapter**.
The stack is **100% Cloudflare-only** and requires zero external service configurations.
**Live Demo:** [waitlist.metareignity.com](https://waitlist.metareignity.com)
---
## Core Features
- **Next.js 15 & React 19:** Built on Next.js `15.5.18` to guarantee compatibility and prevent handler bundling errors on Cloudflare Workers.
- **Cloudflare D1 Database:** Primary SQL database mapping waitlist records natively at the edge. Includes schema files and quick D1 migration commands.
- **Referral Tracking Swarm:** Auto-generates unique, lightweight referral codes for registrants and tracks referring nodes.
- **Native D1 Rate Limiting:** Implements IP rate limiting natively inside Cloudflare D1 with a `rate_limits` table to prevent spam submissions, requiring no external databases or Redis instances.
---
## Prerequisites & Setup
To run this boilerplate, you only need a Cloudflare Account.
### Cloudflare Account & D1 Database
1. Create a Cloudflare account.
2. Authenticate the wrangler CLI locally:
```bash
npx wrangler login
```
3. Initialize your D1 SQL database:
```bash
npx wrangler d1 create waitlist-db
```
4. Copy the generated `database_id` and name into your `wrangler.jsonc` file.
---
## Local Development Setup
1. **Clone the Repository:**
```bash
git clone https://github.com/Metareignity/waitlist-cloudflare.git
cd waitlist-cloudflare
```
2. **Install Dependencies:**
```bash
pnpm install
```
3. **Configure D1 Local Schema:**
Apply the migration to initialize the SQLite database locally:
```bash
npx wrangler d1 execute waitlist-db --file=schema.sql --local
```
4. **Start Development Server:**
```bash
pnpm dev
```
Open `http://localhost:3000` in your browser. (Note: No local `.env` or `.dev.vars` environment variables are needed!).
---
## Production Deployment
1. **Apply D1 Production Migration:**
Create the database schema on your live Cloudflare D1 instance:
```bash
npx wrangler d1 execute waitlist-db --file=schema.sql --remote
```
2. **Configure wrangler.jsonc Bindings:**
Add D1 binding details and your custom domain target:
```jsonc
"d1_databases": [
{
"binding": "DB",
"database_name": "waitlist-db",
"database_id": "<your-cloudflare-d1-db-uuid>"
}
],
"routes": [
{
"pattern": "waitlist.yourdomain.com",
"custom_domain": true
}
]
```
3. **Deploy live to Cloudflare:**
Compile the Next.js bundle and upload the worker to Cloudflare:
```bash
pnpm run deploy
```
No production environment variables or secret keys are needed in the Cloudflare Dashboard!
---
## LLM Compatibility
This repository includes an [llm.txt](llm.txt) file at the root containing standardized markdown context about the architecture, folder layout, and parameters for LLM-based coding agents (like Cursor, Gemini, Copilot) to ingest.
---
## GitHub Repository Recommendations
To optimize your repository on GitHub, configure the **About** section on the right side of the repository page as follows:
* **Description:** ⚡ 100% Cloudflare-Native Next.js 15 Waitlist Boilerplate. Powered by Cloudflare D1 SQL, edge rate-limiting, referral swarms, and interactive WebGL shaders. Zero external dependencies.
* **Website:** `https://waitlist.metareignity.com`
* **Topics:** `nextjs`, `react`, `cloudflare-workers`, `cloudflare-pages`, `cloudflare-d1`, `sqlite`, `waitlist`, `boilerplate`, `tailwindcss`, `webgl`
---
## Multi-Domain Deployment Strategy
If you want to maintain two separate sites (e.g., `waitlist.metareignity.com` as the waitlist boilerplate, and `metareignity.com` as your primary brand website) using the same code repository but with different configurations (`llm.txt`, custom domains, text copy), here are the two standard ways to manage this systematically:
### Option A: Config-Based Builds (Single Git Branch — Recommended)
Instead of maintaining separate git branches (which leads to merge conflicts over time), you keep all changes in a single branch (`main`) and split domain configurations into distinct files:
1. **Create Environment Configuration Files:**
* Rename `wrangler.jsonc` to `wrangler.waitlist.jsonc` (for waitlist) and create a `wrangler.brand.jsonc` (for `metareignity.com`).
* Create `public/llm.waitlist.txt` and `public/llm.brand.txt`.
2. **Add Custom Deploy Commands to `package.json`:**
Add target deployment scripts that copy the correct configuration before running the OpenNext/Wrangler build:
```json
"scripts": {
"deploy:waitlist": "node scripts/switch-env.js waitlist && opennextjs-cloudflare build && opennextjs-cloudflare deploy",
"deploy:brand": "node scripts/switch-env.js brand && opennextjs-cloudflare build && opennextjs-cloudflare deploy"
}
```
This guarantees that you can deploy either site with a single command from `main`, without managing code drift across Git branches.
### Option B: Branch-Specific Commits (Multi-Branch Git Strategy)
If the two sites are highly divergent in content, use git branch staging:
1. **Branch Layout:**
* `main`: Serves as the boilerplate and deploys to `waitlist.metareignity.com`.
* `brand-site`: Derived from `main` but contains custom configurations and custom landing page text, deploying to `metareignity.com`.
2. **Git Workflow:**
* Make core feature additions, security updates, and bug fixes on `main`.
* When features are complete, merge `main` into `brand-site`:
```bash
git checkout brand-site
git merge main
```
* **Handling Config Drift:** Use a `.gitattributes` merge driver (e.g., setting `wrangler.jsonc merge=ours` and `public/llm.txt merge=ours` inside a `.gitattributes` file) to ensure Git never overwrites the branch-specific configurations during merges.
---
## License
Open-sourced and maintained by [METAREIGNITY](https://metareignity.com). Distributed under the [MIT License](LICENSE).
看看同类模板
对比同技术栈与用途的模板,找到更适合的视觉与内容结构。
ai-website-cloner-template
Clone any website with one command using AI coding agents
Next.js · 启动器

Next.js SaaS Starter
Next.js SaaS Starter 是 Next.js 官方维护的 SaaS 起点模板,定位介于学习资源和可直接部署的脚手架之间。
Next.js · SaaS

Next.js Commerce
Next.js Commerce 是 Vercel 团队维护的电商启动模板,基于 Next.js App Router 构建,采用服务端渲染、React Server Components、Server Actions …
Next.js · 电商

Next-js-Boilerplate
Next-js-Boilerplate 是一个面向 Next.js 16、Tailwind CSS 4 和 TypeScript 的启动器,核心定位是开发者体验优先。
Next.js · 启动器

tailwind-nextjs-starter-blog
tailwind-nextjs-starter-blog 是一个面向个人技术博客的 Next.js 与 Tailwind CSS 启动模板,其 v2 版本基于 App Router 与 React Server Comp…
Next.js · 博客

next-forge
Production-grade Turborepo template for Next.js apps.
Next.js · 启动器