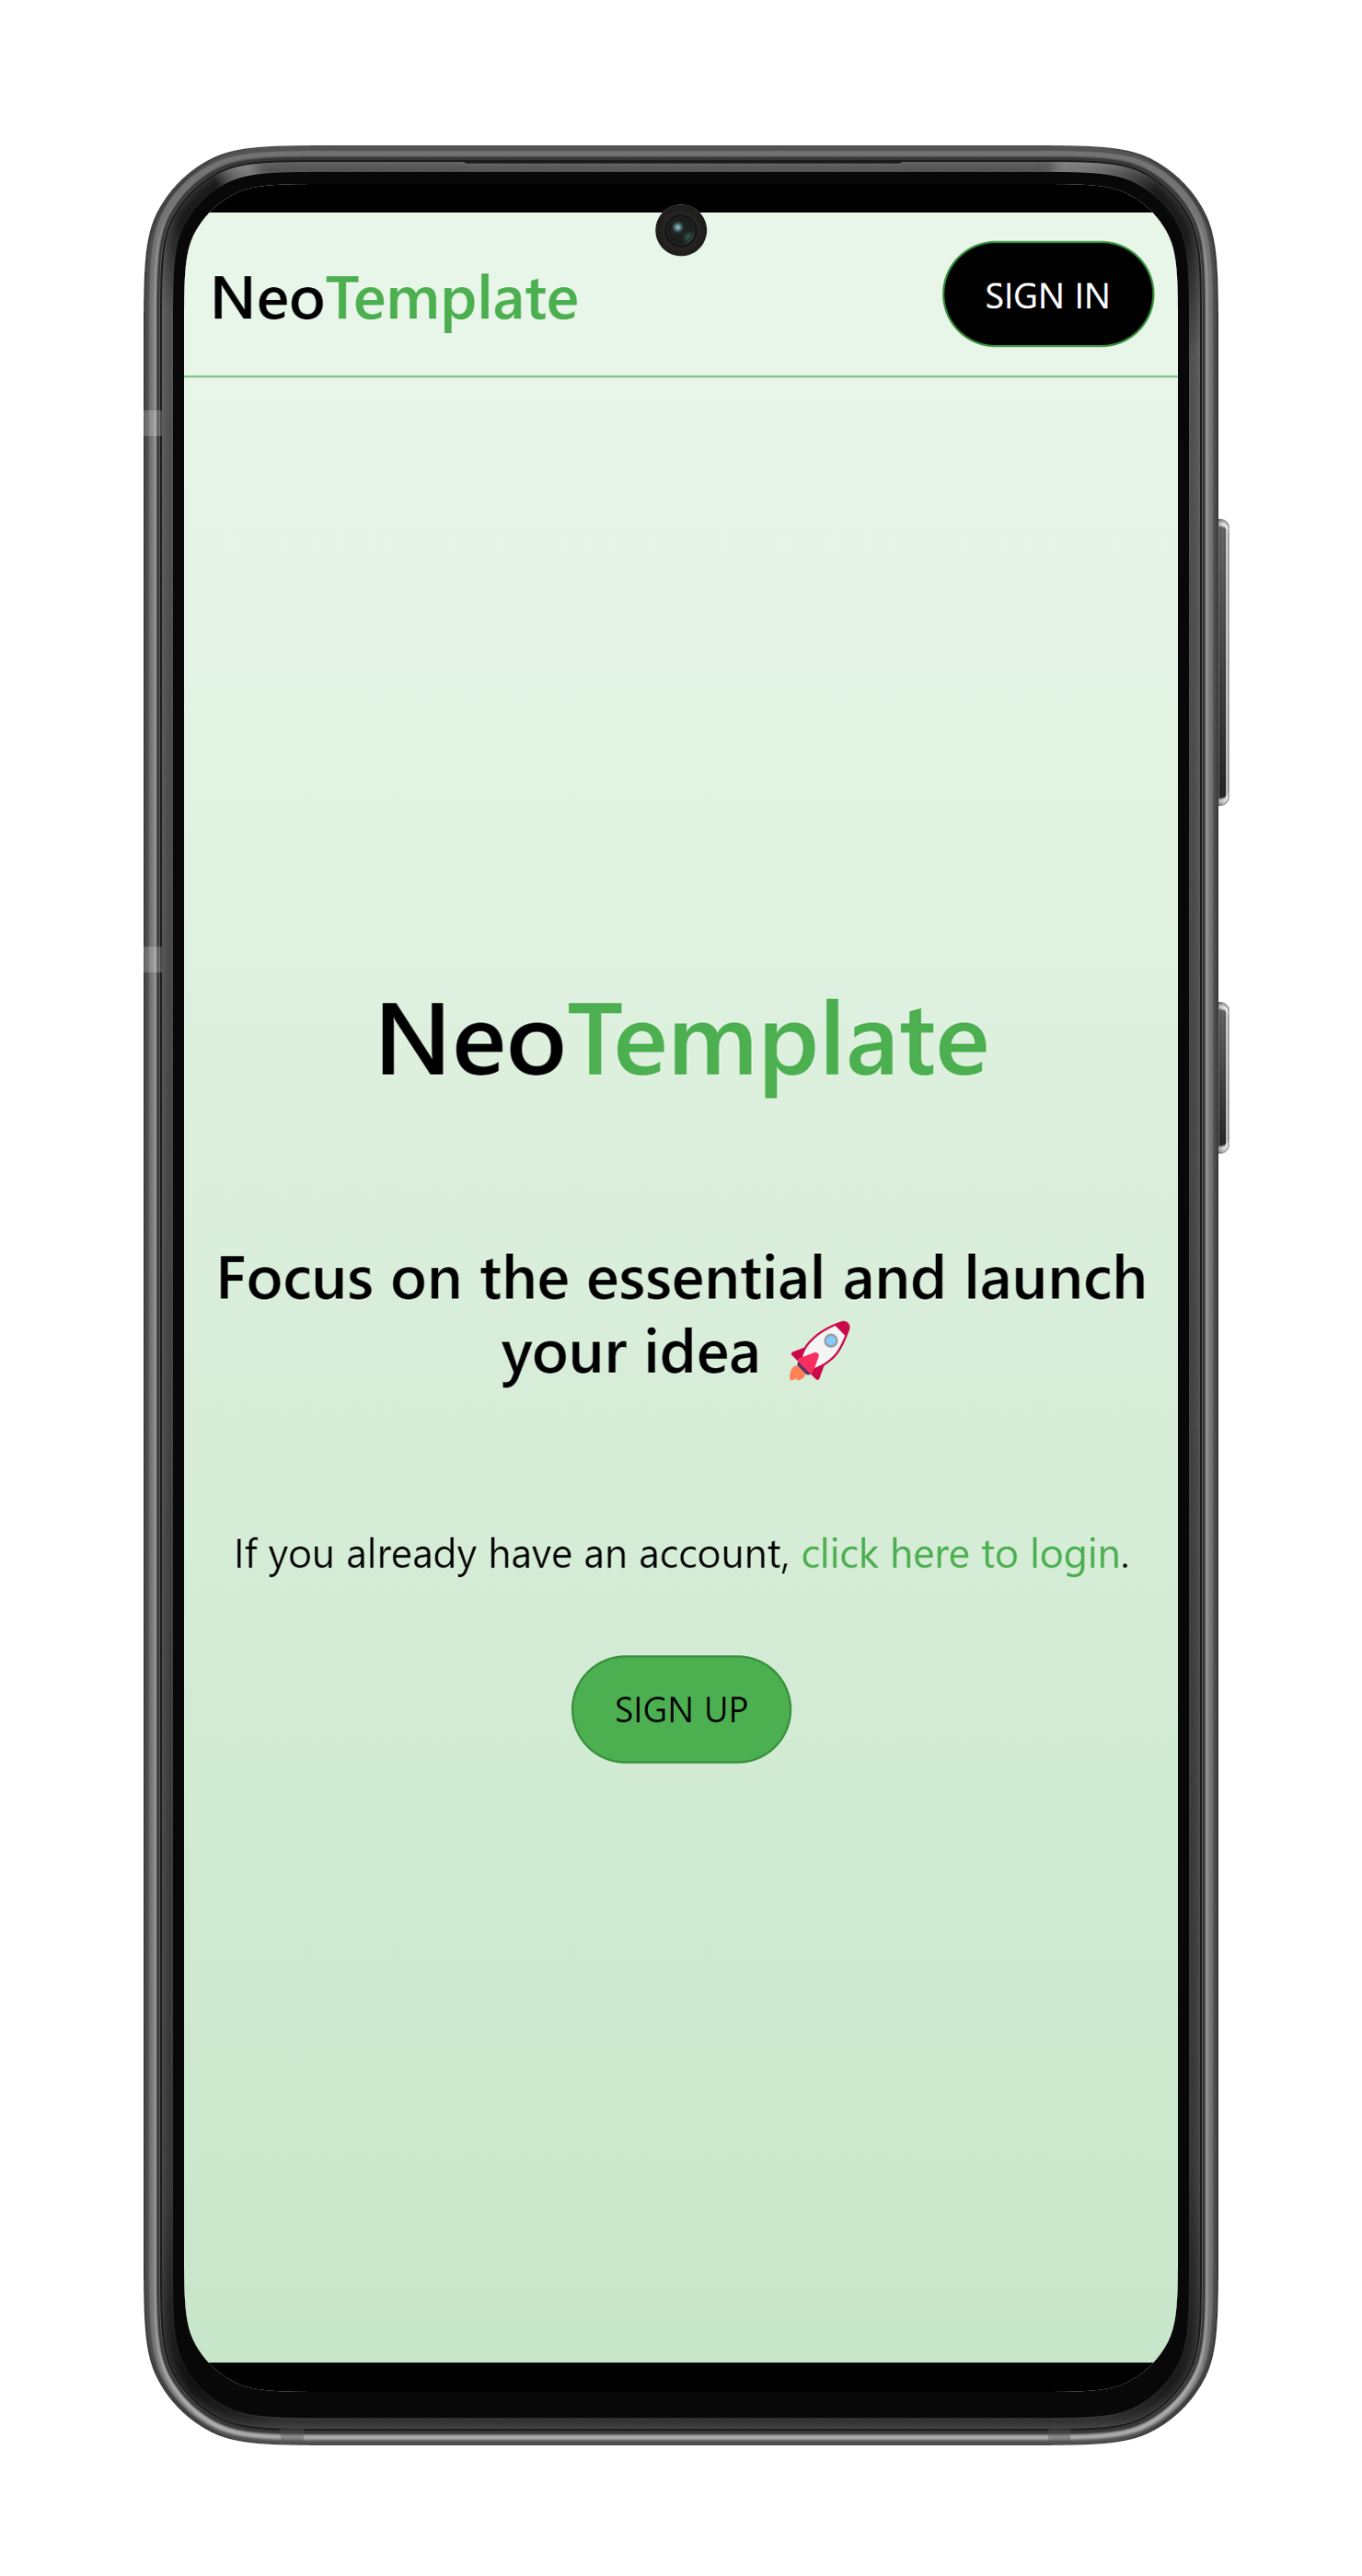
前端基于 Next.js,集成 Material UI、NextAuth 和 i18next
Next.jsDjangoReact启动器
NeoTemplate — Next.js 启动器模板
作者 thomassimmer
NeoTemplate 是一个基于 Next.js 与 Django 的全栈网站模板,前端使用 Material UI、NextAuth 和 i18next,后端使用 Django Rest Framework,内置邮箱注册登录、邮箱验证、密码重置、个人资料与头像上传、明暗主题和语言切换等基础功能。
看看你的网站会是什么样
浏览真实页面截图,比较内容排版与手机效果。点击下方缩略图切换,放大查看整页细节。
目前有 1 张原始预览,可打开完整图片查看设计细节。
截图用于了解视觉与布局,交互效果请以实际项目为准。
采集于 2026-10-03查看来源
值得关注的模板亮点
从已有项目资料中,快速了解它的特点。
后端基于 Django 与 Django Rest Framework
内置邮箱注册登录、邮箱验证和密码重置流程
提供个人资料管理,支持头像上传
支持明暗主题与语言切换,设置保存在客户端
使用 Docker Compose 区分本地开发与生产运行方式
模板详细介绍
NeoTemplate 是一个全栈网站启动模板,前端使用 Next.js,搭配 Material UI 组件库、NextAuth 认证和 i18next 国际化;后端使用 Django 与 Django Rest Framework。模板已经实现了若干基础功能:基于邮箱的注册与登录、邮箱验证、密码重置、带头像上传的个人资料管理,以及一个基础首页。主题(明暗模式)和语言选择保存在客户端。
项目通过 Docker 与 Docker Compose 运行,提供本地开发和生产两套 compose 配置。本地开发启用前后端热重载,生产配置则构建优化镜像、不挂载代码卷。使用前需要在 backend/ 和 frontend/ 目录分别创建 .env 文件,配置 Django 密钥、数据库、JWT、邮箱以及 NextAuth 相关变量。若本地没有邮件服务器,可按 README 说明将邮件后端切换为控制台输出,并把邮箱验证改为 none。
模板本身不包含业务功能,需要自行替换项目名称与 logo 后开始开发。仓库采用 MIT 许可证,允许免费使用、修改、商用和分发该版本代码;但演示图片、字体、图标等第三方素材需单独核对许可,域名、托管、数据库、支付或 AI 等外部服务可能另外收费。
Next.jsDjango启动器
适合你的项目吗?
适用场景
- 需要同时使用 Next.js 前端和 Django 后端的网站项目起步
- 希望直接获得邮箱认证、密码重置和个人资料等基础功能的项目
- 需要明暗主题切换和客户端语言选择的多语言网站
- 使用 Docker Compose 统一管理前端、后端和数据库的开发环境
适合人群
- 熟悉 Next.js 与 Django 并希望快速搭建全栈项目骨架的开发者
- 需要邮箱注册登录与个人资料功能作为起点的网站项目
- 接受通过 Docker 运行前后端与数据库的开发团队
上手与定制指南
结合仓库当前版本的说明,按下面的资料检查内容、配置与运行要求。
- 1
需要安装 Docker 20.10 或更高版本以及 Docker Compose 2.0 或更高版本
- 2
在 backend/.env 和 frontend/.env 中分别配置环境变量,包括密钥、数据库、JWT、邮箱和 NextAuth 相关项
- 3
本地开发运行 docker compose up --build -d,生产部署使用 docker-compose.prod.yml
- 4
本地无邮件服务器时,可在 settings.py 中启用控制台邮件后端并将 ACCOUNT_EMAIL_VERIFICATION 设为 none
- 5
使用前需替换项目中的 NeoTemplate、neotemplate、Neo、Template 等名称以及 favicon、logo 图片
授权与来源资料
使用条件与限制
免费使用 · 保留许可声明本次收录的是公开仓库中采用 MIT 许可的免费版本;免费范围为该版本代码,不代表外部服务或第三方素材免费。
使用时需要遵守
- 允许免费使用、修改、商用和分发该版本代码。
- 分发代码副本或实质性部分时,保留原作者版权声明和完整 MIT 许可声明。
- 代码按现状提供;担保与责任限制以原许可证及适用法律为准。
额外费用与待核对事项
- 邮箱注册、验证与密码重置功能依赖外部 SMTP 邮件服务,需自行提供邮箱账号与密码;本地开发可改用控制台邮件后端,但生产环境需配置真实 SMTP。
- 生产部署前必须配置可用的 SMTP 邮件服务,否则邮箱验证与密码重置等认证流程无法正常工作。
- 生产部署需使用独立的 docker-compose.prod.yml 配置,并自行准备域名、主机与数据库等外部运行环境。
- 演示图片、字体、图标及其他第三方素材需按各自许可核对,不能仅凭代码的 MIT 许可判断。
- 域名、托管、数据库、支付或 AI 等外部服务可能另外收费。
查看原文依据
Permission is hereby granted, free of charge
许可证原文
EMAIL_HOST=smtp.gmail.com [email protected] EMAIL_HOST_PASSWORD=your-email-password
README 原文
Configure proper email SMTP settings
README 原文
https://github.com/thomassimmer/NeoTemplate/blob/main/LICENSEhttps://github.com/thomassimmer/NeoTemplate/blob/main/README.mddocker compose -f docker-compose.prod.yml up --build -d
README 原文
DeepSeek 根据仓库许可证和 README 整理 ·2026-10-03。结果仅覆盖已读取资料,依赖、图片、字体及后续条款变更以各自原文为准。
项目核对记录与介绍依据
模板资料
- 来源平台
- GitHub
- 资料与维护参考分
- 资料较完整 · 76 / 100
- 技术栈
- Next.js · Django · React
- 网站类型
- 启动器
这个分数如何计算
本站按许可资料(最高30分)、演示链接(12分)、预览图(10分)、Star数(15分)、记录的维护时间(15分)、描述完整度(8分)、功能记录(5分)和分类资料(5分)计算。它不是代码、安全或性能测试,也不是 Google 评分;有链接不代表已实测可用。
这个项目需要核对什么
- 记录的仓库更新时间
- 2026-02-04
- 截图检查日期
- 2026-10-03
目前没有记录演示链接。请依据仓库说明在本地评估;仅凭截图无法确认交互行为。
目录记录的主要技术栈是 Next.js。请通过依赖清单和锁文件核对实际版本与托管要求。这些说明基于收录资料,不代表代码审计或部署实测。
查看具体选型方法 →介绍的制作与核对状态
介绍由 AI 辅助整理目录与仓库资料。仓库作者不等于这篇介绍的审核者。
审核声明: [email protected] · 2026-10-04
查看当时使用的来源资料
SHA-256: a8f0d460ea379da3ec1b29af293c11c9d5c32d20ea423ae67234954c845fa62f
2026-10-03T22:57:24.943Z
来源文件 / 仓库# NeoTemplate NeoTemplate is a full-stack website template built using Next.js with Material UI, NextAuth, and i18next for the frontend, and Django with Django Rest Framework (DRF) for the backend. It provides a foundation for creating websites with essential features already implemented, including: - Email-based sign-in/sign-up - Email validation - Password reset functionality - Profile management with profile picture upload - A basic home page - Theme (light/dark) selection (stored client-side) - Language selection (stored client-side) <br>  <p align="center"> <img clear="left" height="400" src="./docs/images/mobile.png"> <img clear="right" height="400" src="./docs/images/dark_mobile.png"> </p> ## Prerequisites Before you begin, ensure you have the following installed: - **Docker** (version 20.10 or higher) - **Docker Compose** (version 2.0 or higher) To verify your installation: ```bash docker --version docker compose version ``` ## Installation ### Step 1: Clone or Use Template Right-click this button to create a repository using this one as a template: [](https://github.com/new?template_owner=thomassimmers&template_name=NeoTemplate&owner=%40me&name=NeoTemplate&description=My+clone+repository&visibility=public) Or clone the repository: ```bash git clone <your-repo-url> cd NeoTemplate ``` ### Step 2: Environment Configuration Create `.env` files in both `backend/` and `frontend/` directories with the required environment variables. #### Backend Environment Variables (`backend/.env`) Create `backend/.env` with the following variables: ```env # Django Settings SECRET_KEY=your-secret-key-here DEBUG=1 FRONTEND_HOST=http://localhost:3000 # Database Configuration SQL_ENGINE=django.db.backends.postgresql POSTGRES_DB=neotemplate POSTGRES_USER=postgres POSTGRES_PASSWORD=your-db-password POSTGRES_HOST=db POSTGRES_PORT=5434 # JWT Configuration JWT_SECRET_KEY=your-jwt-secret-key-here # Email Configuration (for production, use real SMTP settings) EMAIL_HOST=smtp.gmail.com [email protected] EMAIL_HOST_PASSWORD=your-email-password ``` **Note:** For local development without an email server, see the [Troubleshooting](#troubleshooting) section below. #### Frontend Environment Variables (`frontend/.env`) Create `frontend/.env` with the following variables: ```env NEXT_PUBLIC_BACKEND_URL=http://localhost:8000 NEXT_PRIVATE_BACKEND_URL=http://localhost:8000 NEXTAUTH_URL=http://localhost:3000 NEXTAUTH_SECRET=your-nextauth-secret-here ``` **Security Note:** Generate secure random strings for `SECRET_KEY`, `JWT_SECRET_KEY`, and `NEXTAUTH_SECRET`. You can use: ```bash # Generate a secure random string python3 -c "import secrets; print(secrets.token_urlsafe(32))" ``` ## Running the Application ### Local Development For local development with hot-reload enabled: ```bash docker compose up --build -d ``` This will: - Build the Docker images for all services - Start the database, backend, and frontend containers - Enable hot-reload for both frontend and backend (code changes will be reflected automatically) **Access the application:** - Frontend: [http://localhost:3000](http://localhost:3000) - Backend API: [http://localhost:8000](http://localhost:8000) - Django Admin: [http://localhost:8000/admin](http://localhost:8000/admin) ### Production For production deployment: ```bash docker compose -f docker-compose.prod.yml up --build -d ``` **Production differences:** - Frontend is built and optimized (no hot-reload) - Backend runs without reload flag - No volume mounts (code is baked into images) - Smaller, optimized Docker images **Important:** Before deploying to production: 1. Set `DEBUG=0` in `backend/.env` 2. Update `FRONTEND_HOST` and `NEXTAUTH_URL` with your production domain 3. Configure proper email SMTP settings 4. Update `ALLOWED_HOSTS` in `backend/core/settings.py` with your domain 5. Use strong, unique secrets for all keys ### Docker Permission Issues (Linux) If you encounter permission issues with Docker: ```bash sudo chown -R $(id -u):$(id -g) $HOME/.docker ``` Or add your user to the docker group: ```bash sudo usermod -aG docker $USER # Then log out and log back in ``` ## Common Commands ### View Logs View logs for all services: ```bash docker compose logs -f ``` View logs for a specific service: ```bash docker compose logs -f backend docker compose logs -f frontend docker compose logs -f db ``` ### Stop Services ```bash docker compose down ``` Stop and remove volumes (⚠️ **WARNING:** This will delete your database): ```bash docker compose down -v ``` ### Restart a Service ```bash docker compose restart backend docker compose restart frontend ``` ### Execute Commands in Containers Access the backend container shell: ```bash docker exec -it backend bash ``` Access the frontend container shell: ```bash docker exec -it frontend sh ``` ### Rebuild After Changes If you modify Dockerfiles or dependencies: ```bash docker compose up --build -d ``` ## Admin Panel To access the Django admin panel, create a superuser: ```bash docker exec -it backend python manage.py createsuperuser ``` Follow the prompts to create your admin account, then navigate to: [http://localhost:8000/admin](http://localhost:8000/admin) ### Run Django Management Commands ```bash # Make migrations docker exec -it backend python manage.py makemigrations # Apply migrations docker exec -it backend python manage.py migrate # Collect static files docker exec -it backend python manage.py collectstatic ``` ### Run Tests ```bash # Run all tests docker exec -it backend python manage.py test # Run all tests with verbose output docker exec -it backend python manage.py test --verbosity=2 # Run specific test file docker exec -it backend python manage.py test api.tests.test_domain # Run tests and stop at first failure docker exec -it backend python manage.py test --failfast ``` ## What do I need to start from here ? 1. Change every occurence of `NeoTemplate`, `neotemplate`, `Neo` and `Template` by your desired name. 2. Change the logo at `frontend/public/favicon.ico`, `frontend/public/logo.png` and at `frontend/components/icons/logo.png`. And that's it, start implementing your ideas! ## Troubleshooting ### Email Server Not Configured If you don't have an email server configured for local development: 1. Open `backend/core/settings.py` 2. Uncomment these lines (around line 205-206): ```python if DEBUG: EMAIL_BACKEND = 'django.core.mail.backends.console.EmailBackend' ``` 3. Set `ACCOUNT_EMAIL_VERIFICATION` to `"none"` (around line 218): ```python ACCOUNT_EMAIL_VERIFICATION = "none" # Change from "mandatory" ``` 4. Restart the backend container: ```bash docker compose restart backend ``` Emails will now be printed to the console instead of being sent.
看看同类模板
对比同技术栈与用途的模板,找到更适合的视觉与内容结构。
ai-website-cloner-template
Clone any website with one command using AI coding agents
Next.js · 启动器

Next.js SaaS Starter
Next.js SaaS Starter 是 Next.js 官方维护的 SaaS 起点模板,定位介于学习资源和可直接部署的脚手架之间。
Next.js · SaaS

Next.js Commerce
Next.js Commerce 是 Vercel 团队维护的电商启动模板,基于 Next.js App Router 构建,采用服务端渲染、React Server Components、Server Actions …
Next.js · 电商

Next-js-Boilerplate
Next-js-Boilerplate 是一个面向 Next.js 16、Tailwind CSS 4 和 TypeScript 的启动器,核心定位是开发者体验优先。
Next.js · 启动器

tailwind-nextjs-starter-blog
tailwind-nextjs-starter-blog 是一个面向个人技术博客的 Next.js 与 Tailwind CSS 启动模板,其 v2 版本基于 App Router 与 React Server Comp…
Next.js · 博客

next-forge
Production-grade Turborepo template for Next.js apps.
Next.js · 启动器