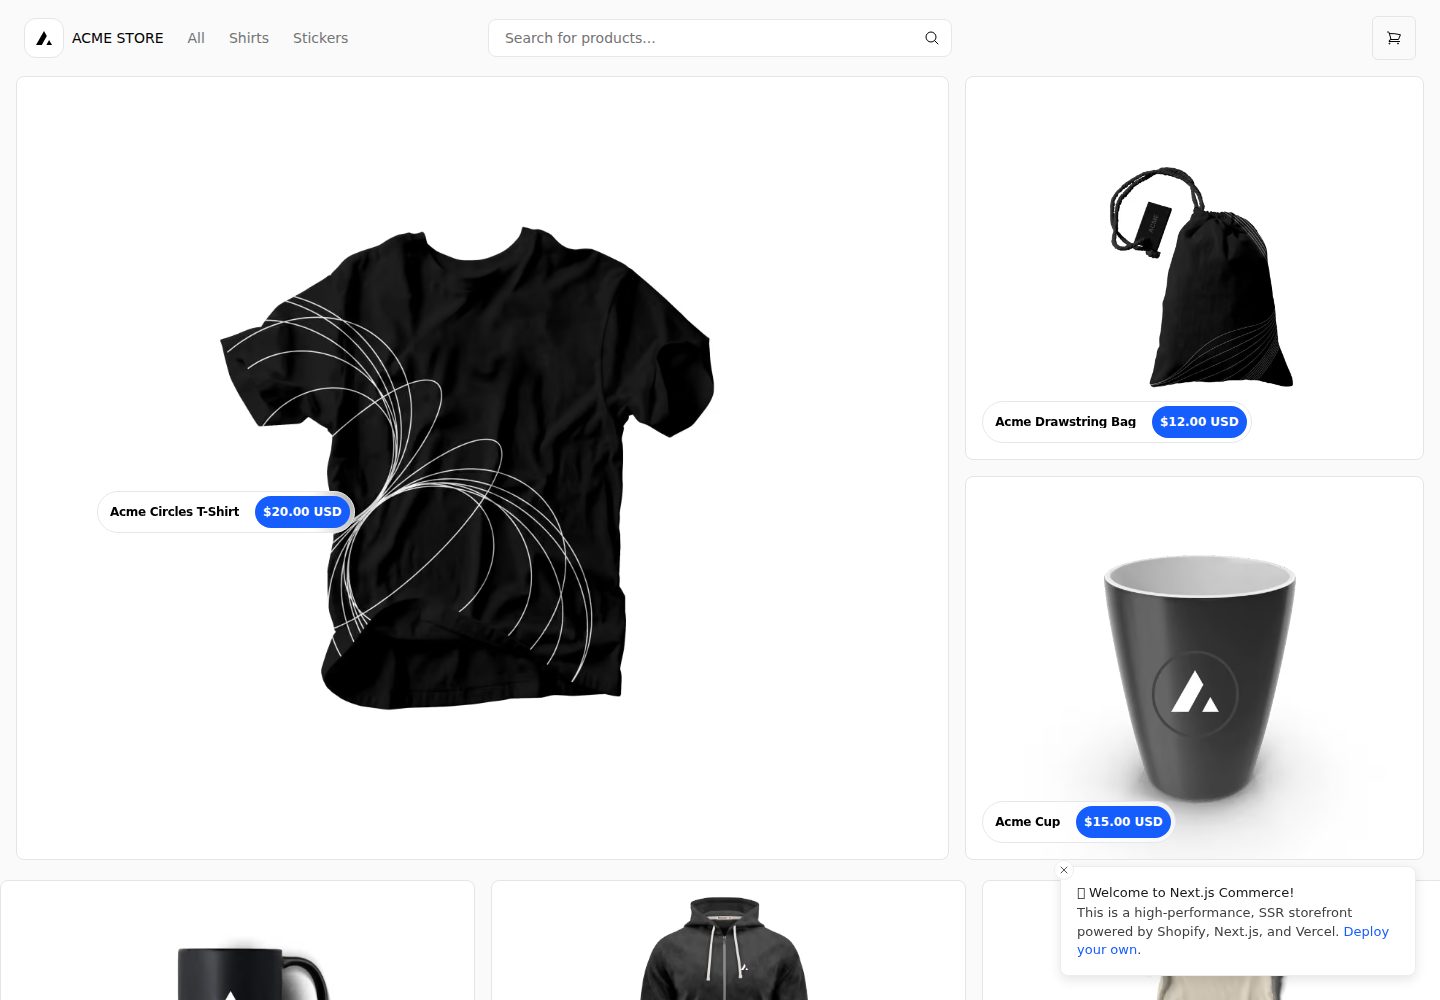
Based on the Next.js Commerce starter template, retaining strongly typed TypeScript components and the provider structure
Next.jsReactE-commerceStarter
streetwares-v2 — Next.js Ecommerce Template
By ethanny2
A streetwear ecommerce frontend built on Next.js Commerce, using TypeScript and Tailwind CSS, with product data from Headless Shopify via GraphQL.
Explore the design
Compare the page layouts and mobile experience. Open any screenshot for a closer look.
Desktop homepage1 / 3
Desktop captureTop of page
Actual screenshot captured by the server browser.
All pages & views 3
Screenshots show visual appearance; interactive behavior may differ.
Recorded 2026-10-02View source
What stands out
A quick read of the recorded project description.
Connects to the Shopify Storefront API via GraphQL to fetch product data
Uses Framer Motion and react-intersection-observer for animations triggered on viewport entry
Styling mixes Tailwind CSS utility classes with CSS Modules local scoping class names
Cart is persisted with cookies, and checkout redirects to the Shopify checkout page
README documents the known PurgeCSS issue with concatenated Tailwind classes and the workaround
Template Details
streetwares-v2 is the author's customized version of the Next.js Commerce starter template, aimed at turning a generic ecommerce skeleton into a storefront for street and skate clothing. The project keeps the strongly typed component structure of Next.js + TypeScript, uses a mix of Tailwind CSS utility classes and CSS Modules for styling, and uses Framer Motion together with react-intersection-observer to trigger animations when elements enter the viewport. Product data is fetched from the Shopify Storefront API via GraphQL, cart information is persisted with cookies, and checkout uses Headless Shopify Lite to redirect to Shopify's checkout page.
The repository README also retains the original Next.js Commerce documentation, which covers the multi-backend provider mechanism, commerce.config.json feature flags, environment variable configuration, and similar topics. These are general capabilities of the upstream template, and whether they are all available in this customized version depends on the actual repository code. The README also records a known issue: during production builds, PurgeCSS cannot recognize Tailwind utility classes generated through string concatenation, and the author works around this with hidden spans, indicating that this customized version has a styling build edge case to watch for.
The project was last updated in 2021, has few repository stars, and the demo site is hosted on Vercel. It is better suited as a starting point for learning or further development than as a finished store ready to launch directly.
Next.jsReactEcommerceStarter
Is it right for your project?
Use Cases
- Learning how to adapt the Next.js Commerce template into a storefront for a specific category (streetwear)
- Referencing TypeScript component directory organization and Framer Motion viewport animation patterns
- Understanding the basic flow of connecting Headless Shopify with a Next.js frontend via GraphQL
- Using it as a personal practice project to set up locally and modify pages and components
Suitable For
- Frontend developers who want to study the Next.js Commerce customization process
- Learners who need TypeScript + Tailwind CSS ecommerce component examples
- Individual project authors planning to integrate the Shopify Storefront API themselves
Getting started & customization
Use these recorded setup notes alongside the repository instructions for your chosen version.
- 1
Copy .env.template to .env.local and fill in the Shopify Storefront access token and shop domain
- 2
Set COMMERCE_PROVIDER=shopify in .env.local and confirm that the @framework path in tsconfig.json points to shopify
- 3
Install dependencies with yarn, then run yarn dev to start local development
- 4
During production builds, note that PurgeCSS may remove Tailwind classes generated by string concatenation; handle this as described in the README
- 5
Third-party assets such as demo images and fonts need separate license verification; the code's MIT license does not cover these assets
License & source material
Usage conditions & limitations
Free to use · keep license noticeThis entry covers the free version in the public repository under the MIT license; the free scope is the code of that version and does not mean external services or third-party assets are free.
Must comply with when using
- The code of this version may be used, modified, used commercially, and distributed for free.
- When distributing copies or substantial portions of the code, retain the original author's copyright notice and the full MIT license notice.
- The code is provided as is; warranties and limitations of liability are governed by the original license and applicable law.
Additional costs & items to verify
- Using this template requires providing your own Shopify Storefront API access token and configuring environment variables such as the shop domain; otherwise product data cannot be fetched.
- The checkout flow depends on the Shopify platform, users are redirected to the Shopify checkout page, and a working Shopify store is required to complete an order.
- During production builds, PurgeCSS removes Tailwind utility classes generated through string concatenation, which may cause responsive styles to be lost; this must be worked around as described in the README.
- Third-party assets such as images used in the demo are from external sources, and their licenses are not included in the MIT code license; verify authorization before commercial use.
- Demo images, fonts, icons, and other third-party assets must be checked against their respective licenses and cannot be judged solely by the code's MIT license.
- External services such as domains, hosting, databases, payments, or AI may incur additional charges.
View Original Text Basis
Permission is hereby granted, free of charge
Original License Text
NEXT_PUBLIC_SHOPIFY_STOREFRONT_ACCESS_TOKEN=xxxxxxxxxxxxxxxxxxxxxxxxxxxx
Original README
Headless Shopify Lite integration to redirect the user to a Shopify checkout page
Original README
In production PurgeCSS (activated through Tailwind) doesn't recognize Tailwind utility classes made via string concatenation.
Original README
https://github.com/ethanny2/streetwares-v2/blob/master/license.mdhttps://github.com/ethanny2/streetwares-v2/blob/master/README.mdI looked online for sample images I could use to replicate the feel / UI of other popular online streetwear stores
Original README
Compiled by DeepSeek based on repository license and README ·2026-10-02. Results only cover the materials read; dependencies, images, fonts, and subsequent term changes are subject to their respective original texts.
Project checks & description sources
Template Information
- Source platforms
- GitHub
- Documentation and maintenance reference score
- Partly documented · 73 / 100
- Technologies
- Next.js · React
- Website type
- E-commerce · Starter
How this score is calculated
Our heuristic uses license records (up to 30), a demo link (12), a preview (10), stars (15), recorded maintenance (15), description completeness (8), feature records (5) and classification data (5). It is not a code, security or performance test, or a Google score. A link does not establish tested functionality.
What to verify for this project
- Repository update recorded
- 2021-06-03
- Screenshot last checked
- 2026-10-02
A demo link is listed. Check it with your own content and viewport sizes; its presence does not confirm that forms, authentication or payments work.
The catalog identifies Next.js as the primary stack. Check the actual dependency manifest and lockfile for versions and hosting requirements. These notes use recorded metadata, not a code audit or a deployment test.
Use a selection guide →How this description was prepared
AI-assisted description based on catalog records and repository material. Repository authors are not automatically the reviewers of this description.
Automatically checked against source and license rules; no manual editorial review.
Inspect the recorded source material
SHA-256: 733df882f81d18ad24280c8dbe925ec424c9228eab8cbf06a62fb4edb365347a
2026-10-02T15:57:34.838Z
Source file / repository[](https://github.com/ethanny2/streetwares-v2/issues)[](https://github.com/ethanny2/streetwares-v2/network)[](https://github.com/ethanny2/streetwares-v2/stargazers)[](https://github.com/ethanny2/streetwares-v2/blob/master/license.md)[](https://twitter.com/ArrayLikeObj)
# 100 Streetwares Ecommerce
#### (Headless Shopify + Nextjs and TypeScript)
## [https://100streetwares.vercel.app/](https://100streetwares.vercel.app/)
<p align="center">
<img src="https://media3.giphy.com/media/2a2FrTYMXXNS5cbH1F/giphy.gif?cid=790b7611a7912e2491c0adb9e8a0a7535213aeae15e93193&rid=giphy.gif&ct=g" alt="Demo gif">
</p>
## Background
The goal of this project was to gain insight on how to connect an ecommerce
storefront with a CMS backend that could easily be handed off to a client. I eventually chose Next.js for its strong ecommerce facing templates and ended up using headless Shopify as the backend (as opposed to Sanity CMS or Bigcommerce).
**Goals** :
- Gain experience with the Nextjs ecosystem and learn when to implement SSG (static site generation) vs SSR (server side rendering)
- Practice using Tailwind CSS animation and styling
- Use Framer motion as a declarative animation library rather than making the animations through Tailwind CSS
- Gain insight into how a professional level TypeScript + Next.js application is built by reading through the codebase and creating new components as necessary
## Technology used
- Next.js
- Framer Motion
- react-intersection-observer to trigger animations when element in viewport
- Basic TypeScript to make strongly typed components to extend functionality
- GraphQL to connect to the Shopify Storefront API and fetch the backend product information
- Tailwind CSS for styling with utility classes
- CSS modules for classes scoped to a specific component
- Cookies to persist user cart information
- Headless Shopify Lite integration to redirect the user to a Shopify checkout page
## Concepts
### Working in a strongly typed professional codebase
Using this template helped me gain experience understanding how to navigate a well maintained codebase and how to add functionality to it by following the project conventions and structure when making my own TypeScript components.
```
100-streetwares
└───components
│ └─── auth
│ └─── cart
│ └─── common
| └─── icons
| └─── product
| └─── ui
| └─── wishlist
| └─── customize
| └─── HeroImage
| └─── HeroImage.module.css
| └─── HeroImage.tsx
| └─── index.ts
| └─── ImageZoom
| └─── ImageZoom.module.css
| └─── ImageZoom.tsx
| └─── index.ts
...
...
```
### Intersection Observer Animations
Using the react-intersection-observer along with Framer motion's declarative syntax I only trigger the Framer motion animation when the element specified by the ref is in the viewport.
```
const controls = useAnimation()
const { ref, inView } = useInView({ threshold: 0.5, delay: 50 })
useEffect(() => {
if (inView) controls.start('visible')
}, [inView, controls])
const imageZoomVariant = {
hidden: { opacity: 0 },
visible: {
opacity: 1,
transition: {
duration: 0.6,
},
},
}
<motion.a
ref={ref}
initial="hidden"
animate={controls}
variants={imageZoomVariant}
className={` ${colClass} ${mediaQueryColClass}
>
// nested content...
</motion.a>
```
### Resigning the Homepage with TypeScript Components
Since I wanted to make a streetwear / skate clothing store I looked online for sample images I could use to replicate the feel / UI of other popular online streetwear stores such as...
- [Black Sheep skateshop](https://blacksheepskateshop.com/)
- [CCS](https://shop.ccs.com/)
- [Skate Warehouse](https://www.skatewarehouse.com/)
- [Tactics](https://www.tactics.com/skate)
I typed my custom components and added in styling via Tailwind CSS and CSS modules to keep the generated class names unique.
**Issues:** In production PurgeCSS (activated through Tailwind) doesn't recognize Tailwind utility classes made via string concatenation. This was unintentionally deleting my responsive code for this component, so as a short work around I applied the generated classes on a hidden span to prevent it from being purged.
```
const ImageZoom: FC<{
colSpanned?: number | any
backgroundImage?: string
title?: string
width?: number
height?: number
to?: any
text?: string | undefined
smallColSpanned?: number | any
hide?: boolean
}> = ({
colSpanned,
backgroundImage,
title,
width,
height,
to,
text,
smallColSpanned,
hide,
}) => {
// other code...
return (
<>
{/* Prevent purging of generated Tailwind classes made through string concatenation */}
<span className="hidden sm:hidden col-span-3 sm:col-span-1 sm:col-span-3"></span>
<Link href={to}>
<motion.a
ref={ref}
initial="hidden"
animate={controls}
variants={imageZoomVariant}
className={` ${colClass} ${mediaQueryColClass}
${hide ? styles.hide : ''}`}
>
<div className={styles['card-zoom']}>
<div
title={title}
className={`${styles['card-zoom-image']} ${backgroundImage}`}
></div>
{text && <h1 className={`${styles['card-zoom-text']}`}>{text}</h1>}
</div>
</motion.a>
</Link>
</>
)
}
```
---
(_Original README_)
# Next.js Commerce
The all-in-one starter kit for high-performance e-commerce sites. With a few clicks, Next.js developers can clone, deploy and fully customize their own store.
Start right now at [nextjs.org/commerce](https://nextjs.org/commerce)
Demo live at: [demo.vercel.store](https://demo.vercel.store/)
- Shopify Demo: https://shopify.vercel.store/
- Swell Demo: https://swell.vercel.store/
- BigCommerce Demo: https://bigcommerce.vercel.store/
- Vendure Demo: https://vendure.vercel.store
## Features
- Performant by default
- SEO Ready
- Internationalization
- Responsive
- UI Components
- Theming
- Standardized Data Hooks
- Integrations - Integrate seamlessly with the most common ecommerce platforms.
- Dark Mode Support
## Integrations
Next.js Commerce integrates out-of-the-box with BigCommerce and Shopify. We plan to support all major ecommerce backends.
## Considerations
- `framework/commerce` contains all types, helpers and functions to be used as base to build a new **provider**.
- **Providers** live under `framework`'s root folder and they will extend Next.js Commerce types and functionality (`framework/commerce`).
- We have a **Features API** to ensure feature parity between the UI and the Provider. The UI should update accordingly and no extra code should be bundled. All extra configuration for features will live under `features` in `commerce.config.json` and if needed it can also be accessed programatically.
- Each **provider** should add its corresponding `next.config.js` and `commerce.config.json` adding specific data related to the provider. For example in case of BigCommerce, the images CDN and additional API routes.
- **Providers don't depend on anything that's specific to the application they're used in**. They only depend on `framework/commerce`, on their own framework folder and on some dependencies included in `package.json`
## Configuration
### How to change providers
Open `.env.local` and change the value of `COMMERCE_PROVIDER` to the provider you would like to use, then set the environment variables for that provider (use `.env.template` as the base).
The setup for Shopify would look like this for example:
```
COMMERCE_PROVIDER=shopify
NEXT_PUBLIC_SHOPIFY_STOREFRONT_ACCESS_TOKEN=xxxxxxxxxxxxxxxxxxxxxxxxxxxx
NEXT_PUBLIC_SHOPIFY_STORE_DOMAIN=xxxxxxx.myshopify.com
```
And check that the `tsconfig.json` resolves to the chosen provider:
```
"@framework": ["framework/shopify"],
"@framework/*": ["framework/shopify/*"]
```
That's it!
### Features
Every provider defines the features that it supports under `framework/{provider}/commerce.config.json`
#### How to turn Features on and off
> NOTE: The selected provider should support the feature that you are toggling. (This means that you can't turn wishlist on if the provider doesn't support this functionality out the box)
- Open `commerce.config.json`
- You'll see a config file like this:
```json
{
"features": {
"wishlist": false
}
}
```
- Turn wishlist on by setting wishlist to true.
- Run the app and the wishlist functionality should be back on.
### How to create a new provider
Follow our docs for [Adding a new Commerce Provider](framework/commerce/new-provider.md).
If you succeeded building a provider, submit a PR with a valid demo and we'll review it asap.
## Contribute
Our commitment to Open Source can be found [here](https://vercel.com/oss).
1. [Fork](https://help.github.com/articles/fork-a-repo/) this repository to your own GitHub account and then [clone](https://help.github.com/articles/cloning-a-repository/) it to your local device.
2. Create a new branch `git checkout -b MY_BRANCH_NAME`
3. Install yarn: `npm install -g yarn`
4. Install the dependencies: `yarn`
5. Duplicate `.env.template` and rename it to `.env.local`
6. Add proper store values to `.env.local`
7. Run `yarn dev` to build and watch for code changes
## Work in progress
We're using Github Projects to keep track of issues in progress and todo's. Here is our [Board](https://github.com/vercel/commerce/projects/1)
People actively working on this project: @okbel & @lfades.
## Troubleshoot
<details>
<summary>I already own a BigCommerce store. What should I do?</summary>
<br>
First thing you do is: <b>set your environment variables</b>
<br>
<br>
.env.local
```sh
BIGCOMMERCE_STOREFRONT_API_URL=<>
BIGCOMMERCE_STOREFRONT_API_TOKEN=<>
BIGCOMMERCE_STORE_API_URL=<>
BIGCOMMERCE_STORE_API_TOKEN=<>
BIGCOMMERCE_STORE_API_CLIENT_ID=<>
BIGCOMMERCE_CHANNEL_ID=<>
```
If your project was started with a "Deploy with Vercel" button, you can use Vercel's CLI to retrieve these credentials.
1. Install Vercel CLI: `npm i -g vercel`
2. Link local instance with Vercel and Github accounts (creates .vercel file): `vercel link`
3. Download your environment variables: `vercel env pull .env.local`
Next, you're free to customize the starter. More updates coming soon. Stay tuned.
</details>
<details>
<summary>BigCommerce shows a Coming Soon page and requests a Preview Code</summary>
<br>
After Email confirmation, Checkout should be manually enabled through BigCommerce platform. Look for "Review & test your store" section through BigCommerce's dashboard.
<br>
<br>
BigCommerce team has been notified and they plan to add more detailed about this subject.
</details>
Explore similar templates
Compare previews and descriptions within the same stack and category.

Next.js SaaS Starter
The official Next.js SaaS starter template, integrating email/password authentication, Stripe Checkout subscriptions, a dashboard with user/team CRUD, basic Owner/Member RBAC, and activity logging.
Next.js · SaaS

Next.js Commerce
Vercel's officially maintained Next.js App Router ecommerce starter with deep Shopify integration, offering a complete product catalog, cart, and checkout flow. Core logic is modular for swapping backends, and community provider versions exist for BigCommerce, Medusa, and Saleor.
Next.js · E-commerce

Next-js-Boilerplate
A developer-first Next.js 16 starter with Tailwind CSS 4 and TypeScript, supporting both App Router and Page Router.
Next.js · Starter

tailwind-nextjs-starter-blog
A Next.js and Tailwind CSS blog starter template using Contentlayer for Markdown/MDX, with built-in SEO, code highlighting, and tags. It targets personal technical blogs and migration from Jekyll/Hugo to React, and supports one-click Vercel deployment.
Next.js · Blog

next-forge
next-forge is a Turborepo-based Next.js template maintained by Vercel, positioned as a starting point for SaaS products.
Next.js · Starter
SaaS-Boilerplate
SaaS-Boilerplate is an open-source SaaS starter template built with Next.js App Router, React 19, TypeScript, Tailwind CSS, and Shadcn UI.
Next.js · SaaS